RaidCrawler Guide
Introduction
RaidCrawler is a program designed to scan and display all active Tera Raid dens in Pokémon Scarlet and Violet. It provides a real-time overview of all currently active Tera Raids on the map and supports automated searching based on user-defined filters to identify raids that meet specific criteria. This significantly reduces the need for manual checking and streamlines the process of searching for a desirable Tera Raid.
Software Installation & Setup
Switch mods/cheats are stored in the atmosphere/contents directory on your SD card. This folder is typically empty on a fresh installation of Atmosphère.
Methods for Disabling Mods/Cheats
Any of these methods can work to disable mods/cheats. You should select the best one for your use case.
- Rename the
atmosphere/contentsfolder to something else, such asoldcontents. This will allow you to keep everything you previously installed. You can simply rename the folder back when done. - Delete the
atmosphere/contentsfolder. This may be a good option if you have many files in this directory that you do not recognize and you want to clean out your SD card. - Delete specific mods/cheats from the
atmosphere/contentsfolder. This requires you to know which title ID corresponds to what. - If you wish to keep the
atmosphere/contentsfolder intact, you can holdLevery time you boot SV. This option will not work if RaidCrawler is resetting the game for degraded performance.
Required Downloads
- RaidCrawler (includes sys-botbase)
- .NET 10.0 Desktop Runtime
Installation Instructions
- Download and extract the contents from the
RaidCrawler.zipinto a fresh, empty folder in a known location on your computer. - Move the
atmospherefolder (sys-botbase) to the root of your Switch SD card then reboot the console into your chosen CFW environment (SysCFW recommended). - Download
.NET 8.0and run the setup wizard until complete. This is a required program dependency. - Open the folder that contains your RaidCrawler download and run
RaidCrawler.exeto confirm that the program opens correctly with no issues.
Connectivity Instructions
- Launch SysCFW on your console, then enter the Homebrew menu.
- Press the
Ybutton to display the local IP address. - Type the IP address into the
Switch IP:field of RaidCrawler. - Click the
Connectbutton, you should now seeStatus:bar at the bottom of the window has updated.
Program Overview
Figure 1 - RaidCrawler Setup

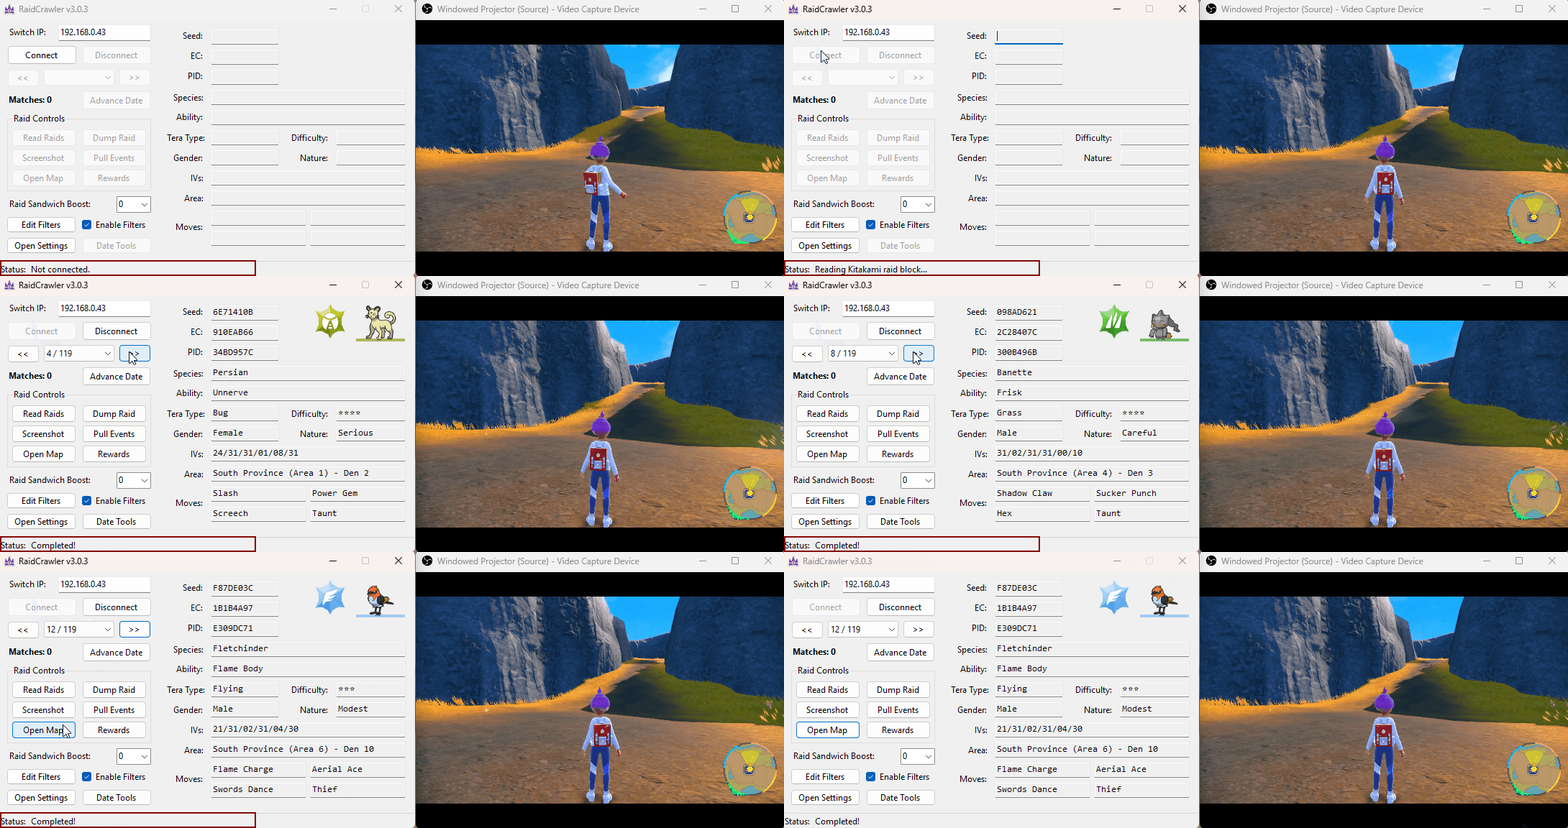
Figure 1 displays the window that you will be presented with after opening RaidCrawler for the first time. For the purposes of the guide this window will be referred to as the "Main Window". Inside the Raid Controls box we can see various buttons, here's some information about what each button does.
Button Overview
Read Raids- Re-scans for active raids at any given point.Screenshot- Takes a screenshot of the game for sharing using Discord Webhooks.Open Map- Shows the location of the currently viewed raid on the world map.Dump Raid- Dumps the raid block (for researchers & raid preservation).Pull Events- Pulls the most recent promotional event raid data.Rewards- Shows the reward items given to the player after completing the raid.Raid Power Sandwich- Influences reward items, set this according to your active Raid Power sandwich.
After taking some time to understand the various features of the main window you will need to apply any relevant search filters & configure the program settings.
Figure 2 - Filter Overview

Clicking the Edit Filters button opens the Filter Settings subwindow. Here, you can set the conditions that will tell RaidCrawler to stop scanning for raids once a result has been found.
You can set filters to search for a single specific target or search for multiple targets at once, such as filtering for any shiny Pokémon OR a 6IV Pokémon, or filtering for a shiny Pokémon WITH 6IVs. Filters can be enabled or disabled at will by checking/unchecking the boxes on the right-hand side of the subwindow.
Search Filter Example
- Clicking the
Shiny?checkbox then updating the filter will look for any shiny Pokémon. - Clicking the
Speciescheckbox, setting a desired species, then updating the filter add a second filter for Pokémon of the chosen species. - If we are seeking a shiny Pokémon of a specific species, we would combine both of these filters into one instead.
- If we are seeking ANY shiny Pokémon OR a Pokémon of a specific species, we can set the filters independently to look for one or the other instead of seeking both.
Figure 3 - Settings Overview

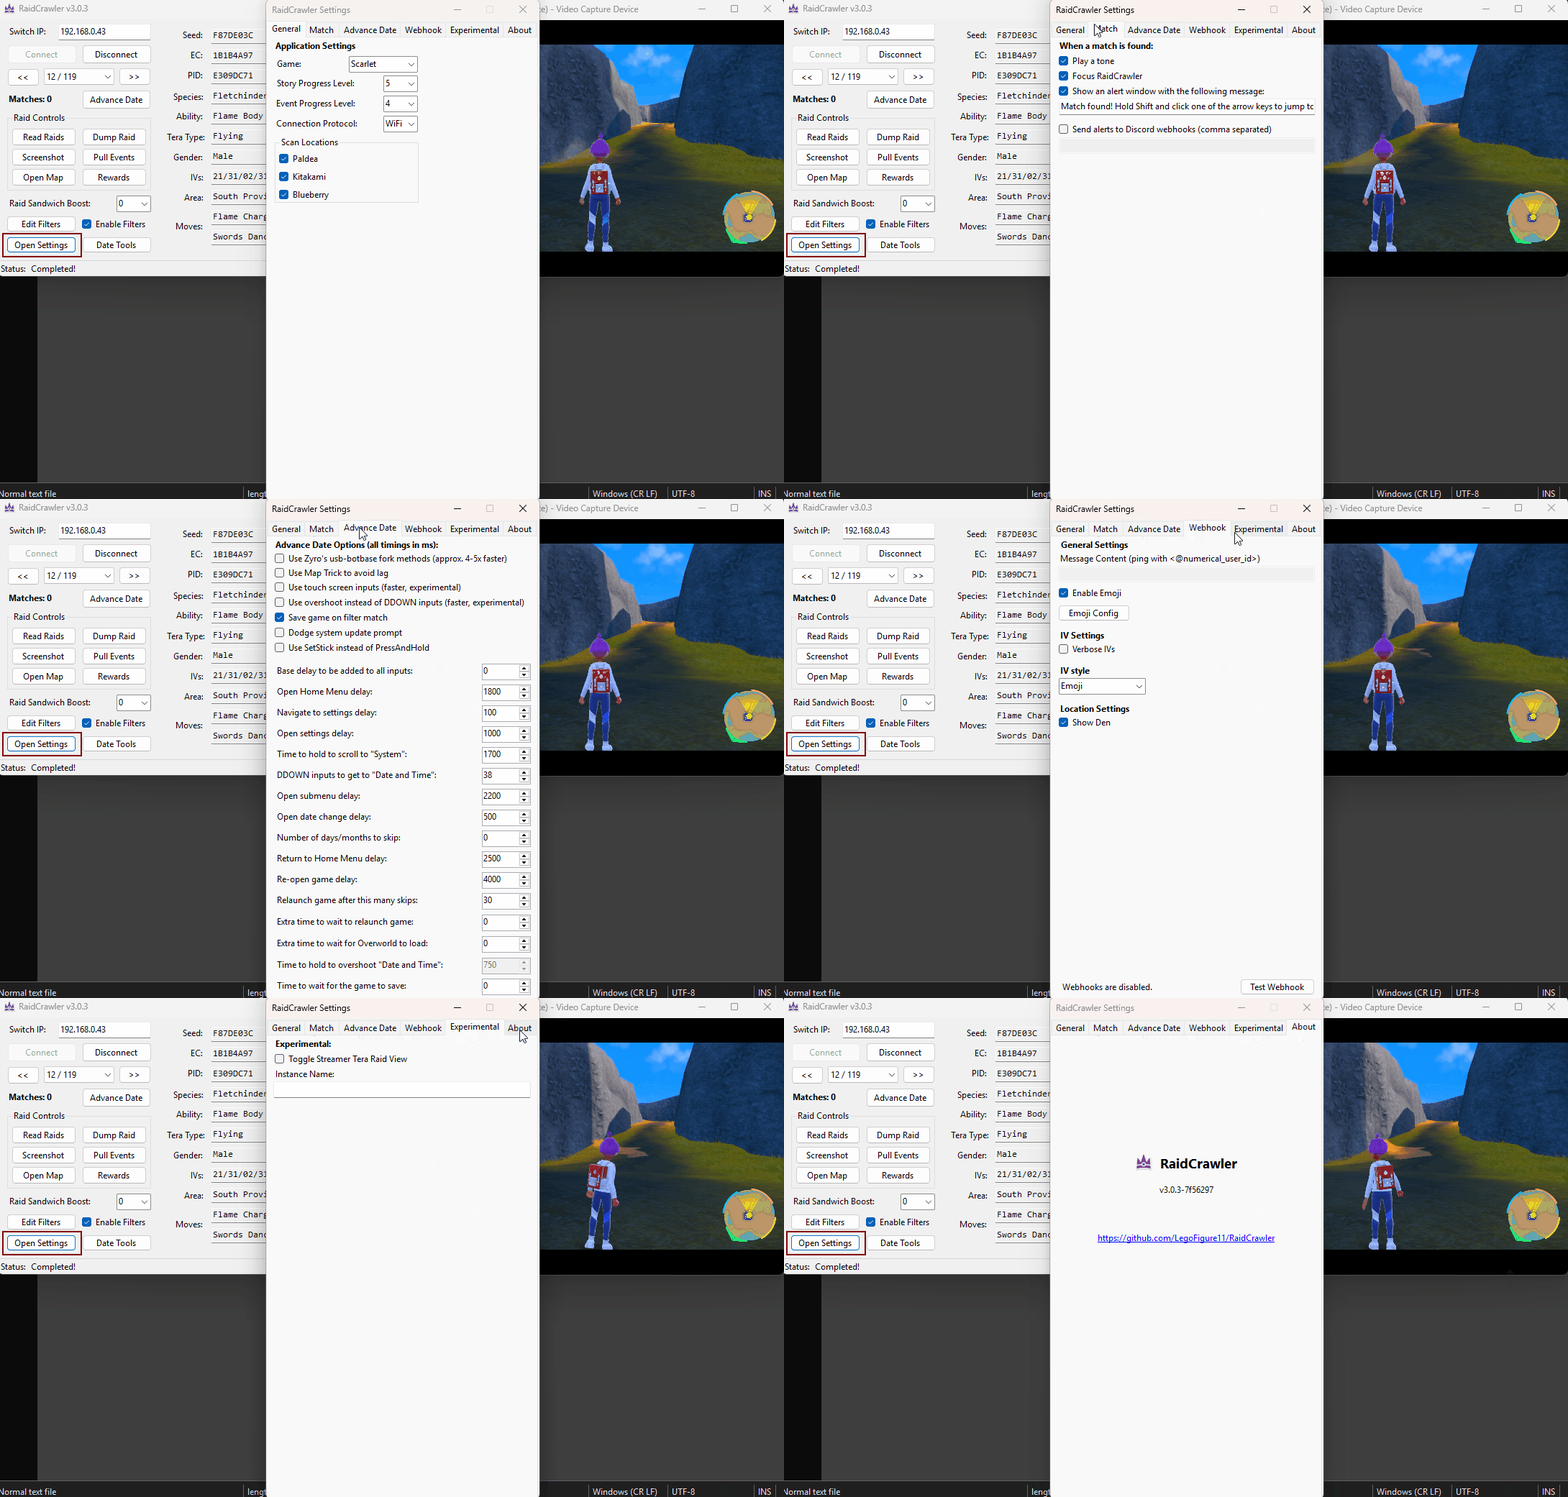
Clicking the Open Settings button will open the RaidCrawler Settings subwindow. Here we can change a bunch of settings that determine how the program operates.
Settings Overview
General- Shows game information such as story progress.Match- Decide how you want to be notified when a result has been found.Advance Date- For making changes to parts of the date skipping routine.Webhooks- Hook RaidCrawler up to your Discord server using Webhooks.Experimental- Unfinished experimental features of the program.About- Shows current program build and developer information.
Discord Webhook Integration
To use Discord Webhooks, confirm that you have Webhook permissions in the channel you wish to use and follow these steps:
Webhooks Setup (Discord)
- Navigate to the server where you want to send the webhook messages.
- Click on the server name at the top-left corner and select
Server Settings. - In the left menu, go to
Integrations -> Webhooks, then clickNew Webhook. - Give your Webhook any name you like.
- Select the channel where you want the Webhook to post messages.
- Click
Copy Webhook URL. This is the link you will use to send data.
Webhooks Setup (RaidCrawler)
- Open the
Settingssubwindow, then click on theMatchtab. Activate the checkbox that mentions Discord Webhooks. - Enter your Webhook URL into the field directly below the Discord Webhook checkbox, then navigate to the
Webhookstab. - (Optional) Add Webhook message content. For example, you can ping your Discord ID or role by using <@your_user_id>/<@your_role_id>.
- (Optional) configure any additional settings such as Verbose IVs or Emoji Config.
- Close and reopen RaidCrawler entirely to apply your new Webhook changes. Open the Seed Reset
Settingssubwindow and navigate to theWebhookstab again. - Click the
Test Webhookbutton. If done correctly you should see a functional Webhook in your chosen channel.
Date skipping is required to refresh the active Tera Raids currently on the map. We can utilize sys-botbase to completely automate the date skipping process, then use RaidCrawler to scan the active raids until a result that matches the chosen filters has been found.
Pressing the Advance Date button on the main window will initiate 1 of 3 date skipping routines, based on what was chosen inside the Settings subwindow.
- Zyro's method - This method advances the system time once every 5 seconds by altering the system clock using sys-botbase instead of System Settings.
- Touch screen inputs - This method is the quicker of the two methods that manually change the date as intended using System Settings.
- DDown inputs - This method is the slower but more consistent System Settings method, use this if you are having trouble with option 2.
If you are using Zyro's method for date skipping, ensure that Date & Time is synced via the internet in the Switch system settings. If you are using either of the other methods this setting should be disabled.
System Settings Advancements Setup
The default routine is configured for generic V1 Switch consoles, if you are using a Lite or an OLED, or are having any inconsistencies using the overshoot setting on any type of console when using the default routine, you will need to change the value inside Time to hold to overshoot "Date and Time" or use DDOWN inputs instead.
| Console | Suggested Overshoot Value |
|---|---|
| Switch V1/V2 | 900-950 |
| Switch Lite | 800 |
| Switch OLED | 950 |
It's now time to begin searching for a target raid!
The Process
In this example we will be searching for any shiny Pokémon using Zyro's date skipping method. You can be more specific with the filters or use a different date skipping configuration if you wish, such as filtering for a specific species or IV values and/or using the DDown input date skipping method.
Figure 4 - Filter Configuration

In Figure 4 we can see that the filters have been set to search for any shiny Pokémon, after making sure that the search filters are configured correctly, we then opened the settings subwindow and confirmed that we are using our desired date skipping method.
If you have not already done so, enter the overworld in-game and pause to open the map, then click Connect on the main window of RaidCrawler. Disconnect any controllers that are currently connected to the console once you have reached this stage. Controllers must be disconnected for RaidCrawler to take proper control of the console.
Click the Advance Date button to initiate the date skipping routine. RaidCrawler should now begin advancing the date and scanning for new Tera Raid dens, it will continue to do this automatically until a result that matches your search criteria has been found.
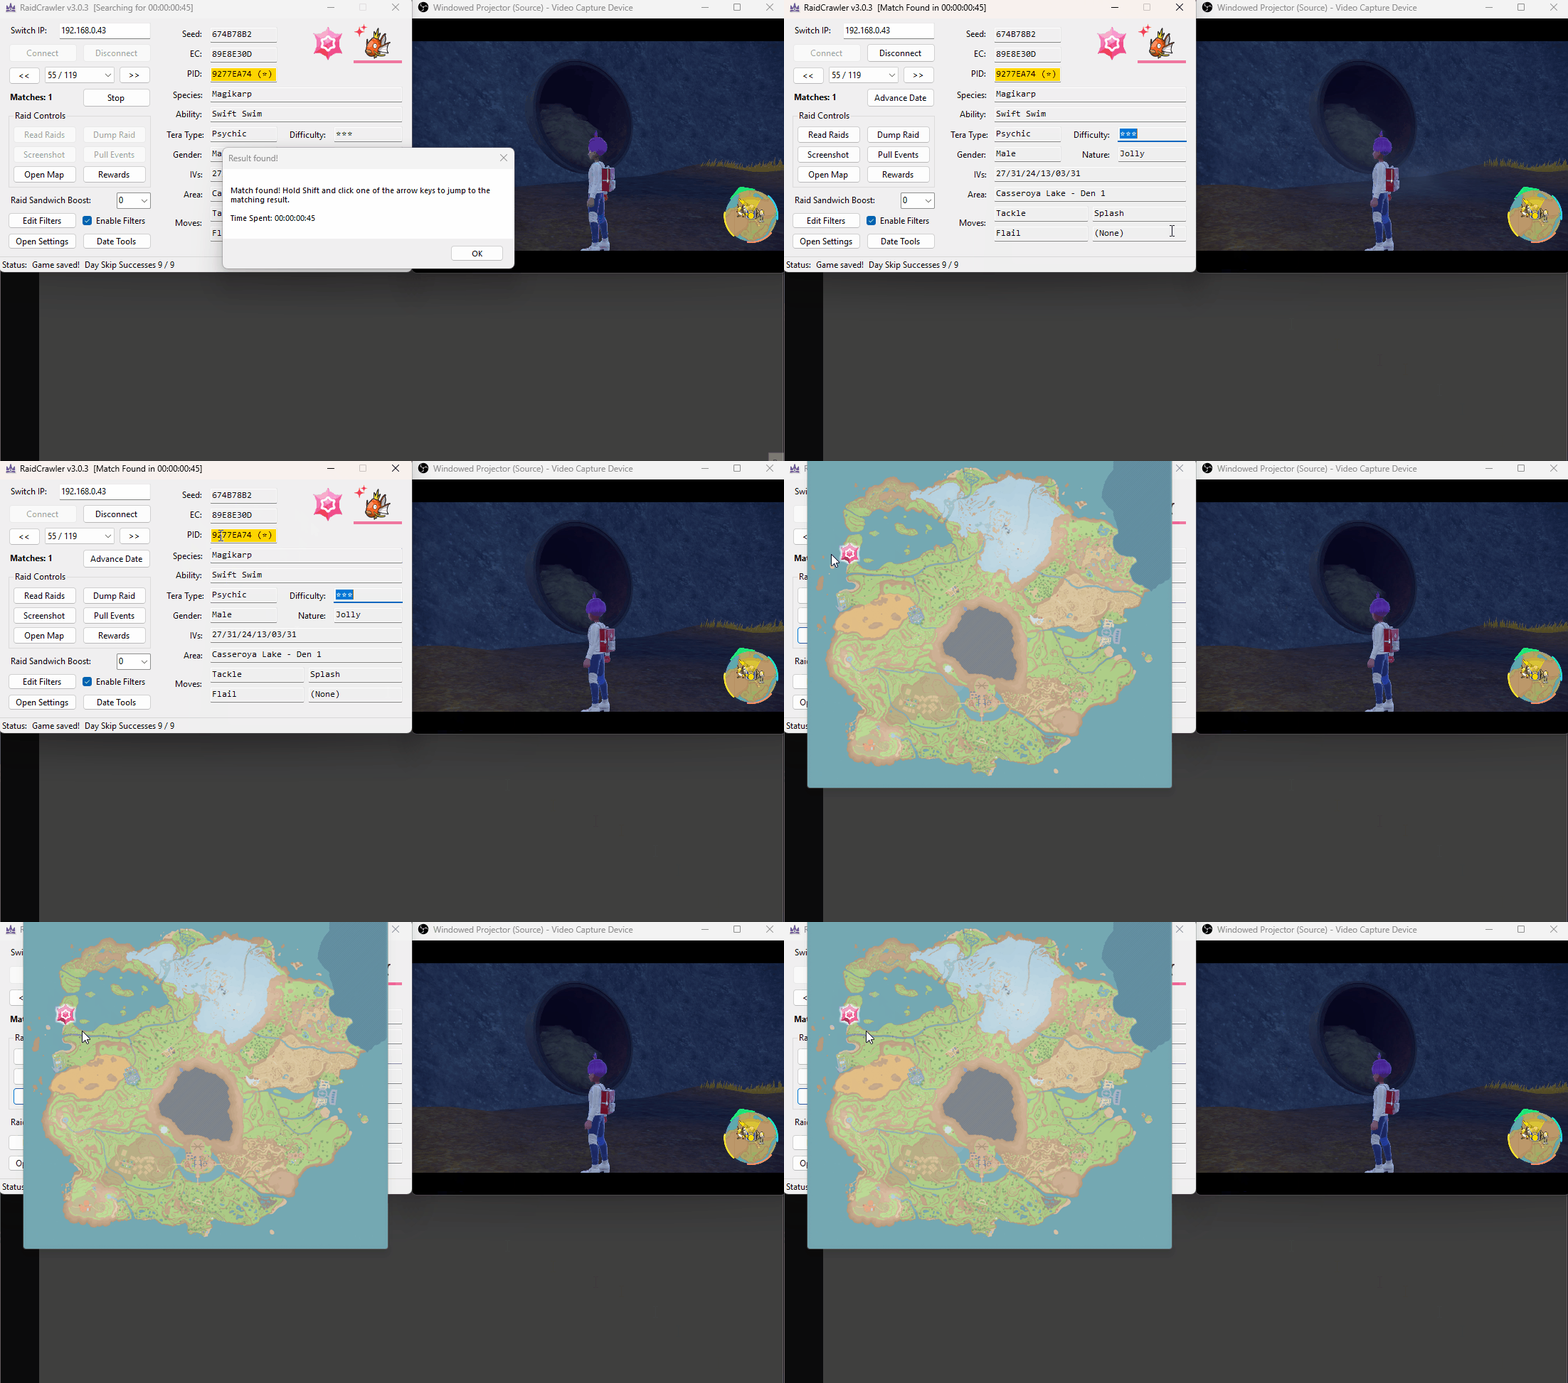
Figure 5 - Result Found

After scanning the raid dens and advancing the system date using Date Skipping, we were able to quickly find our desired Tera Raid and we have been provided with the following information:
- Pokémon Seed, PID and EC, PID will be highlighted gold if the Pokémon is shiny.
- Species and Tera typing.
- Location of the raid on the map.
- Raid difficulty & Rewards.
- IVs & Nature of the raid.
- Raid Type (normal, event distribution).
The Open Map button displays the rough location of the Raid Den on the map. If RaidCrawler produces multiple potential locations, compare with the in-game map to find the properly matching location.
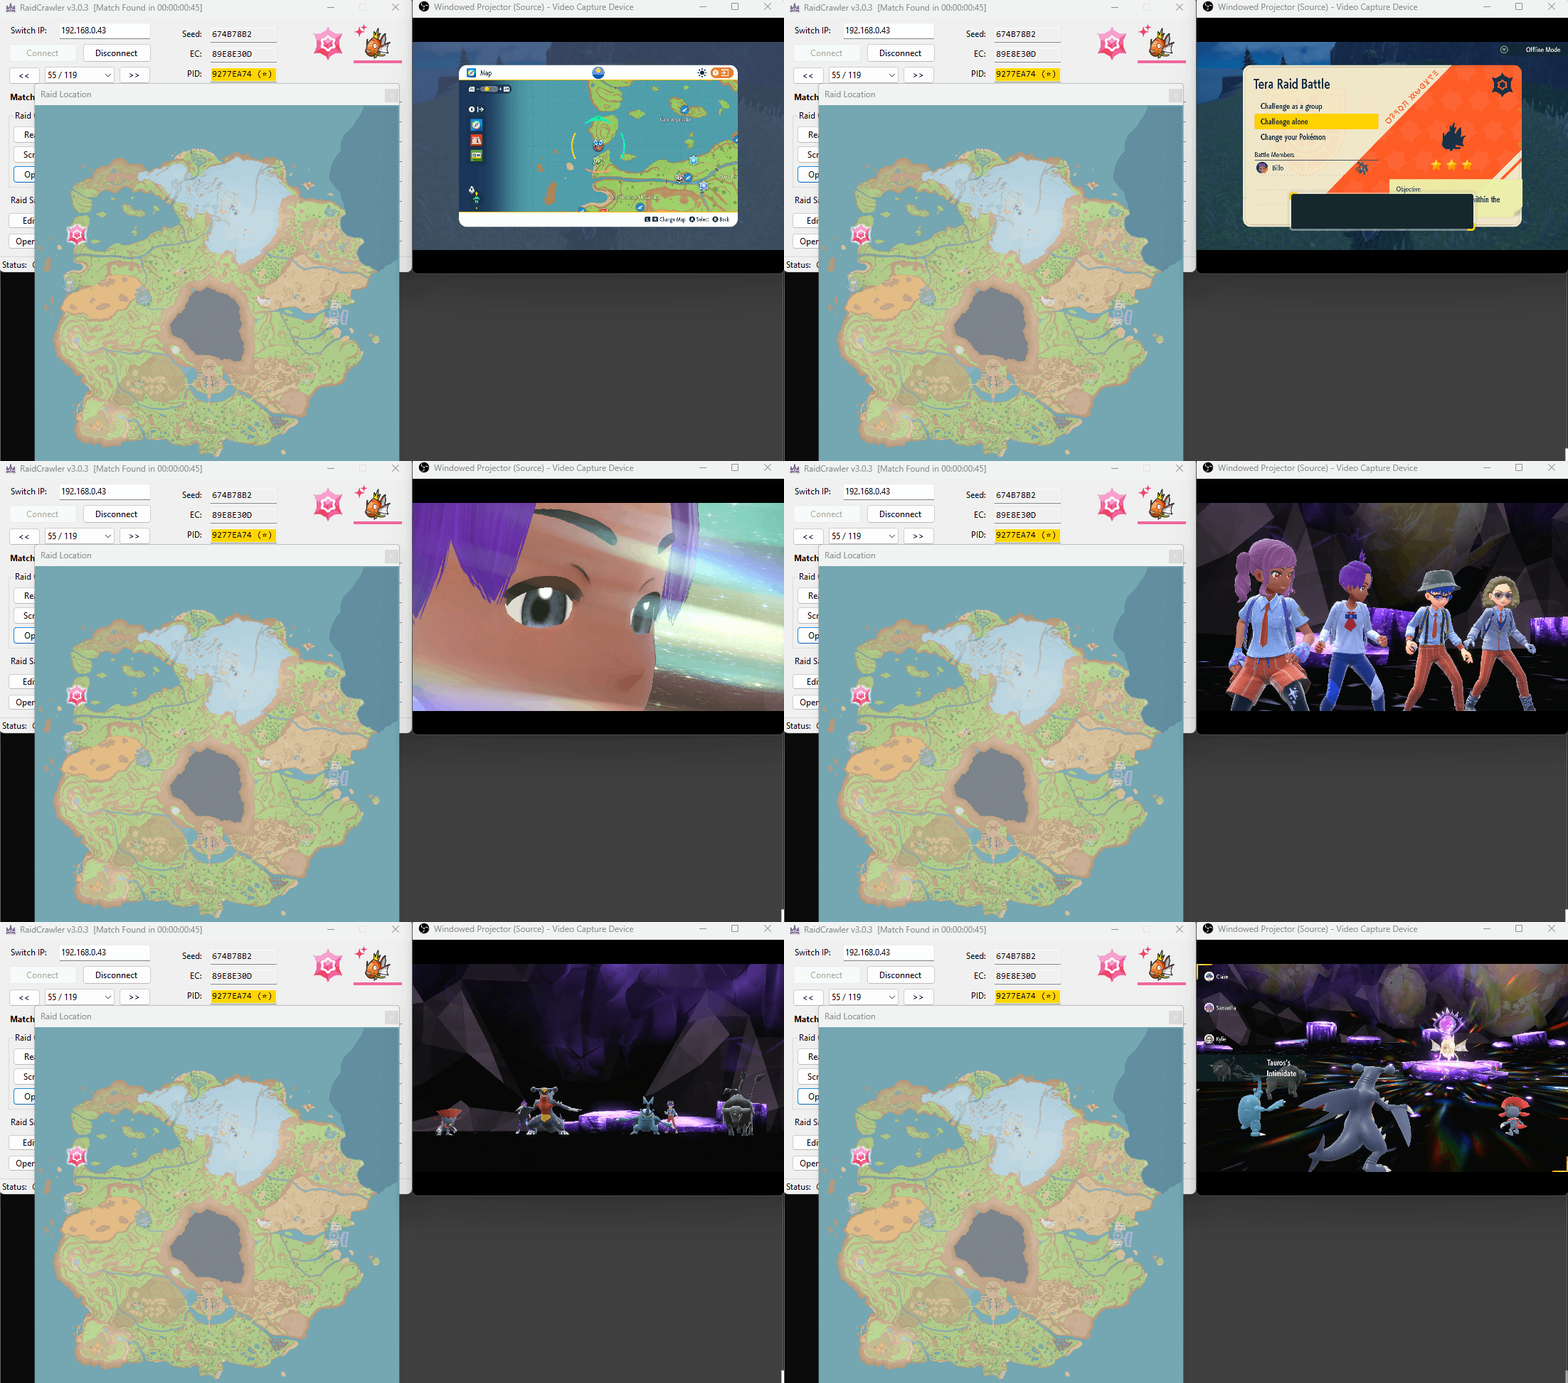
Figure 6 - Initiating Tera Raid

The raid matches the output displayed by RaidCrawler, once you have confirmed a match you can either capture the raid for yourself, or reset the game and host the raid for members of the community. Autosave should be disabled, and the game should be manually saved before entering the raid if you intend to share with other players.
That's all there is to it! You can now repeat everything you have learned from this guide to effectively hunt for any Tera Raids that you desire.