Max Raid RNG Guide (RETAIL)
This guide covers how to use PokeFinder by AdmiralFish to perform RNG manipulation on Max Raid Battles in Sword/Shield. With raid RNG, you can predict and filter for desired raid attributes like IVs, Nature, and Shiny status.
Each raid is assigned a "den seed," which determines the Pokémon within a den. This seed advances by 1 each day in a predictable manner, allowing for RNG manipulation through a technique called "date skipping" to reach a target seed.
From here it is assumed you are using an unmodified Switch console.
Have CFW installed? Click here for the CFW focused guide!You will need:
- PokeFinder
- Visual C++ Redistributable
- Access to a SysBot running Sword/Shield (recommended), or a friend running a custom firmware Switch console.
Instructions
- WINDOWS ONLY - Download
Visual C++ Redistributablethen run the installer files until fully complete. - Download the latest version of
PokeFinderfor Windows, then extract all the contents into a clean, empty folder. - Use google to locate a Discord server that runs a Sword/Shield SysBot, or a friend with a Switch console running CFW.
SysBot (or CFW in general) is used to identify your current raid seed, this is the most efficent method and so will be the recommended and used method throughout this guide.
Ensure that you have access to a SysBot running Sword/Shield, or a friend running Custom Firmware (CFW) before continuing.
Tool Overview & Seed Checking
This section will cover the essential details you need to know in order to use each of the required tools. If you do not yet have a complete understanding of how each of the tools to find and search seeds, follow along with this section.
Figure 1 - PokeFinder Overview
After opening the Gen 8 Raid section in PokeFinder, a larger window will open. This is where you can set search parameters and calculate target frames. We’ll refer to this window as the “main” window throughout the guide.
Feature Overview
- Left Side - Enter search conditions, select a specific raid, and input seed and # of advances.
- Center - Specify raid details, such as species, raid type (common/rare), and difficulty (star level).
- Right Side - Search filter details, filter for high IV, specific nature, and/or shiny target frames.
- Top - Profile management, enter your 5 digit IDs & trainer information from your save file here.
- Bottom - Search result output, any result that matches your filters will be displayed here.
Upon opening PokeFinder, prior to opening the main Window, a smaller window is available on screen to select the type of RNG abuse you wish to do. There are small tabs across the top of this window, one of them is labeled Gen 8 Tools.
In the Gen 8 Tools dropdown menu, select Den Map, this will open a sub window containing a map of each of the wild areas. Here you can select any Den and find it's rough location on the map, indicated by the red circle icon on the map display.
Matching your in-game Raid Den with the Den ID of PokeFinder can be a long or confusing process, so we can take advantage of this feature to more easily narrow down the Den ID we need. This will be visualized later on in the guide.
Figure 2 - Finding Your Current Seed

Showing a Pokémon caught from a Max Raid Battle to a SysBot will produce a "Raid seed", (as pictured in Figure 2), this is what PokeFinder uses to predict upcoming advancements.
Step-by-Step
- Throw a Wishing Piece into the den you wish to seed check.
- Capture the Pokémon from the raid, DO NOT SAVE AFTER THIS POINT.
- Navigate to the server that contains the SysBot, enter the channel for inputting commands.
- Initiate a
seedchecktrade (command syntax may vary between hosts). - Wait for the bot to message you a trade code, then meet with it in-game.
- Show the bot the caught Pokémon and wait for it to message you a den seed.
- Reset the game, you should now be back at the active den and also have your den seed.
There are methods to aquire your seed without the use of SysBot or Custom Firmware at all, but this is an unnecessarily lengthy process that will not be covered in this guide. Visit the Smogon Raid RNG Guide to find out more.
Figure 3 - Searching For Results
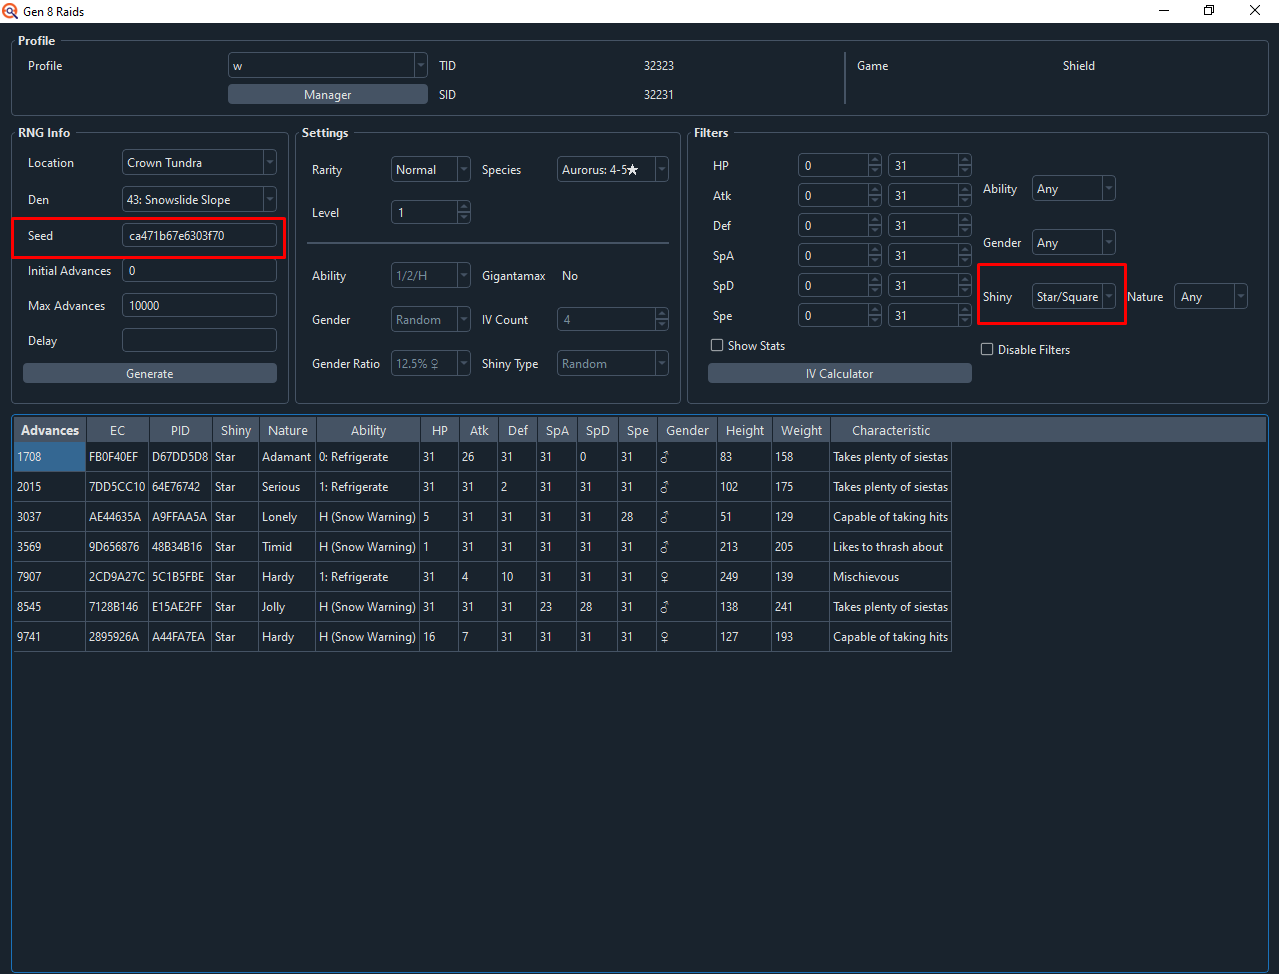
In the above image (Figure 3), the seed aquired from the SysBot seed check has been entered into the Seed field in PokeFinder, the search range has been set to 10,000, and the search filters are set to look for any frame that produces a Shiny Pokémon.
At the bottom of the window various result has been produced, the earliest frame that will produce a shiny Pokémon will occur in 1708 advances. Depending on the chosen species, raid type and star count, the internal details (such as IVs and Nature) will be different.
Setting Correct Filters
- Using the
Gen 8 Tools -> Den Mapfeature of PokeFinder, locate the den you are currently standing at in-game, take note of the ID after doing so. - Select the Den ID in the dropdown list inside the main PokeFinder window, then set the correct beam type (
Common= RED |Rare= PURPLE). - Set the filters on the right to search for your desired Pokémon, in Figure 3 we are only filtering for any shiny Pokémon. You can be more specific if you wish.
- Paste the seed produced by the SysBot into the
Seedfield, set your search range (10,000 recommended), then clickSearch.
If your result is undesirable, repeat the following:
- Throw a Wishing Piece into a random raid den to despawn the current den.
- Go back to your chosen den and throw in a new Wishing Piece to reset the seed.
- Follow the seed checking process again to get a new seed.
- Enter the new seed into PokeFinder and check for desirable results.
- Repeat this process until a desirable result has been found.
Advancing Towards a Target
This section covers how to advance towards a target frame, and how to manipulate the species to match your desired Pokémon.
Figure 4 - Den Finding & Search Filters
Before anything else, you will need to pick the Den or Pokémon you wish to RNG abuse in. This is best achieved using an online resource, such as the Serebii.net Raid Encounter Tables
Navigate to the location of your desired Raid Den in game, defeat the raid if there is a Pokémon inside, then throw in a Wishing Piece, this will save the game. You will now need to match the in-game den with the corrisponding Den ID in PokeFinder. An example of how to do this can be seen in the above image.
Finding the Den ID
- Open the
Den Mapfound in theGen 8 Toolsdropdown menu of PokeFinder. - Select the map that corrisponds to the map which contains your desired Pokémon (Wild Area | IoA | CT).
- Select different Den IDs until you find one in the rough location of where you are standing in-game.
- Select the Den ID in the PokeFinder main window and confirm the species match on PokeFinder and in-game.
Now you will need to obtain the correct type of raid, if your Pokémon only appears in a Rare (purple neam) raid, you will need to reset the den until a Rare raid appears from throwing in a Wishing Piece. This can be done one of two ways:
- Run back and fourth between raids, throwing in Wishing Pieces until your raid is of the desired rarity.
- Throw a Wishing Piece into your desired den, then press the Home button once the beam appears. If it is not your desired rarity, restart the game.
Event Distributions are also red, so you will need to use the first method if you are hunting for an event distribution den.
If your den is from a promotional event distribution, selectEventin theLocationdropdown menu on the left, then select the exact distribution in the dropdown directly below. You do not need to track your Raid Den location for event distributions.
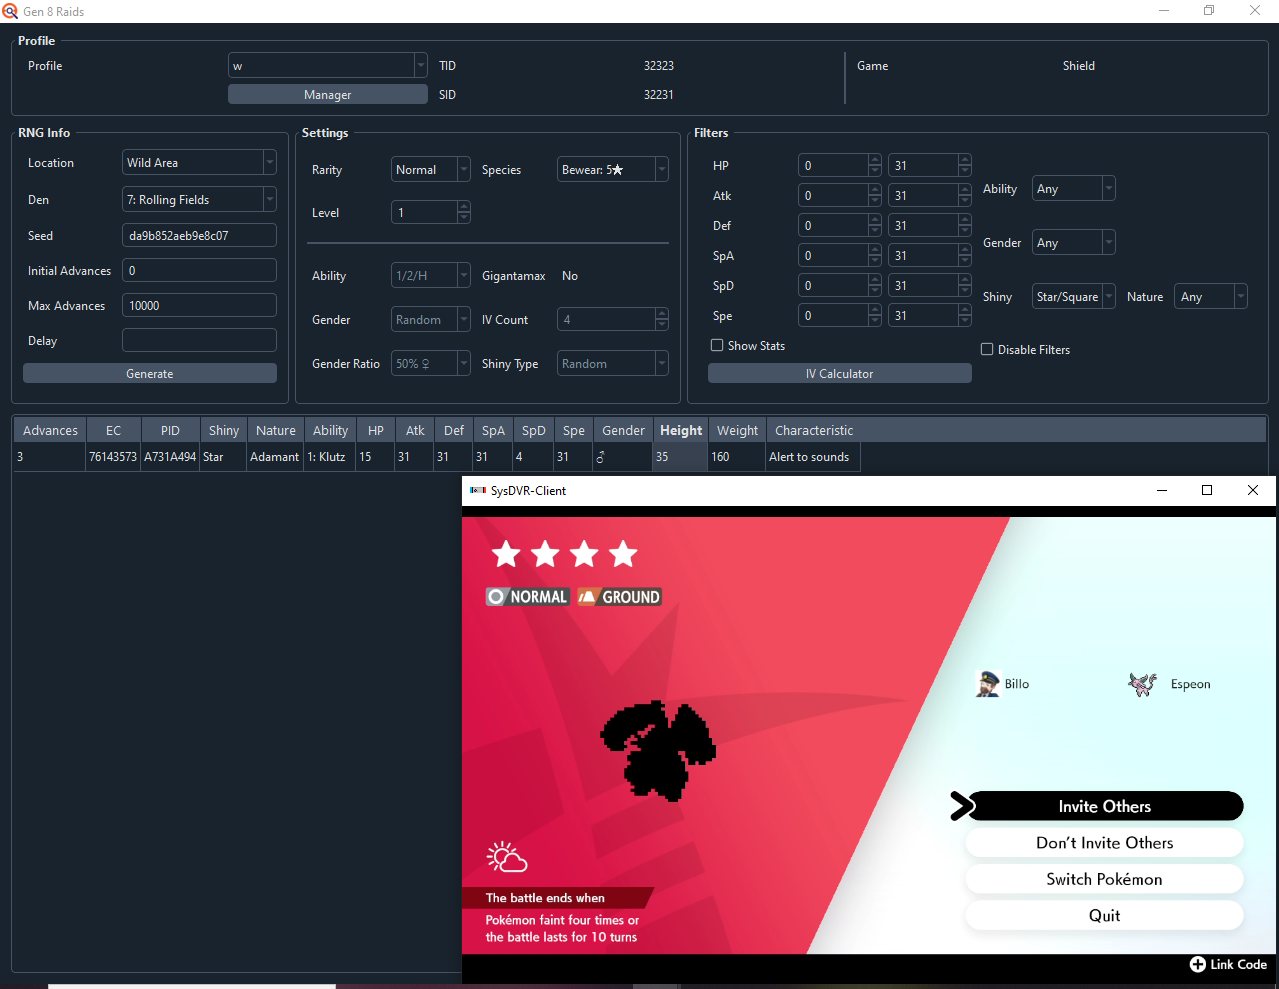
Figure 5 - Target Found

Target frame found! in Figure 5 we can see that a Shiny, Adamant natured Bewear has been found in 78 advancements, and that the den we are searching in has a common (RED) beam. It is now time to begin advancing towards the target.
Frames are advanced by 1 per day that has passed, which means we will need to advance 78 days to hit our target shiny frame. We can trick the game into thinking a day has passed using the date skipping exploit.
How to Date Skip
Date-skipping on retail hardware is a manual process that requires some initial setup, there are two methods you can use, the faster method requires a Nintendo Switch Online subscription or multiple consoles/games, while the slower method does not.
Use one of the below methods to advance towards your target frame, try to keep track of the rough amount of advancements you have done so far. You can use SysBot to check your current seed once you are closer to your target frame.
Fast Method
- Enter an online single or double battle, you can search without a code for quicker wait times.
- Enter airplane mode once you enter the battle. Alternatively you can play out the whole battle if you wish.
- From here navigate to the System Settings and change the date ahead by one day, then reopen the game.
- If done correctly your raid should now give off Watts again, as if you have not interacted with it in the first place.
- From here you can date-skip easily by repeating step 3. This exploit needs to be re-activated every time the game is reset.
If your target is >1000 advancements away and you intend to use the fast method, it is recommended to re-locate to an indoor location to do your advancements to avoid crashing the game.
Slow Method
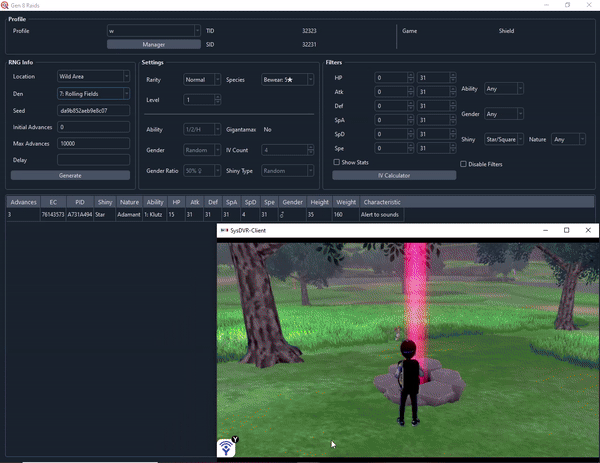
- Find an active Max Raid, interact with it, then click "Invite Others".
- From here navigate to the System Settings and change the date ahead by one day.
- Exit back to the main menu of the home screen and reopen the game.
- If done correctly your raid should now give off Watts again, as if you have not interacted with it in the first place.
- To repeat this process you will need to start again from step 1.
Note - If you wish to manipulate the species inside the den you must save 3 advancements (or date skips) away from your target! The first 2 days are locked onto a specific species and the third one is decided at random.
Figure 6 - Species Manipulation
At this stage you should be exactly 3 frames/advances/days away from your target (today(0), second day(1), third day(2), target day(3)), from here you can manipulate the species on the "target day".
In the above image, we saved 3 frames away from the target and advanced the seed 3 times, but the species is incorrect, this problem can be corrected by doing the following:
Species Manipulation Tutorial
- First, save the game once you are confident that you are 3 frames away from your target den.
- Advance 3 days, then enter the raid to confirm that it is what you expect (check if shiny, capture if specific stats and non shiny).
- Reset the game and re-enter the overworld, you should now be stood back at your raid den, 3 advanced away from the target.
- Advance 3 days, you should now see that the species has changed, repeat this step until your desired species appears.
- Save once you hit your desired species if you wish to share the raid with others!
If you're unsure whether you've hit the correct frame or species, especially when targeting a shiny Pokémon, you can enter the raid and intentionally lose. This allows you to verify that the Pokémon matches your expectations before saving the game.
Figure 6 - Result Found!
The den now contains the desired species, in this case, a 5 star Bewear! We can now capture the Pokémon or share the raid with friends.
When sharing the raid with friends, ensure the System Time does not pass 00:00 (Midnight) as this will cause the seed to advance naturally. Since you should be saved on a raid, you can simply change the date back to the date you saved on to preserve the current seed and share the raid across multiple days.
That's all there is to manipulating Max Raid Battles on retail hardware!