Wishing Piece Raid RNG (CFW)
Introduction
Sword/Shield Max Raid RNG manipulation is used to select for specific characteristics of Pokémon found in raid battles. It is possible to predict values such as IVs, Nature, Shiny status, Size (Jumbo/Teensy Mark in SV), and Gender. The Pokémon species and raid star count cannot be manipulated, but we can randomly reroll them until the desired target is achieved.
Note that it is only possible to manipulate encounters found inside Max Raid dens; it is NOT POSSIBLE to manipulate the details of Pokémon found in Dynamax Adventures.
Each raid has a randomly-assigned "raid seed" that determines the traits of the Pokémon inside a den. Every day that passes advances the den seed by 1 in a predictable manner, making RNG abuse entirely possible via "date skipping". We can simply skip the required number of days to reach a desired seed.
Don't have CFW installed? Click here for the retail focused guide!Setup and Overview
Switch Software
Installation Instructions (Switch Software)
- Download
Luxrayand extract the contents of the download to the root of your Switch SD card. - Download
sys-botbaseand extract the contents of the download to the root of your Switch SD card. - Download
ldn_mitmand extract the contents of the download to the root of your Switch SD card. - Reboot the console into your chosen CFW environment (SysCFW recommended).
DISABLING GAME MODS AND CHEATS
You will need to remove all mods or cheats for the game you are playing before proceeding. Mods/cheats can alter the RNG of the games and cause RAM reads to fail. Switch mods/cheats are stored in the atmosphere/contents directory on your SD card. This folder is typically empty on a fresh installation of Atmosphère.
Methods for Disabling Mods/Cheats
Any of these methods can work to disable mods/cheats. You should select the best one for your use case.
- Rename the
atmosphere/contentsfolder to something else, such asoldcontents. This will allow you to keep everything you previously installed. You can simply rename the folder back when done. - Delete the
atmosphere/contentsfolder. This may be a good option if you have many files in this directory that you do not recognize and you want to clean out your SD card. - Delete specific mods/cheats from the
atmosphere/contentsfolder. This requires you to know which title ID corresponds to what. - If you wish to keep the
atmosphere/contentsfolder intact, you can holdLevery time you boot the game.
Note - Some sys-modules that are not necessary for these tools can still cause interference if they are present on your Switch. If you are still experiencing issues, remove all unnecessary sys-modules that were not required by this guide.
PC Software
Installation Instructions (PC Software)
- Download and extract
PokeFinderfor your operating system into a fresh, empty folder on your computer. You should download the zip file ending in-winfor Windows,-macOSfor Mac, and-linuxfor Linux. - Refer to the PKHeX Plugins Wiki for installing PKHeX with the required plugins. Do not leave the setup page until you have LiveHeX working properly.
- When launching PKHeX/PokeFinder you may be asked to install the relevant dependencies if you do not already have them installed. Download the installer when prompted and go through the setup instructions until complete. These programs should be functional before you move on to the next step.
Alternative Seed Checking for Mac/Linux
If you do not have a PC and are unable to run PKHeX and LiveHeX, you can consider CaptureSight to check and monitor your seeds. This is a Tesla overlay that is installed on your Switch.
CaptureSight will not be covered on this guide, so refer to the GitHub repository above for installation, usage, and troubleshooting. Keep in mind that CaptureSight interferes with programs that rely on sys-botbase, so you will need to reboot the console each time you want to switch over.
L + R + L-Stick (Booting LAN, LAN enabled). You will not have a 420000000010 folder in the atmosphere/contents directory since the outdated sys-module will crash Atmosphère.
Software Overview
Figure 1 - PokeFinder Overview
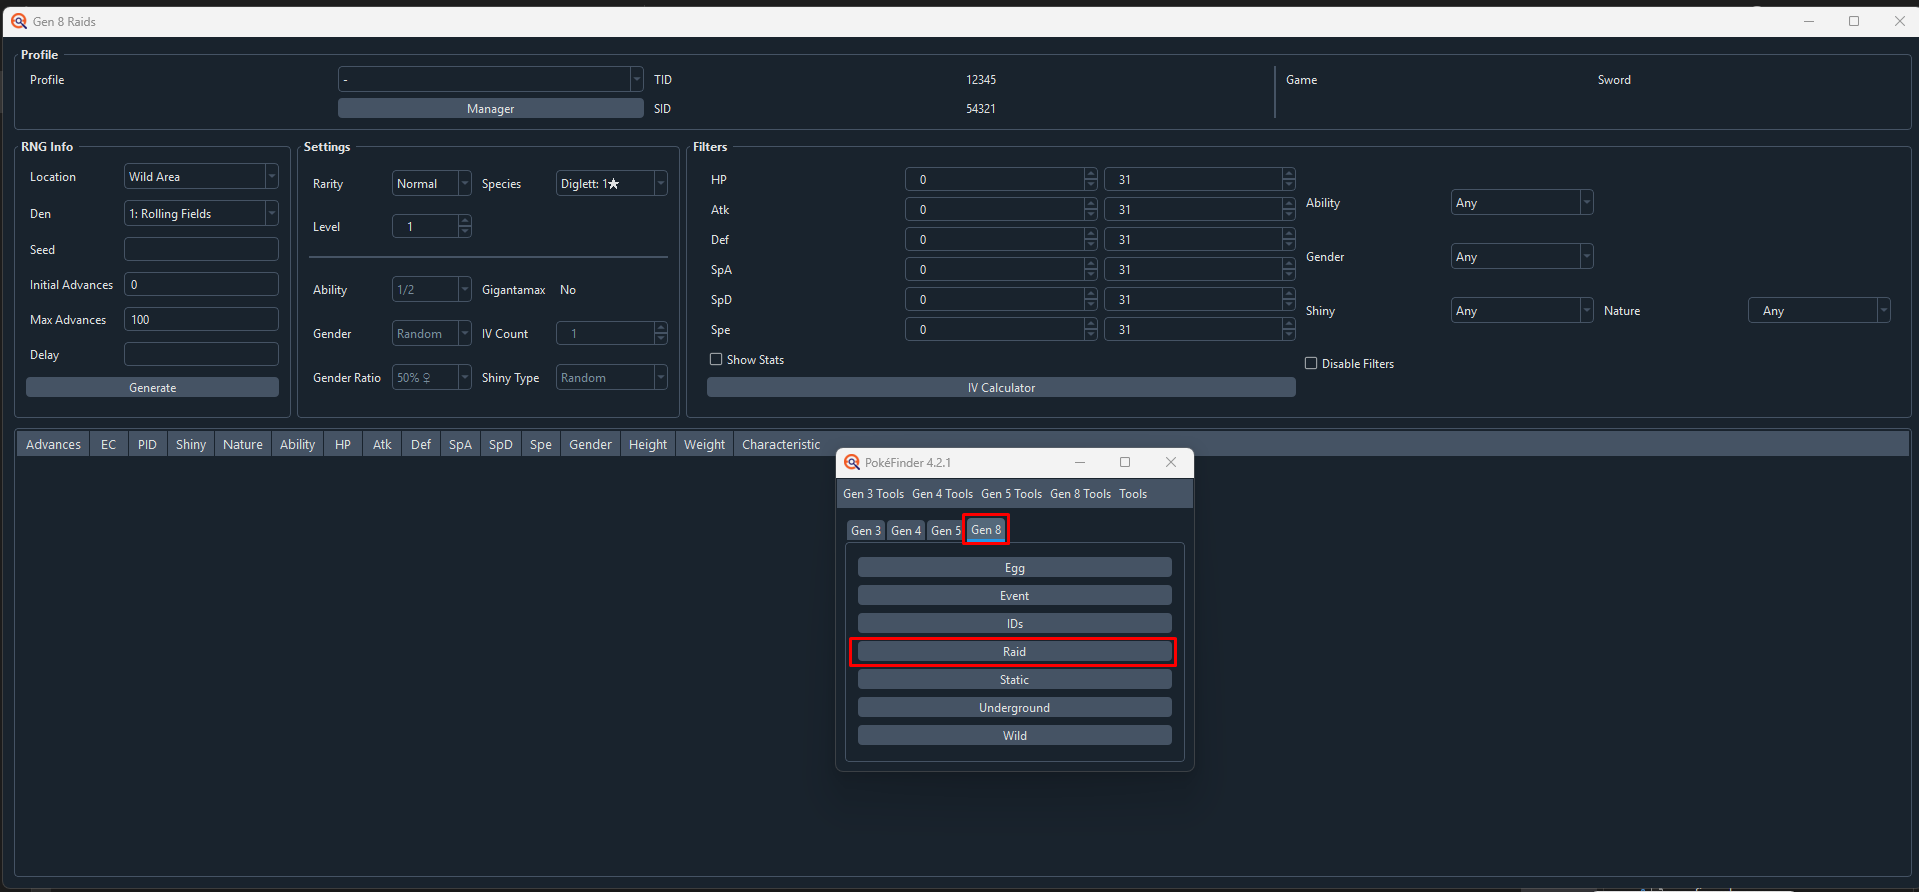
PokeFinder launches as a small window with a separate tab for each generation and multiple buttons on each tab. Select the Gen 8 tab and click the Raid button to open a larger window titled Gen 8 Raids. For the purposes of this guide, the Gen 8 Raids window will be referred to as the "main window." Here, we can configure the program to search raids and calculate upcoming advances based on user-defined search criteria.
Main Window Feature Overview
- Left Side - Specify search conditions to target specific raid dens, and input seed and # of advances to search.
- Center - Specify raid details, such as species, raid type (Normal/Rare), and difficulty (star count).
- Right Side - Add search filters for IVs, Nature, Shiny Status, Gender, and Ability; filters are combined.
- Top - Manage your profiles; this lets you store each game's version, 5 digit TID/SID, and presence of charms.
- Bottom - View all search results that match your filters.
Profiles
It is important to a set up a basic PokeFinder profile. For Max Raids, only the game version is necessary. This allows PokeFinder to display the correct version-exclusive species details for your game's raid dens. Everything else is optional and will NOT affect raid predictions. Select your profile in the dropdown menu at the top of the main window after creation.
Technical Details
Pokémon found in Max Raid battles always have the same Shiny status for all participants. For the game to do this, the raid seed generates a PID and a fake trainer's TID/SID. If the PID is shiny for the fake trainer, it will be shiny for everyone, and if it is nonshiny for the fake trainer, it will be nonshiny for everyone. After each participant captures the Pokémon, its PID is modified for the player's TID/SID to ensure that the original shiny status is maintained. This is why entering your correct TID/SID into your PokeFinder profile is NOT required.
However, if you enter correct IDs into your profile, the PID will be calculated based on your TID/SID. This is useful for trading communities that require proof that the Pokémon was obtained through legitimate means since the PID will be correct in the search table.
Finding your 5 digit TID/SID
- Load your save file into PKHeX, then right-click and
Viewa self-obtained Pokémon. - Select the OT/Misc tab and hover over the TID field with your mouse.
- Your 5 digit TID/SID will be displayed in a tooltip. These are the values PokeFinder expects.
Before you continue, you should understand the difference between stock raid dens and event dens.
Stock raid dens are location-specific, and their beams can either be red (Common/Normal) or purple (Rare). These raid dens are always available, even if you have not connected online. You can see what appears in each location using Serebii's Max Raid Battle Dens page.
Event dens are obtained by connecting online to receive the Wild Area News. These dens appear anywhere on the map and contain unique tables of available Pokémon for a limited time. These raid beams are always red. You can see what appeared in each event distribution using Serebii's Max Raid Event Dens page.
In most cases, you should have the final event distribution active in-game. Information about injecting older Wild Area News can be found in this ProjectPokémon tutorial. No further support for Wild Area News injection will be provided in this guide.
Figure 2 - PokeFinder Den Map
In this section, you will learn how to find the Den ID for your chosen raid den. The Den ID is used to identify which Pokémon are available in a stock raid. Later on, we will use it to find the correct raid seed for your den, whether it is a stock den or event den.
Finding Den ID
On the initial, smaller window that first appears when launching PokeFinder, the navigation menu at the top lists tools used for different games. Under Gen 8 Tools, there is an option for Den Map. This tool opens in a subwindow and can be used to find your chosen raid den's ID more easily.
We can match the in-game location of a raid den to its location on PokeFinder's Den Map to find the corresponding Den ID.
- If you are planning to RNG manipulate a stock den, use Serebii to find a raid den that contains your desired Pokémon. Otherwise, find an event den, which can be confirmed by checking the Pokémon inside versus what normally appears in that raid den.
- Throw a Wishing Piece into the den and confirm the species matches the tables on Serebii. If the species does not match, you are not standing by the correct den in-game.
- Take note of the map (Wild Area, IoA, or CT) and the area (e.g. Dusty Bowl) for your selected den.
- Open the
Den Mapsubwindow on PokeFinder. - Select the correct map from the first dropdown menu (Wild Area, IoA, or CT).
- Under the second dropdown menu, check each option that matches the area until the red dot appears in the same place as your chosen raid den.
- The number that appears in front of the location in the second dropdown menu is the Den ID. Take note of this value.
- If you found your raid den at
76: Dusty Bowl, then the Den ID is76, the area isDusty Bowl, and the map isWild Area. - Go back to the main PokeFinder window to enter this information.
- Confirm that the correct profile has been selected at the top.
- From the
Locationdropdown, select the correct map if you are manipulating a stock den, orEventif you are manipulating an event den. - From the
Dendropdown, select the Den ID you found earlier if you are manipulating a stock den, or the correct Wild Area News Event if you are manipulating an event den. - If this is a stock den, select the correct Den rarity (Normal/Rare) from the
Raritydropdown. This does not matter for event dens. - Confirm that the species selection in PokeFinder matches Serebii.
- Remember the Den ID you found for the next step.
Figure 3 - PKHeX/LiveHeX Overview
LiveHeX is a feature of the Auto-Legality Mod plugin that is used to read the details of Max Raid dens while we are playing the game. We connect to LiveHeX using sys-botbase, a Switch program that was installed earlier.
LiveHeX Connectivity
- Open PKHeX, then navigate
Options->Settingsand set yourBlank Save Versionto the game you are playing (Sword or Shield). - Open the Homebrew Menu on your console, then press the
Ybutton to display the local IP address of your console. - Close the subwindow, then navigate to
Tools->Auto Legality Mod->Open LiveHeXto open the LiveHeX subwindow. - If you do not have ldn_mitm installed, connect to the Y-Comm in game or enter LAN mode. This step can be skipped if you already have ldn_mitm installed.
- Enter the local IP of your console into the
IP:field and click theConnectbutton. If done correctly, your console should now be connected to LiveHeX. - At the bottom of the LiveHeX window, open the dropdown menu and select the Raid block that corresponds to the location of your desired raid den.
- Select
Raidif your raid is located in the Wild Area. - Select
RaidArmorif your raid is located in the Isle of Armor. - Select
RaidCrownif your raid is located in the Crown Tundra. - Click
Edit Block, which will then show details of all the raid dens on the map.
Figure 4 - LiveHeX Den ID Confirmation

Step-by-Step
- If you have not already thrown a Wishing Piece into the den, close any raid block windows open on LiveHeX and use a Wishing Piece.
- Connect to LiveHeX and open the Raid block subwindow for the correct map.
- Select your Den ID you found earlier. If this is the correct Den ID, you should see the following:
isActiveisTrue.isRareisTrue(purple beam) orFalse(red beam).isWishingPieceisTrue.- Close the Raid Parameter Subwindow by either clicking the X in the top corner or clicking the
Cancelbutton. DO NOT CLICK SAVE.
Pressing the Save button will inject the current seed and any other details back into the Raid Den (very bad). NEVER USE THIS BUTTON TO CLOSE THE RAID PARAMETER SUBWINDOW if you care about the legitimacy of your Pokémon.
Figure 5 - Luxray Overview
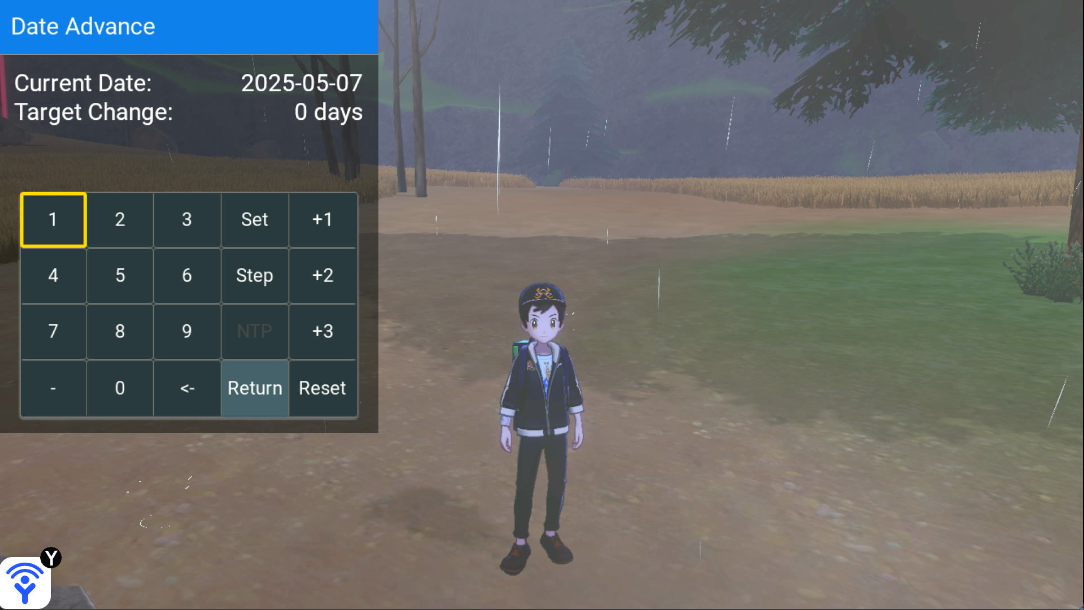
Luxray is a Switch tool used for automating the (otherwise tedious) date skipping process. It can be launched from the Switch Homebrew Menu. As mentioned above, the den seed advances by one for each day that passes. Luxray can be used to alter the system clock and make the game believe that a day has passed to advance den seeds.
Using Luxray
Upon launching you will be presented with a calculator-style application with three main features:
- Set - Adjust the network time by the number of days entered. Useful for changing the weather.
- Step - Date skips based on the number of days entered. Used to automate date-skipping.
- NTP - Synchronizes the date and time back to network time. This should be done after every date-skipping session.
Date & Time must be synced via the internet in the System Settings in order to use Luxray.
NTP or Set to adjust the clock if you are going out of bounds.