Legends: Arceus RNG (RETAIL)
Introduction
In Legends: Arceus, all Legendary & Mythical Pokémon have predetermined internal values that can be predicted in advance using RNG manipulation. Currently, not all legendary/mythical Pokémon can be predicted on retail hardware, but the ones that can be predicted are predictable with 100% consistency with no timing required. Learning how this works allows you to obtain most Legendary/Mythical Pokémon in the game with desired IVs & Natures.
Legendary/Mythical Pokémon are not all generated the same way and there are two seperate categories that they fall into "Main RNG" or "Spawner RNG". Only those that fall into the Spawner RNG category can be manipulated on retail hardware at this current time. Here is a list encounters tied to Spawner RNG:
- Lake Trio - Uxie, Mesprit & Azelf
- Weather Quartet - Tornadus, Thundurus, Landorus & Enamorus
- Heatran
- Cresselia
- Manaphy & Phione
- Shaymin
- Darkrai
Anything not included in this list is in the Main RNG category and cannot currently be manipulated on retail hardware. In the event that more research is done that gives retail players access to the Main RNG state this guide will be updated to support those encounters.
Setup, Installation & Usage
Tools and Applications
- ParLiAment
- Access to a SysBot running Legends: Arceus
You can find a SysBot by searching online for "Legends: Arceus SysBot server" or by asking in relevant communities. This RNG utilizes someone elses Custom Firmware Switch to assist in dumping the relevant Pokémon files on your behalf.
Game Setup
Before starting, make sure your game is properly set up and that you have the required resources to ensure the RNG process is as smooth as possible. It is assumed that you have progressed the story enough to spawn your target Pokémon. If you have not yet done so you should go back and do this now.
In-game Resources
- Plenty of throwable items to remove the shield and stun the target Pokémon (e.g., Sticky Glob, Ball of Mud, etc.)
- Plenty of healing items to keep your Pokémon in good health (e.g., Full Restore, Revives, etc.)
- Plenty of Poké Balls to capture your target Pokémon (e.g., Gigaton Ball, Jet Ball, Ultra Ball, etc.)
- Plenty of stealth items, particularly helpful for weather genies and Darkrai (e.g., Stealth Spray, Smoke Ball, etc.)
Party Setup
- A strong Pokémon with a Super Effective move, ideally capable of knocking out your target Pokémon in 1-2 attacks.
- A fast Pokémon capable of inflicting status conditions (Paralysis or Sleep) onto your target Pokémon.
- At least one spare space on your party for your target Pokémon to go into.
Game Settings / Misc
- In the
Communicationstab of the pause menu, setInternet ConnectiontoOffandAutomatically Connect?toNo. - In the
Helptab of the pause menu, open theSettingsand navigate toAutosave, ensure that it is set toDisabled. - (Optional) Most of these encounters have an initial in-game cutscene the first time you interact with them, you can choose to clear this cutscene if you wish to do so.
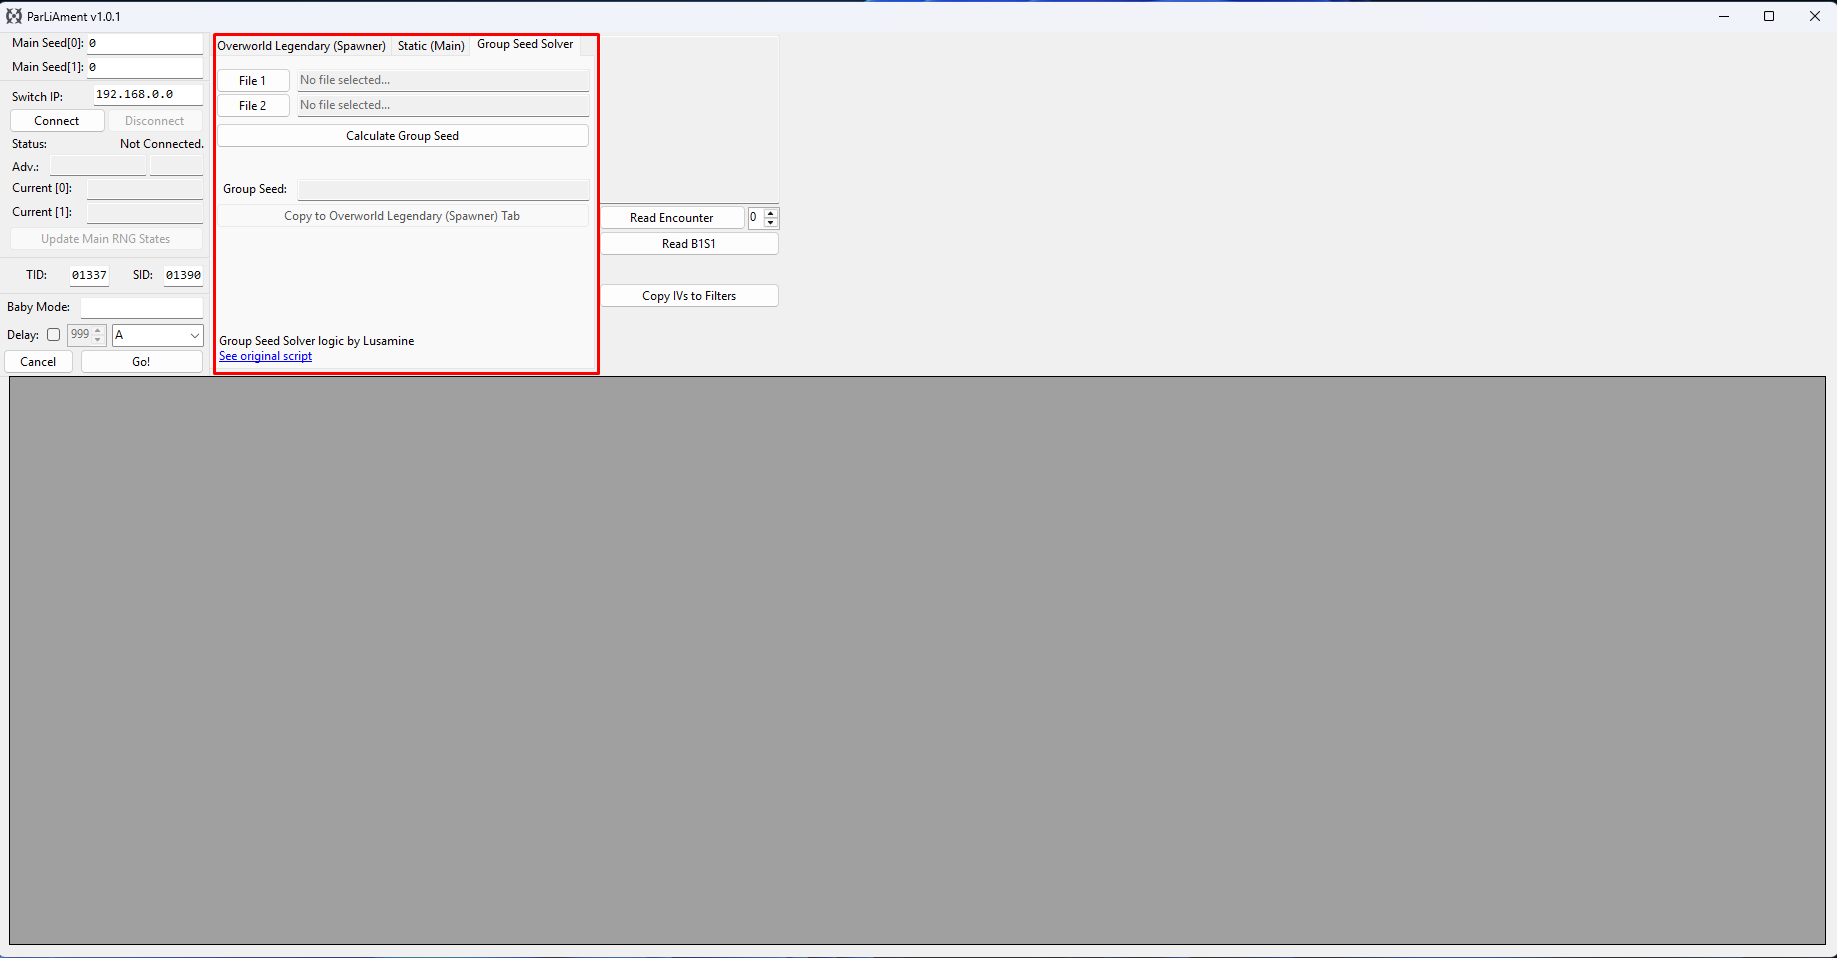
Figure 1 - ParLiAment Overview
You will be presented with the above screen when opening ParLiAment for the first time. The left-most and right-most columns are for those running manipulating Main RNG encounters using Custom Firmware, these two columns can be safely ignored.
Our focus will be on the middle two columns, here we can see some tabs towards the top of the window labelled Group Seed Solver and Overworld Legendary (Spawner), which perform the actions we need for this RNG.
- Group Seed Solver - Resolves a group seed based on provided Pokémon files, this is the seed expected by the Overworld Legendary (Spawner) tab.
- Overworld Legendary (Spawner) - Calculates upcoming advances based on a given target Pokémon and the provided group seed.
To learn more about how to use each of the tabs continue reading below.
Figure 2 - Group Seed Solver Tab Overview
This Group Seed Solver tab expects you to add two consecutive Pokémon files from your target spawner to resolve your group seed, to understand how to use this tab you will first need to learn how to advance the RNG state. The method used to advance the RNG state varies depending on the target, but everything will fall into one of two categories:
Immediate Respawn
Includes: Uxie, Mesprit, Azelf, Heatran & Cresselia
These Pokémon are tied to story quests, which means that they will immediately respawn when knocked out, to respawn any of the Pokémon in this list do the following:
- Engage the target Pokémon in battle and knock it out.
- Mash the A button through the cutscene.
- You should now see that the Pokémon has respawned.
Despawns When Defeated
Includes: Phione, Manaphy, Shaymin, Darkrai, Tornadus, Thundurus, Landorus & Enamorus
These Pokémon require extra effort to respawn, they will disappear from the map once you knock them out, to respawn any of the Pokémon in this list do the following:
- Engage your target Pokémon in battle and knock it out.
- Teleport to a campsite, then set the time of day to evening.
- Tornadus - Sleep repeatedly until the weather is Blizzard.
- Thundurus - Sleep repeatedly until the weather is Thunderstorm.
- Enter the closest subzone (cave) before the time of day turns to night.
- Shaymin/Landorus - head to the cave at Lake Verity.
- Enamorus - head to the cave at Lake Valor.
- Thundurus - head to the cave at Firespit Island.
- Phione/Manaphy - head to their spawn location (Seaside Hallow cave).
- Tornadus - head to the cave at Lake Acuity.
- Darkrai - head to either side of Wayward Cave.
- Wait inside the cave until night-time, this should take roughly 3 minutes.
- Leave the cave and head back to the location of your target Pokémon, you should now see that the Pokémon has respawned.
Figure 3 - Group Seed Solver Tab Usage
- Head into the map that contains your desired target Pokémon and save the game.
- If your target Pokémon is Cresselia, Shaymin, Darkrai, Tornadus, Thundurus, Landorus or Enamorus, save the game upon entering the area.
- If your target Pokémon is Uxie, Mesprit, Azelf, Heatran or Manaphy, save the after entering the cave that contains your target.
- If your target Pokémon is Phione, capture 2/3 of the Phione in Seaside Hallow, deposit them into your boxes at a campsite, then save the game.
- Capture your target Pokémon, then head back to Jubilife and initiate a dump trade with the SysBot you found earlier.
- If you need any help with this step, ask the bot host for more information about how to initiate a dump trade.
- Show the bot the Pokémon you caught, you should then receive a
.pa8file from the bot (typically found in your Discord private messages). - The
.pa8file contains the information the seed solver needs to determine the group seed of our target spawner. - Reset the game without saving, you should now be back in the area that contains your target Pokémon.
- Advance the RNG state once then capture the Pokémon that respawns, show that Pokémon to the SysBot too.
- Reset the game once more, you should now be back in the area that contains your target Pokémon with two
.pa8files. - On the
Group Seed Solvertab of ParLiAment, select the two files you just obtained from the bot and clickCalculate Group Seed. - Once your group seed has been resolved, click the
Copy to Overworld Legendary (Spawner) Tab.
Figure 4 - Overworld Legendary (Spawner) Tab Usage
Once you have obtained your matching group seed from the spawner seed solver you can then move back to the Overworld Legendary (Spawner) tab. Here is where you will search for upcoming target Pokémon on your seed.
- Ensure your group seed has been copied over from the Group Seed Solver tab.
- Ensure that the
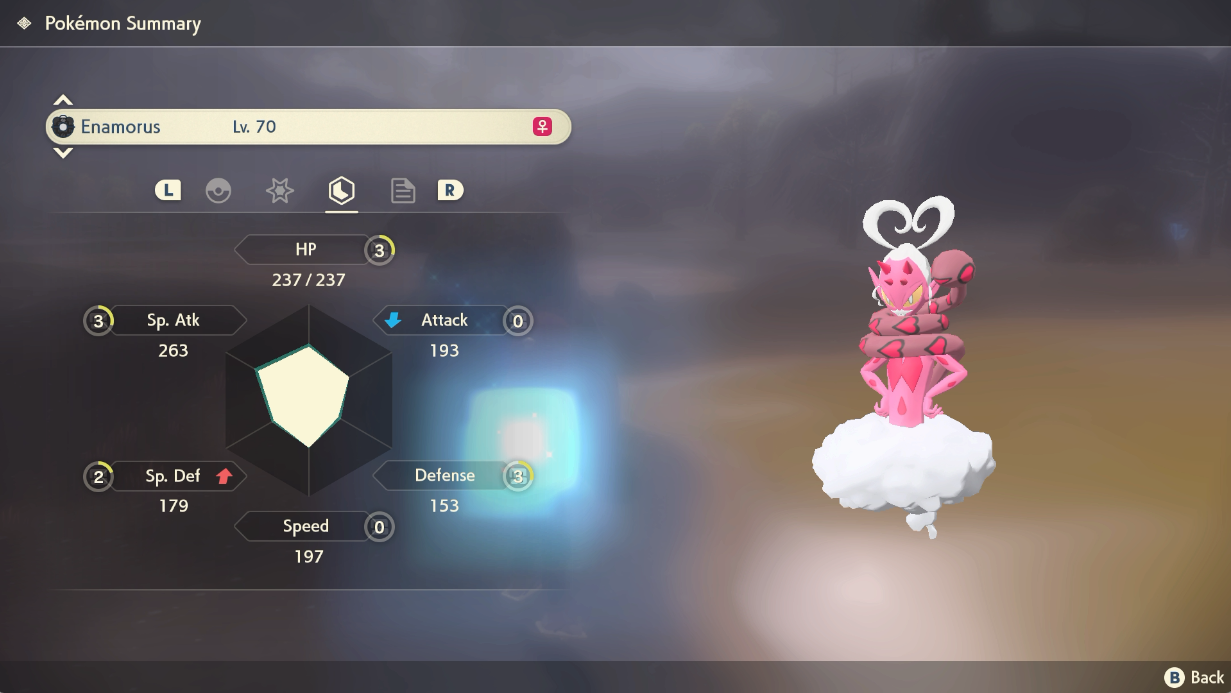
0-indexed Seedcheckbox is ACTIVE. - Select your target Pokémon from the list, in this case we are targeting Enamorus.
- Enter your search range, consider the time it takes to advance the RNG state.
- For Uxie, Mesprit, Azelf, Heatran & Cresselia, advancing the seed once takes around 30-60 seconds as they immediately respawn.
- For Phione, Manaphy, Shaymin, Darkrai, Tornadus, Thundurus, Landorus & Enamorus, advancing the seed once can take up to 5 minutes.
- It may take a long time to reach your target frame. It is recommended to have a
SearchDepthof 10-100 depending on the rarity of your target. - Enter any search filters on the right if you wish, such as filtering for 0 speed IV.
- Click search, you should now see your upcoming advances in the search result table.
If you do not find any results or do not like your seed, you will need to head back to Jubilife and repeat the process of resolving your group seed again. Do this until you find a desirable result.
Figure 5 - Target Found
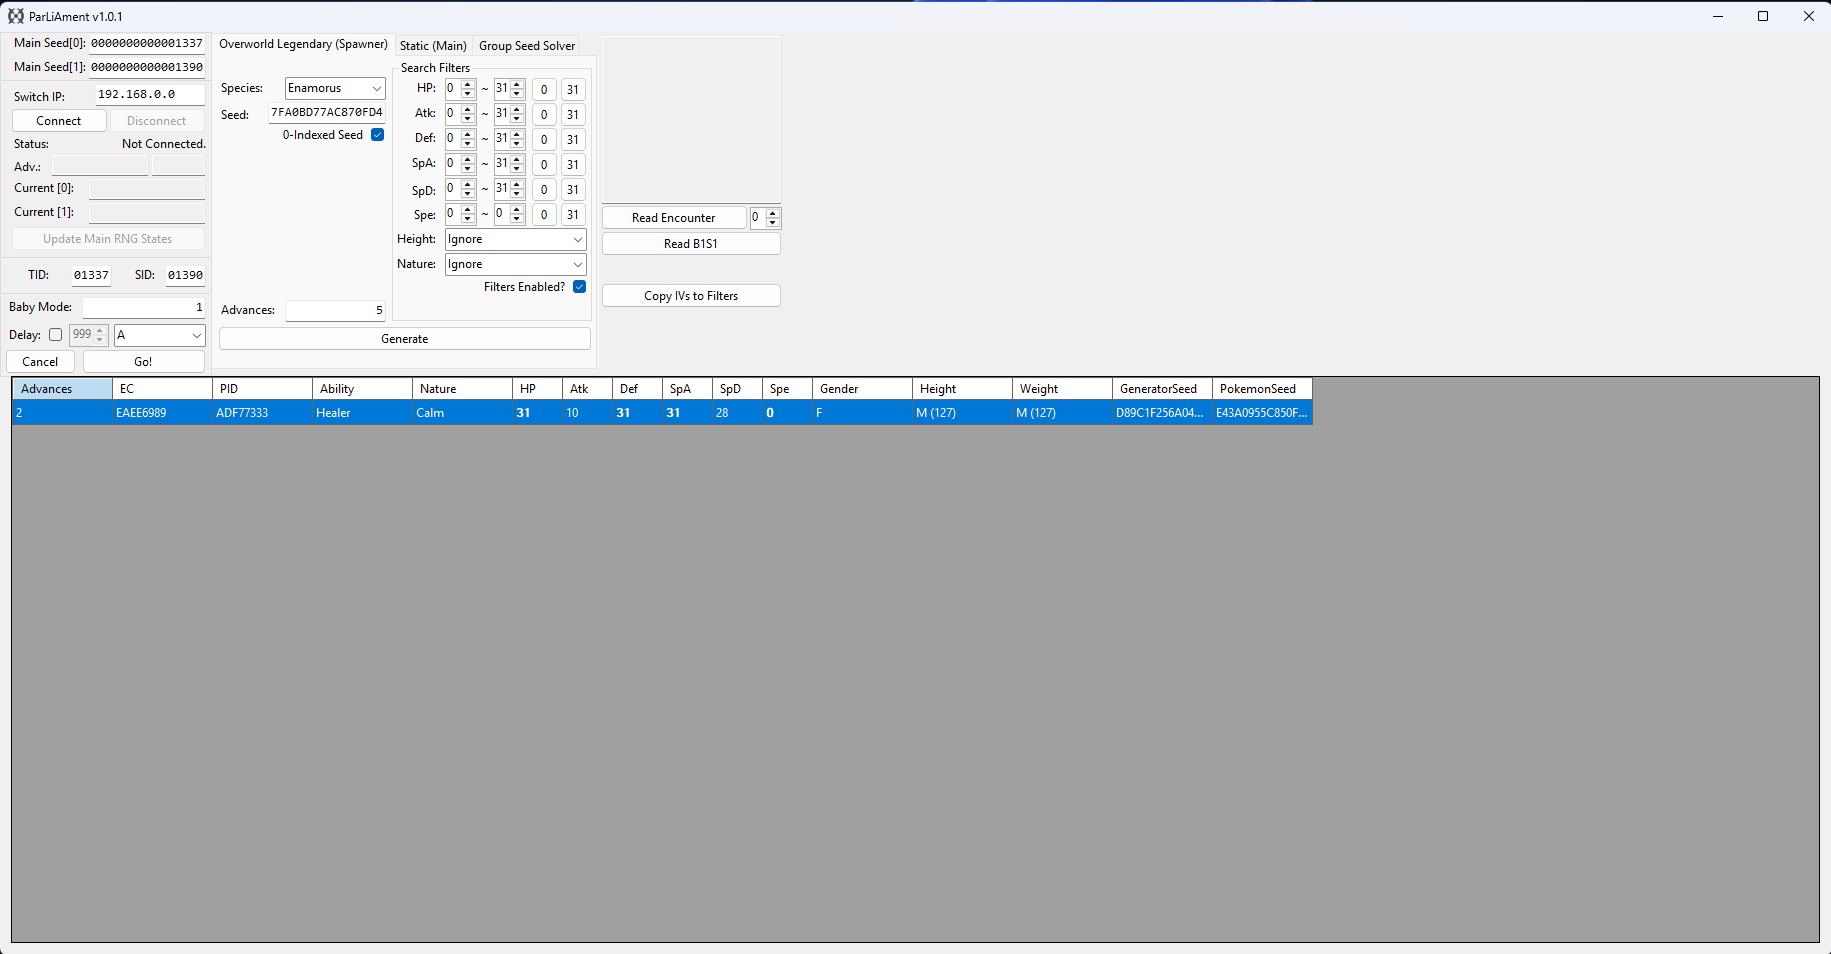
A target Pokémon that matches our desired conditions has been found! In this case we have found an Enamorus with 0 speed in 3 advances. We can now advance the RNG state using the method described above until we reach the desired state.
How to Track Your State
- Perform a search without filters, enter the search range of your target seed (for example, enter 50 as your search range and disable any filters if your target seed is in 50 advances).
- Click
Search, you should now see every frame leading up to your target, click the row you are currently on and follow along until you reach your desired target seed. - If you get lost along the way, simply save the game and capture whatever Pokémon is in front of you, then compare the IVs and Nature to the search result table.
- In Legends: Arceus, Effort Levels are displayed instead of exact IV counts, the conversion is as follows:
- IV of 0-20 gives it Effort Level 0
- IV of 20-25 gives it Effort Level 1
- IV of 26-30 gives it Effort Level 2
- IV of 31 gives it Effort Level 3
Figure 6 - Result Found