Wishing Piece Raid RNG (CFW)
This section provides a worked example of how to do Wishing Piece RNG manipulation for Max Raid battles. Wishing Piece RNG involves throwing a Wishing Piece into your chosen raid den, searching for a desirable result using PokeFinder, then advancing the seed by date skipping until the result has been acquired.
Figure 1 - Game Setup

First, you will need to pick the raid den or Pokémon that you wish to RNG abuse. Instructions on how to find your Den ID can be found on the main page. If you do not know how to find this information, go back and review the material starting from this point. Return to this page once you have picked a raid den and found the Den ID.
Next, you will need to activate a beam of the correct rarity. This is done by saving next to an inactive den, then using either of the following methods:
- Throw a Wishing Piece into the raid den and press the
Homebutton on your controller as soon as you see the beam colour. If the colour does not match your desired rarity, reset the game before it automatically saves and try again. - Throw a Wishing Piece into the raid den and let the game save. If the colour does not match your desired rarity, clear the den or throw a Wishing Piece into a different den. Since only one den may be activated by Wishing Piece at any time, this will deactivate your original raid den. This method consumes more Wishing Pieces.
Note - Event dens will always be of common rarity (red beam), which means you will need to use the second method and check the species inside the den to confirm that you have spawned an event den.
Need more Watts to buy Wishing Pieces? Visit the item RNG guide!
Figure 2 - Tool Setup

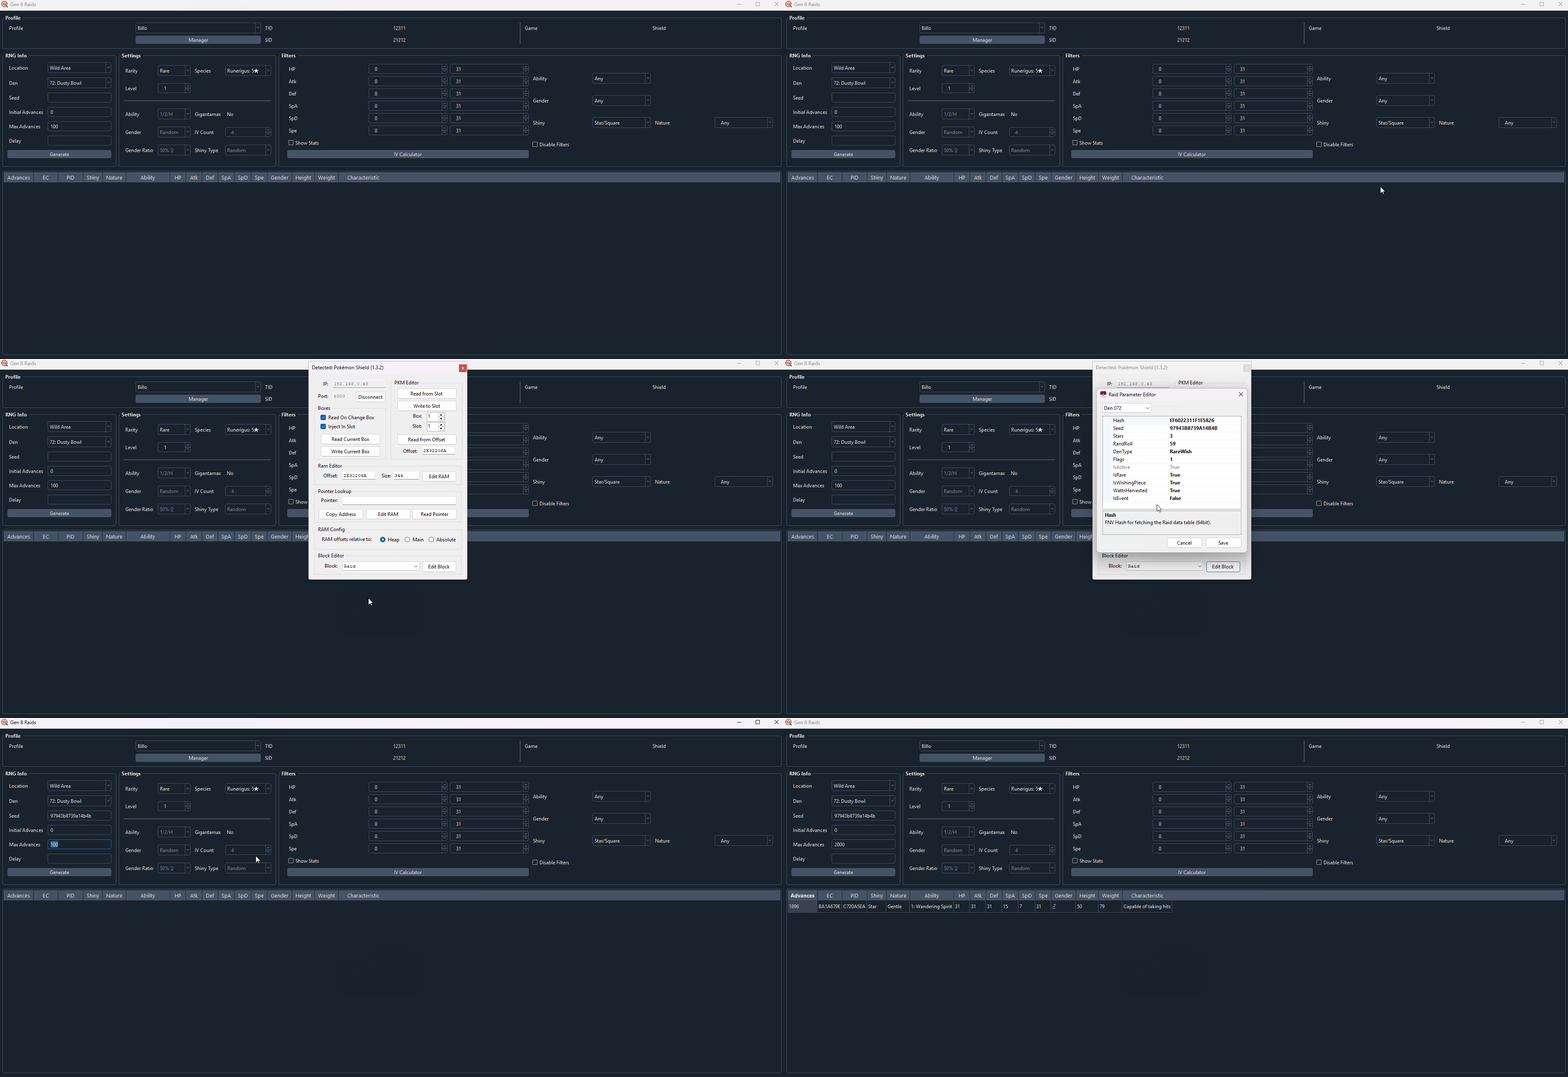
After acquiring the correct raid den rarity, you will need to configure PokeFinder accordingly. In this example, our search filters are configured to search for any shiny Runerigus within 10,000 advances. It takes roughly 1 hour to advance 7,000 days using the quickest method (Luxray date advancing). Keep this in mind when considering your search range.
Once you have configured your search filters in PokeFinder, connect to LiveHeX, open the correct Raid subwindow at the bottom, and select your Den ID in the dropdown. In this example, my Den ID is 72.
Copy the seed and paste it into the Seed field of PokeFinder. Hit the Search button. If your seed produces any Pokémon that matches your search conditions, they will appear in the search result table.
If you did not find any desirable results, consider setting less strict search filters, increasing your search range, or finding a different seed by clearing out the den and throwing in a new Wishing Piece.
Advancing the RNG State
Figure 3 - Target Found

In Figure 4 we can see that a shiny, Gentle-natured Runerigus appears in 1,896 advances (rare beam). It is now time to advance the seed by date skipping until we are close to the target.
The seed is advanced one time for each day that passes, which means we will need to advance 1896 days to hit our target seed. We can trick the game into thinking a day has passed using the Luxray date advancement tool (recommended for speed), or using the date skipping exploit (recommended if you dislike the idea of using Luxray to artificially modify the system date).
Note - Most players will want to target a specific species in the raid den. Unfortunately, the species cannot be RNG manipulated, so we can only roll it randomly. This is done by stopping exactly 3 advances before the target RNG state, saving the game, and repeatedly advancing 3 times to see if the species has randomly rolled to the correct one. Ensure that you subtract 3 from the total number of advances required if you plan to reroll species. In my case, I would advance 1,893 days as I wish for my shiny raid to be a Runerigus.
Date Skipping Methods
These are all of the possible methods used to advance the RNG state, from quickest to slowest:
Using Luxray (Quickest Automated Method)
- Launch Luxray through the Homebrew Menu.
- Type the number of days you wish to advance into the calculator. For safety, you may wish to stop a few days earlier in case the system time rolls over automatically.
- For targets >1,000 advances away, move to an indoor location like a Pokémon Center before date skipping. Skipping rapidly for a long time while standing in the Wild Areas can cause the game to crash.
- Click the
Stepbutton and wait for the calculator to count to 0.
PvP Date Skipping Exploit (Quickest Manual Method)
- Open the game and enter any Wild Area. Position your camera so you can see some active raid beams or claim the Watts from a nearby raid den.
- Open the Y-Comm, connect to the internet, and select the
Link Battleoption. - Search for a battle with no code to find an online battle as quickly as possible.
- Once you have entered the battle, cancel the battle by turning on
Airplane Mode. - Close any in-game menus and go back to the overworld.
- Change the console date forward in the
System Settings>System, then resume the game where you are looking at the overworld. - It is possible to skip multiple days at once without resuming the game. To do this, setting the date forward, hit
OK, and repeat this process until you have done enough days. You can only skip once each time you hitOK, so changing the date forward by more than 1 will still be treated as 1. - If you are in the Wild Area, resuming the game after advancing multiple days has a chance to crash your game! If you are advancing more than 1 month at a time, we suggest you move indoors to a Pokémon Center.
- If you did this correctly, the screen will flash, the currently active raid beams will change location, and any Watts you claimed will become available again.
- Repeat this process from step 4. The exploit remains active until the game is restarted.
"Invite Others" Date Skipping Exploit (Slow Manual Method)
- Open the game, enter any Wild Area and find an inactive raid den. You can use your chosen raid den if you wish.
- Throw a Wishing Piece into the raid den, then interact with it.
- Click
Invite Others, then minimize the game by pressing the Home button. - Navigate to
System Settings. Change the console date forward underSystem, then resume the game. - Back out of the raid and re-enter the overworld.
- If you did this correctly, you should see that you are able to claim Watts from the raid den again.
- Repeat this process from Step 3 onwards as much as needed.
NTP or Set to adjust the clock if you are going out of bounds.
Figure 4 - Species Manipulation

As stated previously, we cannot RNG manipulate species for Max Raid dens; we must randomly roll them. Raid dens lock the species for the first 2 days from the current day, but the 3rd day is random. Therefore, we must repeatedly advance 3 days until the species we want appears in the raid den. This is why it is important to stop 3 advances/days before the target if you want a specific species.
At this stage, you should be exactly 3 advances/days away from your target (today(0), second day(1), third day(2), target day(3)). From here, you can reroll the species on the "target day".
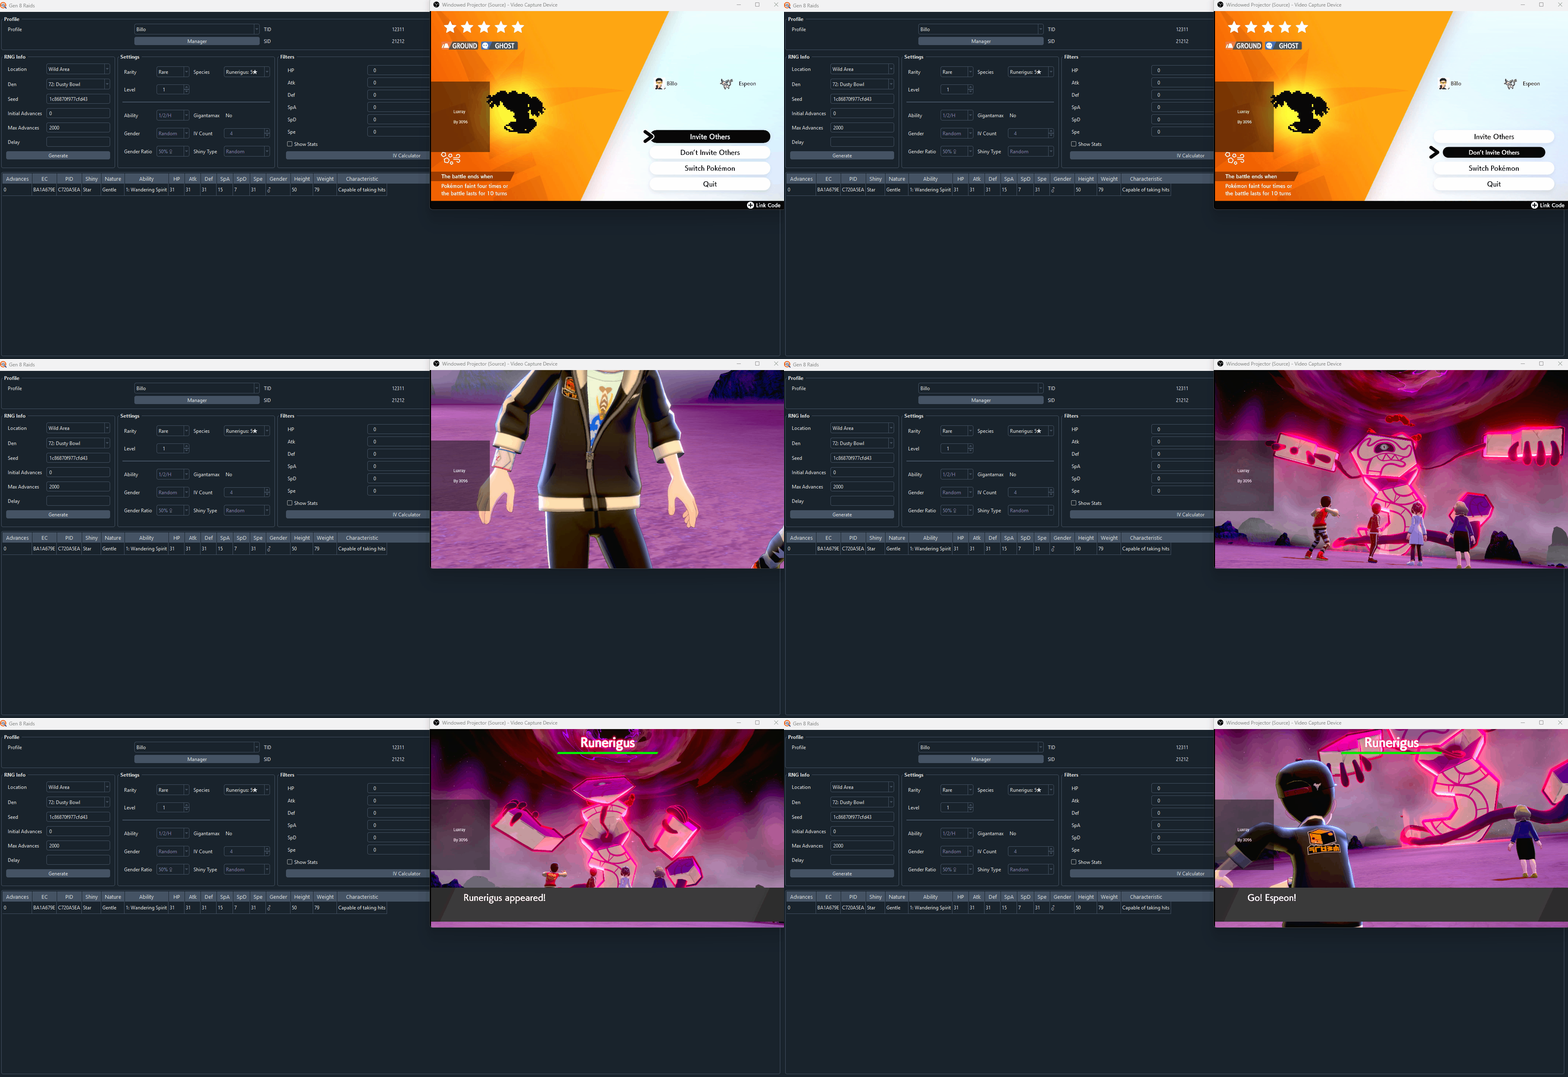
In the above image, the game has been saved and we are 3 advances away from the target. After advancing the seed 3 times, we started the raid to confirm that the Pokémon is shiny, but the species was wrong. This problem can be resolved by doing the following:
Rerolling the Raid Species
- Check your seed and confirm that you are exactly 3 advances away from the target.
- Save the game once you are confident that you are in the correct state.
- Advance the seed 3 times by date skipping. Open the raid den lobby and check the species. If the species is not what you wanted, reset the game.
- You should now be standing besides your den, and the raid seed should be 3 advances away again. Repeat step 3 until your desired species appears.
- (Optional) Save the game after acquiring your desired species if you intend to share it with friends.
Be careful that the date does not automatically advance while you are doing the "3 day" method. You can change the system time to earlier in the day. If system time naturally advances past midnight, the seed will advance as well, which can cause you to go past your target.
Figure 5 - Result Found

The Max Raid den now contains the desired species. In this case, a 5 star shiny Runerigus! We can now capture the Pokémon or share the raid with friends.
That's all there is to manipulating Max Raid Battles using Custom Firmware!