BDSP Static Encounter RNG (CFW)
This section of the guide covers how to RNG manipulate Pokemon from static encounters. Static encounters are defined as Pokemon that engage in a wild battle after interacting with them, not to be confused randomly occuring wild encounters.
Ensure that the autosave feature is disabled, and that you have enough resouces (Pokeballs, healing items, etc.) to successfully capture the Pokemon you plan to RNG manipulate.
At this stage you should have already followed all of the setup and installation instructions found on the initial page of this guide.
Missed some setup instructions? Click here to go back!In BDSP, the game operates on a constantly advancing RNG seed, which determines all random events such as shininess, and stats of encounters. Moarencounterbots can track & monitor seeds in real-time and even automate seed progression to a specific point. This automation handles the tedious RNG work, allowing you to focus on finding and hitting targets instead.
For most static encounters, you will need to consider the "delay", which is the number of frames the game takes to generate a Pokémon after input. For example, if the target is on frame 100 with an 85-frame delay, initiate the encounter 85 frames beforehand (100-85=15). A recommended list of delays for each encounter can be found inside the table below.
A list of screens can be found by clicking the hyperlinks in the table, these are the screens of the final button input, which is where you should be when attempting to hit a target frame.
| Type Of Encounter | Recommended Delay |
|---|---|
| Starters | 64 |
| Honey Tree | 0-2 |
| Dialga/Palkia | 84 |
| Uxie | 85 |
| Mesprit | 85 |
| Azelf | 85 |
| Giratina | 84-85 |
| Heatran | 84-85 |
| Regigigas | 85-86 |
| Cresselia | 102-104 |
| Ramanas Park Legends | 84 |
| Shaymin | 1350-1385 |
| Darkrai | 84-85 |
| Arceus | 84-85 |
| Rotom | 89-90 |
| Drifloon | 84 |
| Spiritomb | 84 |
Note -Dialga/Palkia delays are based on the post Elite 4 encounter, attempting to manipulate these encounters before completing the Elite 4 will result in extra unwanted instability.
With all the required reading out of the way, it's time to get to work!
The Process
First, you will need to configure PokeFinder to match the details of the Pokemon you are hunting, then set the desired search filters.
Figure 1 - PokeFinder Setup
Click the Gen 8 -> Static button after launching PokeFinder to open the main window for static Pokemon. Here is where we will fill in all the details about the Pokemon being hunted.
RNG Setup
- Select the correct
Profilein the dropdown menu at the top of the PokeFinder window. - Select
Leadif you are using a Pokemon with an influencing ability (like Synchronize). - In the
Max Advancesfield, enter the amount of frames you are willing to search through. - Enter the delay inside the
Delayfield, pick the lowest possible number (refer to the delay table). - In the
Settingssection in the middle, specify Pokemon and encounter details (e.g Roamer, Mesprit). - Configure your search filters on the right, such as searching for any Shiny, or a 6IV Pokemon. Filters can be also combined.
Having a Pokemon with the ability Syncronize ensures that all encountered Pokemon have the same nature as your Pokemon. Your synchronizer needs to be the first team member in your party to work properly.
Next, you will need to find your current seed, this can be done using Moarencounterbots (SysBot.NET).
Figure 2 - Finding Current Seed
To easily obtain your current seed at any given point you can use the EncBotCopySeedBS routine in Moarencounterbots. You will need to toggle a few settings in the Hub tab to output the seed that is expected by PokeFinder.
CopySeed Setup
- In the
Hubtab, open theEncounterRNGBSdropdown menu. - Select
Bit64PokeFinderin theDisplaySeedModedropdown menu. - Set the
MonitorRefreshRateto 0, this will be needed later. - In the
Botstab, type the local IP address of the console. - In the dropdown menu on the right, select
EncBotCopySeedBSand add the bot.
When starting the EncBotCopySeedBS bot at any point your seed will be produced inside the Logs tab. These seeds can be pasted into the Seed 0 & Seed 1 fields of PokeFinder to search for targets that match your search parameters.
Save the game, then run EncBotCopySeedBS and paste the seeds into PokeFinder and hit search, repeat this process until a result that matches your search parameters has been found.

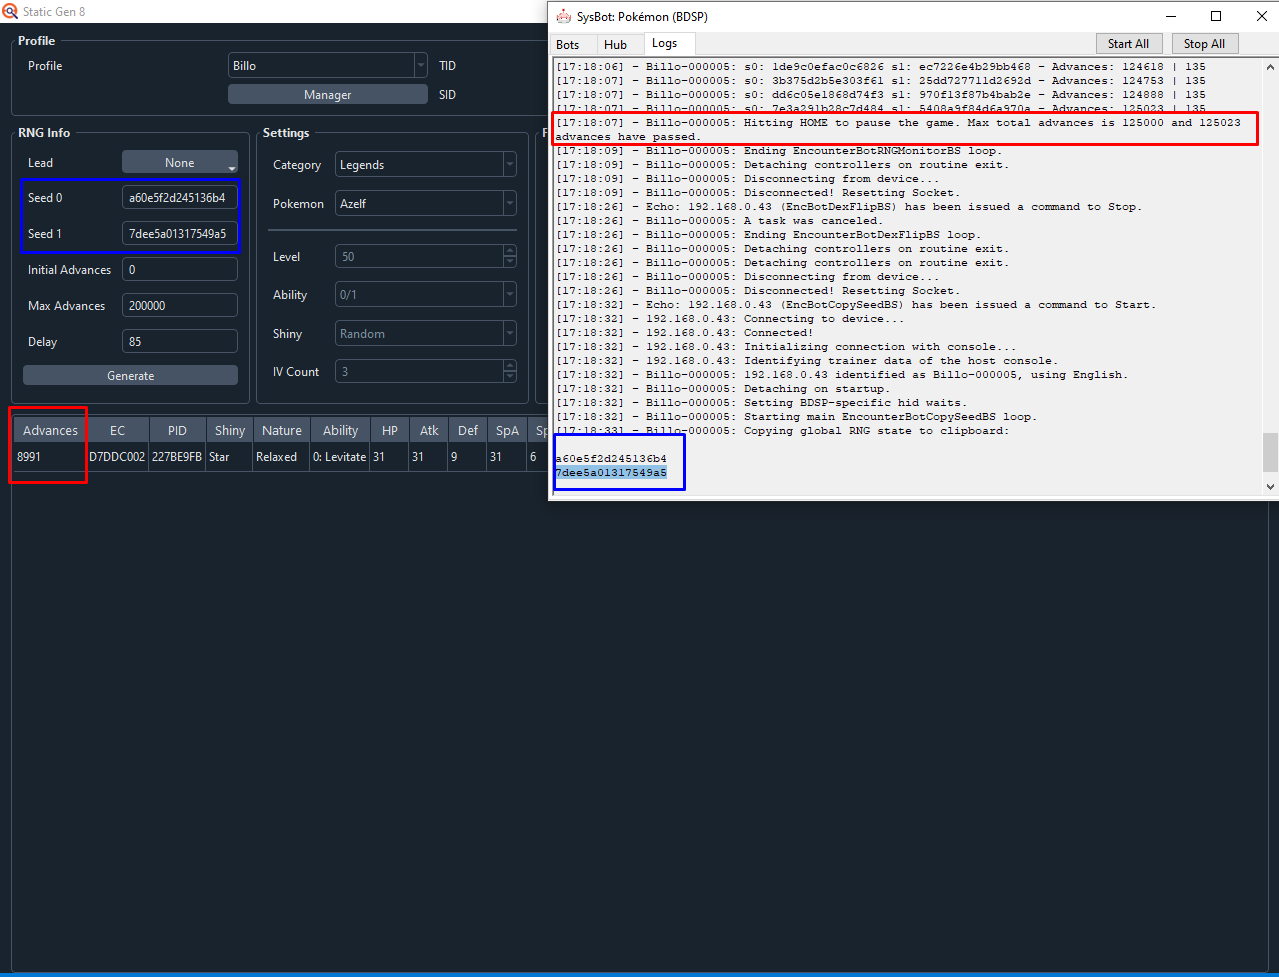
A Shiny Azelf that matches the search filters has been produced in 135305 advances. Since delay has been considered (85), this is the exact frame that we will aim to press the A button to initiate the encounter.
Undesirable Result?
- Reset the game to refresh the seed, then enter the overworld.
- Run
EncBotCopySeedBSagain to produce a new seed. - Paste the new seeds into PokeFinder and search again.
- Repeat until a desirable result has been found.
Consider increasing the search range if you are consistently finding "bad" seeds. Moarencounterbots is capable of advancing millions of frames with ease using the EncBotDexFlipBS routine. Alternatively you can opt to use less strict search filters.
From here you will need to advance towards your target frame. The majority of the work can be done using Moarencounterbots, but this will require changing extra settings inside the Hub tab.
To advance large distances as quickly as possible, use the EncBotDexFlipBS routine. A description of this routine can be found here. Having a decent chunk of your Pokedex completed is important for optimizing this method.
Settings Toggles
- In the
Hubtab, open theEncounterRNGBSdropdown menu. - Set the
MaxTotalAdvancesvalue to ~10,000 frames before your target (e.g if Target is at 100,000, set to 90,000). - In the
Botstab, type the local IP address into the assigned field and remove any other active bots. - In the dropdown menu on the right, add both
EncBotDexFlipBSandEncBotRNGMonitorBS
After the settings have been properly toggled, open the Pokedex in game, disconnect all controllers using the unsync button, then start the bot. The bot will automatically pause the game when the MaxTotalAdvances has been reached.
Controller Connectivity Troubleshooting
- JoyCons - Slide the JoyCons onto the Joycon rail then press any button to sync them to the console.
- Pro Controller - Reconnect the controller from the controller settings if you are having issues with automatically connecting, or the controller is synced as a second controller.
You do not need to use the Dex Flip routine if your target is of a small distance away or if you are manipulating your starter Pokemon, standing in the overworld while monitoring your seed is effective enough in these cases.
Figure 5 - Dex Flip Complete
Final Advancements
Once you are close to your target frame (within ~10,000 frames), you will need to advance the rest of the way and hit your target frame slowly using EncBotRNGMonitorBS to monitor your seed.
The recommended method of hitting a target frame accurately (particularly in fast paced environments), is by pressing the home button twice to resume and pause the game, this technique is known as "home mashing". While you can hit targets without using this technique, it is considered less consistent.
- With the game in the Home Menu, remove all active bots and add
EncBotCopySeedBSto the bot list, then click theStart Allbutton and paste your new seeds into PokeFinder, this will provide your new starting frame. - Remove
EncBotCopySeedBSand addEncBotRNGMonitorBSinstead, then start the bot to begin monitoring your seed. If done correctly the logs should start from advance 0. - Unpause the game, stand within a single
Abutton press of your target encounter, then let the RNG state advance until you are within a few hundred frames of the target.
You may optionally choose to manually advance the RNG state by scrolling the Pokedex. Be careful not to overshoot your target!
- Interact with your chosen encounter, reach the screen of the final button press (see the delay table if unsure), then pause the game using the Home Menu.
- Use the home mashing technique mentioned above to inch towards your target frame slowly, once you hit the correct target frame keep the game paused on the Home Menu.
- Quickly spam the
Abutton to initiate the encounter, if done correctly the encounter should match what is expected by PokeFinder.
For Roaming encounters (Mesprit & Cresselia), the internal details are set in stone after setting them free, you will then need to chase them down and initiate a battle for comfirmation instead.
Shaymin Specifics
Shaymin is located in an area where the RNG state advances rapidly, making it mostly uncontrollable and very difficult to hit your target frame. So far, there are two main methods:
- Using the above method to try hitting a target, often advances the RNG state rapidly in multiples of 8 (inconsistent).
- Using the Grand Underground, where the RNG state advances much slower, to attempt to hit the correct target (more consistent).
If you are using the second method, the goal will be to resurface from the underground on the correct target frame then mash the A button to initiate a battle with Shaymin. The recommended delay range in the delay table is for using the Grand Underground method.
Regardless of the method used, expect Shaymin to take a large number of attempts before actually achieving your result.
Figure 6 - Target Frame Hit
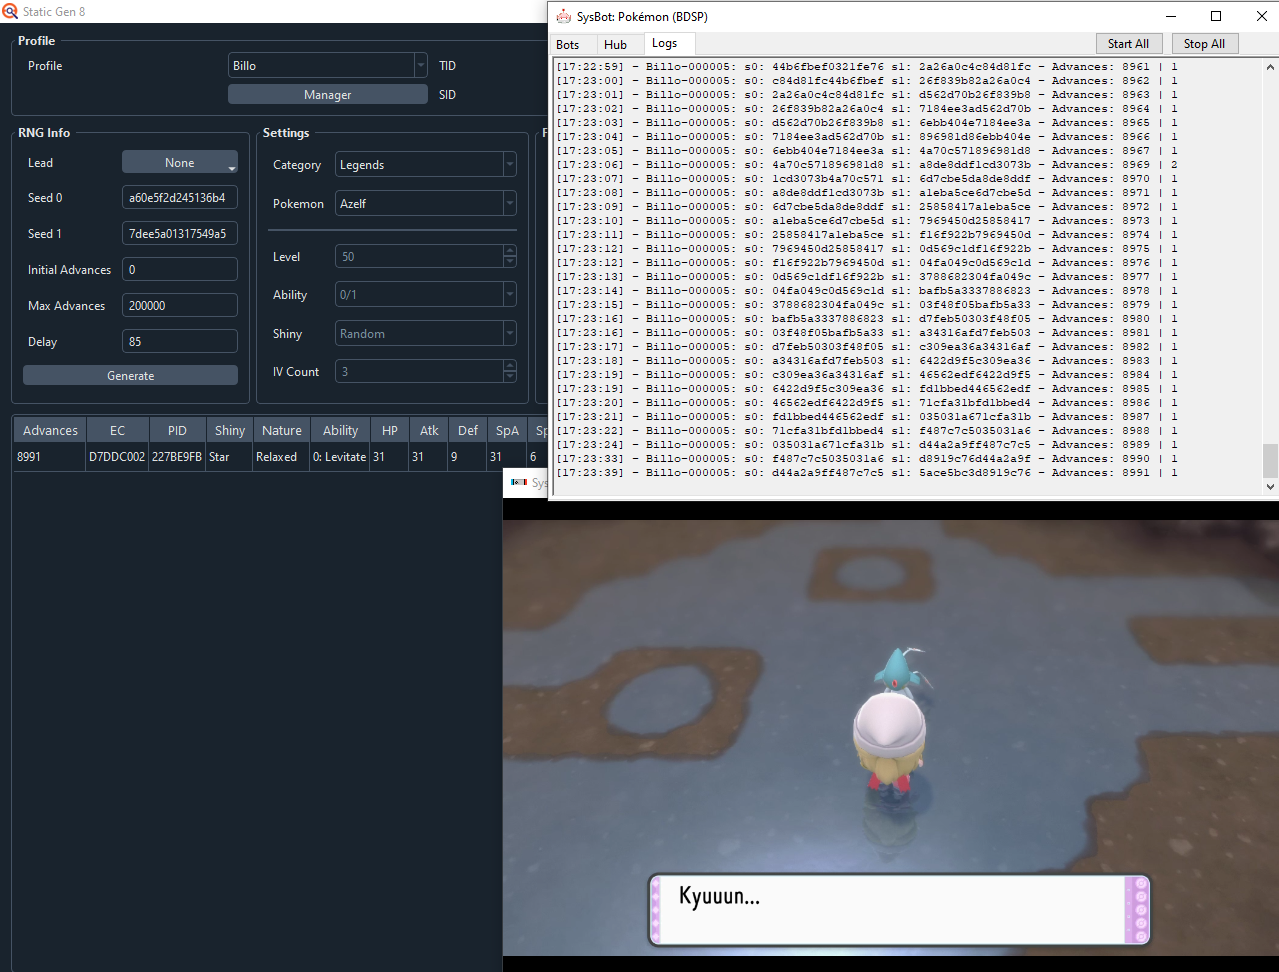
PokeFinder displays the target on advance 8991, delay has already been entered into the Delay field (85), and SysBot logs indicate that 8991 advancements have occured, so we can now mash the A button to initiate the encounter and see if we hit the correct target frame.
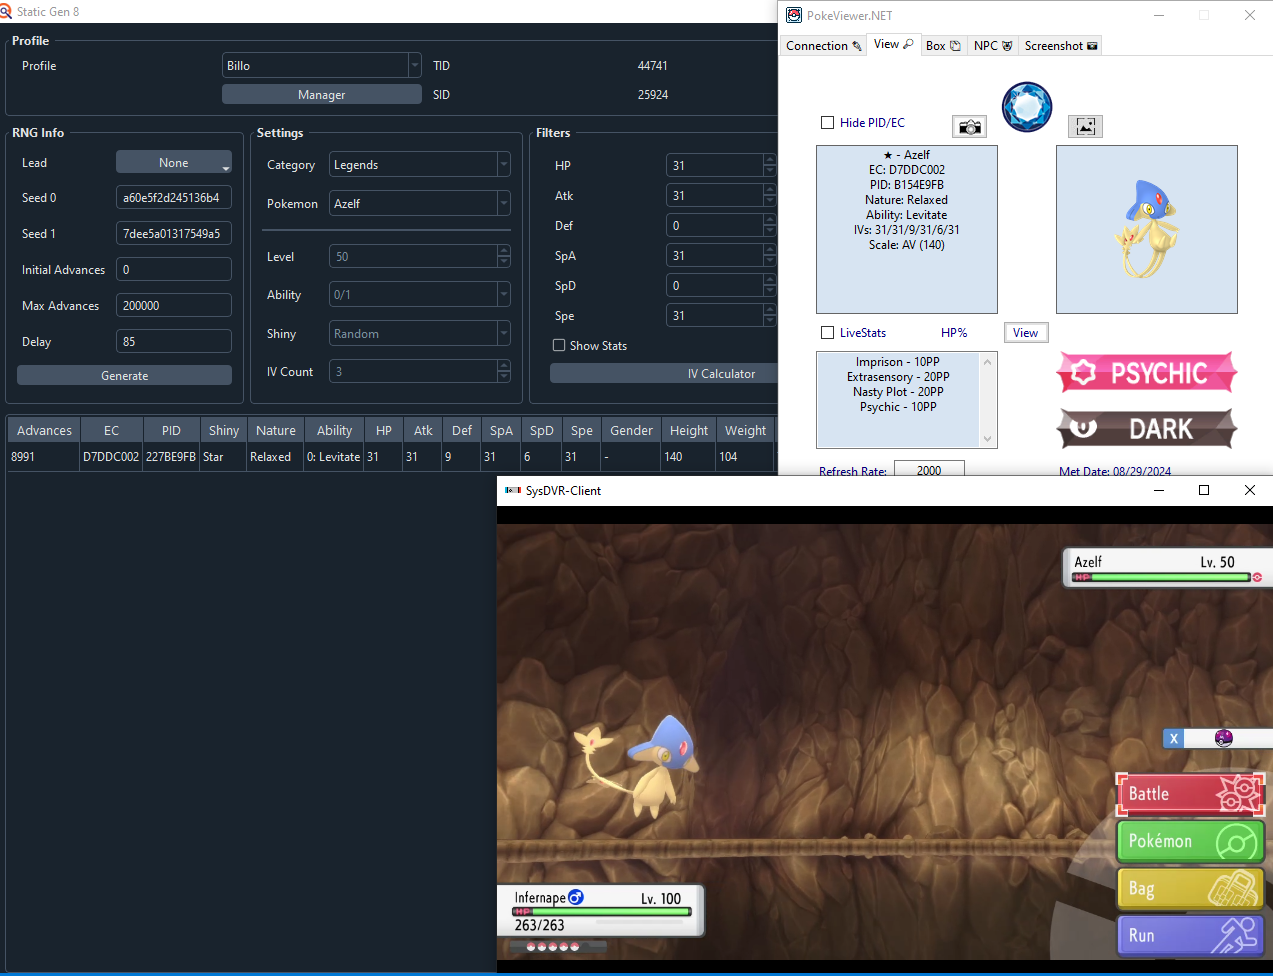
After opening PokeViewer.NET and using the Battle View function, we can see that the Pokemon matches the PokeFinder search result. Mission accomplished!