Grand Underground RNG
Grand Underground RNG manipulation can be used for any Pokémon found within the whole of the Sinnoh Grand Underground. This can serve as an alternative method of RNG manipulation if you are opposed to manipulating standard wild encounters or eggs.
How Does This Work?
In Brilliant Diamond/Shining Pearl the game determines the outcome of "random" events using a constantly advancing RNG seed. Using tools like PokeFinder and SysBot.NET we are able to predict the outcome of these random events and understand exactly when a desirable result will be produced and take advantage of this.
Moarencounterbots is able to track and monitor RNG seeds in real time as well as advance the RNG state until a given point, removing the vast majority of work that would otherwise be tedious. This allows the player to put their efforts into more important factors like hitting their target frame instead.
Additional Information
Pokémon that are generated within a Pokémon Hideaway will remain spawned until the player leaves the cave. This means that the only time sensitive portion of this RNG is ensuring that you enter the correct cave on the right frame. Your target Pokémon can then be encountered at any point before leaving the Pokémon Hideaway.
Any Pokémon found inside Pokémon Hideaways can also be hatched from egg, with the exception of Ditto. Egg RNG manipulation can provide boosted shiny rates and higher IVs, so we recommend using it instead Grand Underground manipulation where possible (or if you are NOT targeting Ditto). If you still wish to proceed however, you can continue following the content on this page.
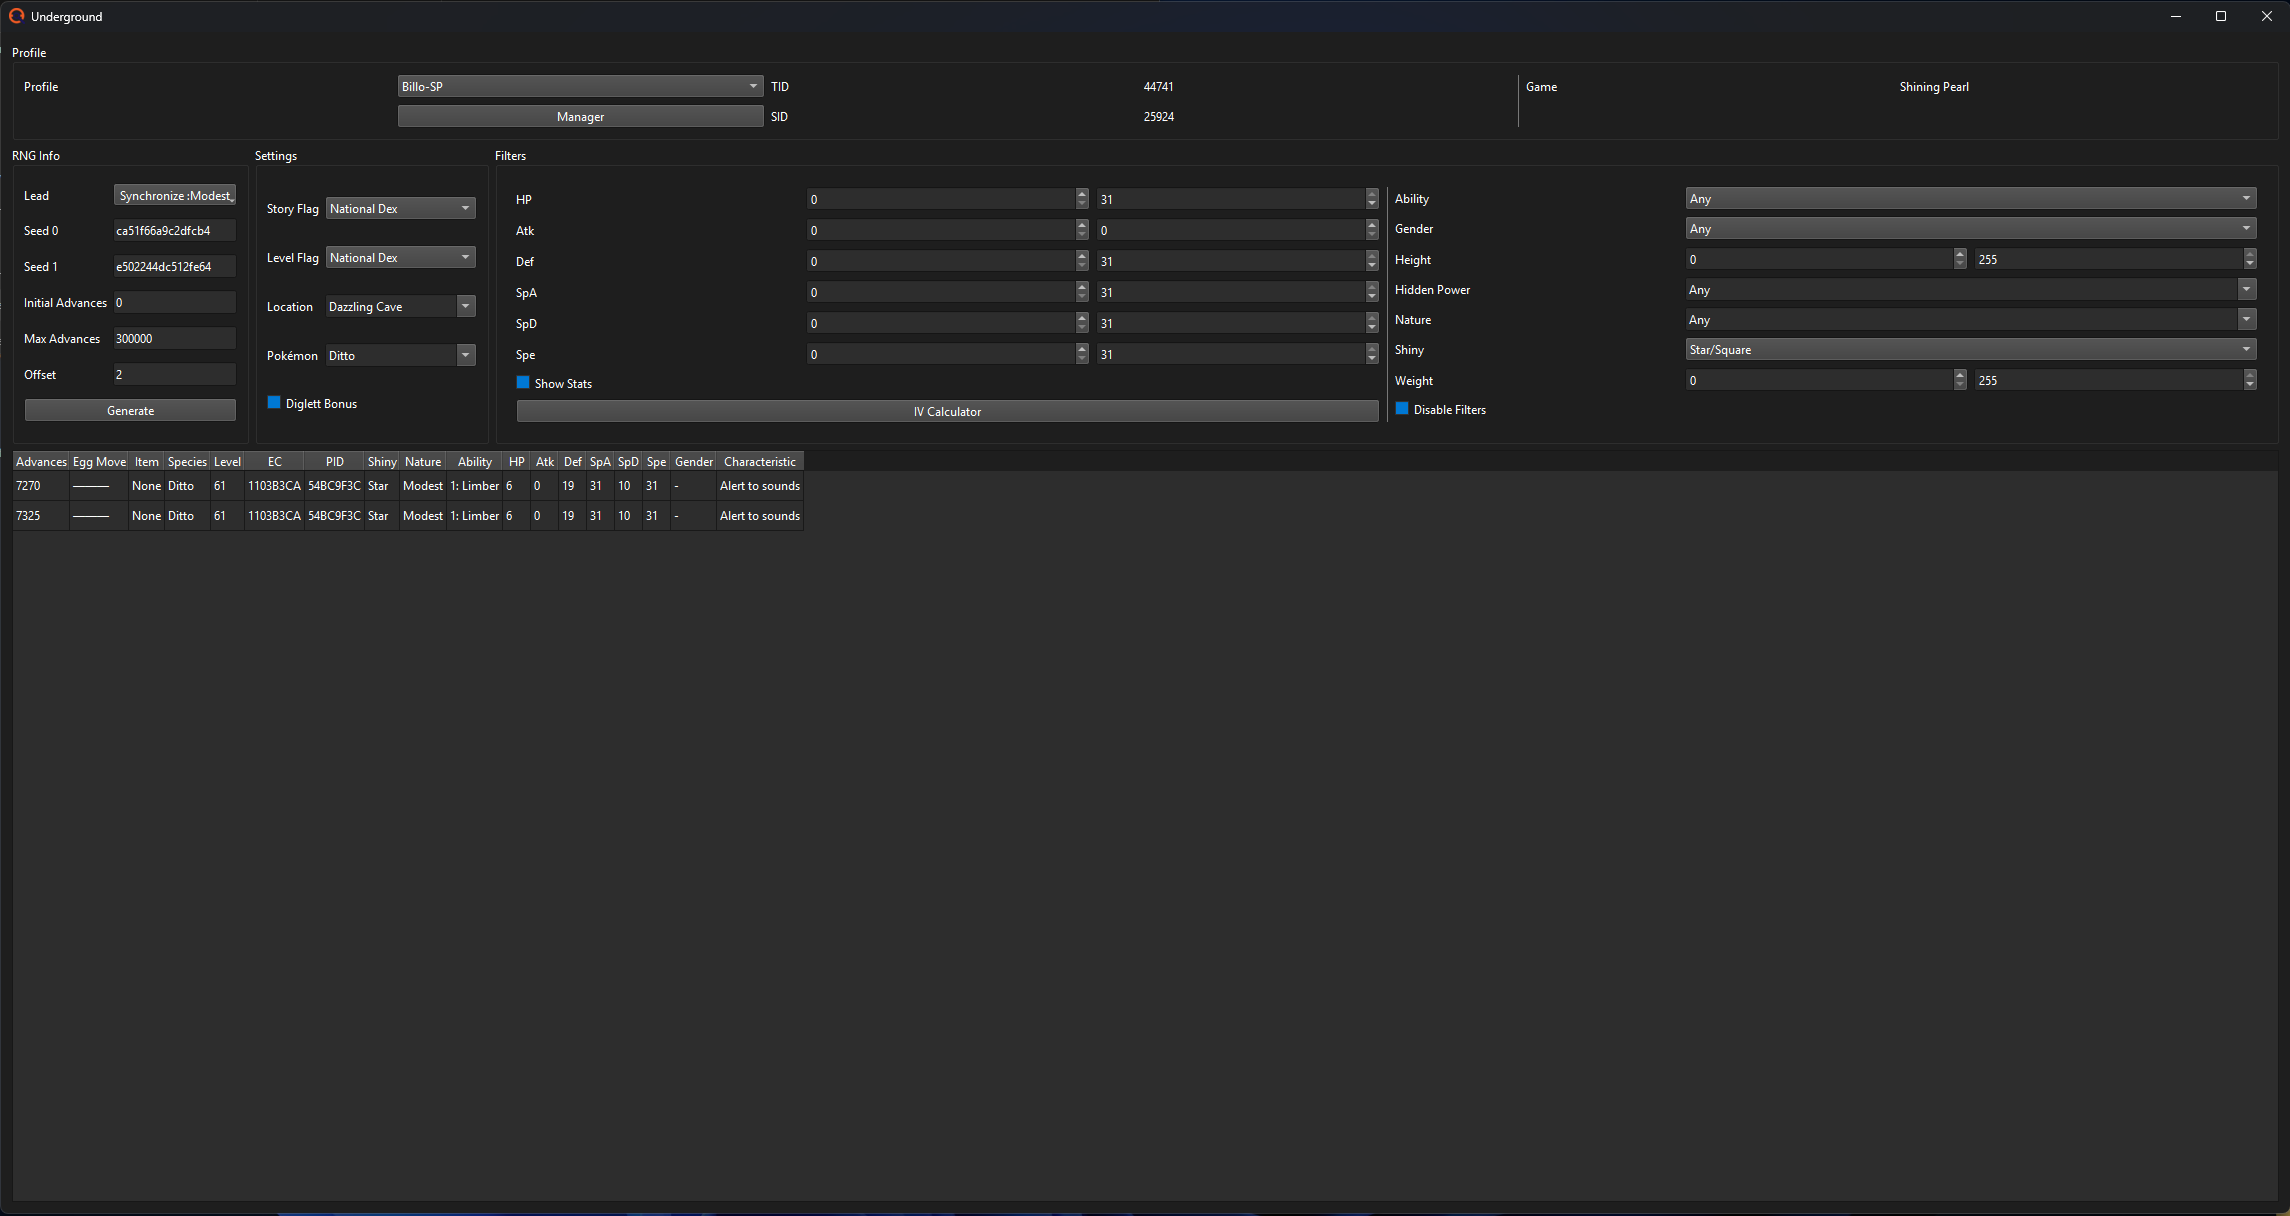
Figure 1 - PokeFinder Setup

Click the Gen 8 -> underground button after launching PokeFinder to open the main window for underground manipulation. Here is where we will fill in the relevant details required for this RNG, such as entering game progress, Cave ID, and details of our desired target.
RNG Setup
- Select the correct
Profilein the dropdown menu at the top. - Select
Leadif you are using a Pokémon with an influencing ability (e.g. Synchronize). - Enter the amount of advances you wish to search through into the
Max Advancesfield. - In the
Settingssection in the middle, specify the story flag, level flag, location (Hideaway ID), and target species. - Select the checkbox at the bottom if you intend to use Diglett Bonus to boost your shiny rates.
- Configure your search filters, such as filtering for a shiny Pokémon with 0 IVs in attack.
Figure 2 - Game Setup
Ensure you have all the required items and Pokémon you will need to successfully capture your target Pokémon, after doing so, set your game up in this specific state:
- Head to the overworld location that contains your target Pokémon, then use the Explorer Kit to bring up the Grand Underground connectivity options.
- Select the
Play aloneoption, then enter the Grand Underground and navigate close to the Hideaway that contains your target. - This GIF demonstrates the ideal positioning your character should be in before saving the game.
- Entering and exiting the Hideaway that contains your target Pokémon will put you within a one-tile radius of the loading zone, which is ideal for this RNG.
- You can also take this time to ensure that the correct Pokémon is placed in the lead position of your party, for example, if you are using a Pokémon with the ability Synchronize for nature control purposes.
- After confirming that you are properly set up you should save the game, then close and re-open the software from the Switch System Menu. This will help to remove any unwanted advancements.
Restarting the game may seem unnecessary but is a requirement for the sake of consistency. If you do not save and restart the game after entering the Grand Underground you will observe that the RNG state still advances with the Switch Home Menu open. This makes the RNG manipulation process more difficult than it needs to be.
Figure 3 - Finding Your Seed
To easily obtain your current seed at any given point you can use the EncBotCopySeedBS routine in Moarencounterbots. If you have already followed the setup instructions found on the main page the bot should be configured to output the seed in the way PokeFinder expects. If you did not do this yet or your settings have changed for whatever reason, follow these instructions:
Settings Toggles
- Open SysBot.exe and navigate to the
Hubtab. - Open the
EncounterRNGBSdropdown menu to display the relevant settings. - Under
DisplaySeedMode, selectBit64PokeFinder. - Set the value in
MonitorRefreshRateto0.
Grabbing Seed Information
- Navigate back to the
Botstab, enter your IP address, then addEncBotCopySeedBS. - Stand in the overworld in-game, press the
Homebutton, then clickStart All. - Navigate to the
Logstab. Your seed should be visible here (split into 2 sections referred to as "Seed 0" and "Seed 1"). - By default your seed will be copied to clipboard, but pasting directly into PokeFinder will not work.
- Copy the top half of the seed into the
Seed 0field of PokeFinder. - Copy the bottom half of the seed into the
Seed 1field of PokeFinder. - You can now click the
Generatebutton to search for targets that match your parameters. - You may wish to calibrate your Delay/Offset first before searching for target frames! See below for more information.
If you do not find any results consider increasing your search range, applying less strict search filters, or restarting the game to generate a new seed. Repeat this process until a desirable seed has been found.
Figure 4 - Delay/Offset Calibration
For encounters in the Grand Underground it is in your best interest to calibrate your commonly hit Delay/Offset, as it will be slightly variable depending on your current location. In most cases you should expect to see Offsets of 0-2, but may experience more significant variation.
It is assumed that you have optimal positioning when calibrating delay. Ensure that you are positioned optimally before continuing.
Step-by-Step
- Launch the game then enter the Switch Home Menu by pressing the
Homebutton on your controller. You should now be on the Home Menu with your cursor hovered over the game you are playing. - Add
EncBotRNGMonitorBSto the list of active bots and clickStart All, then head over to the logs tab to observe your current RNG state. - The goal is to observe the number of advances consumed by entering the Pokémon Hideaway, so you will need to keep a close eye on the logs tab going forward.
- Press the
Homebutton again while holding the direction on your control stick that moves you into the loading zone of the Pokémon Hideaway. - As the screen transitions to black you will need to observe the amount of advances that are consumed by watching the logs tab.
- Try to observe the number of advances that are consumed between you entering the Pokémon Hideaway and the moment the Pokémon was generated, this should be a low number (< 10) when positioned optimally.
- In my case (see above image) we can see that after entering the Pokémon Hideaway there were 2 extra advances, then a large jump of 150 advances was observed. This indicates that the Pokémon inside the Hideaway were generated.
- As two advances were consumed before the Pokémon inside the Hideaway were generated, our Delay/Offset for this attempt is 2.
- Exit the cave and repeat this process a few times from step 1 to figure out the offset you are most commonly hitting, then enter that value into the
Offsetof the PokeFinder window.
The Process
Figure 5 - Target Found
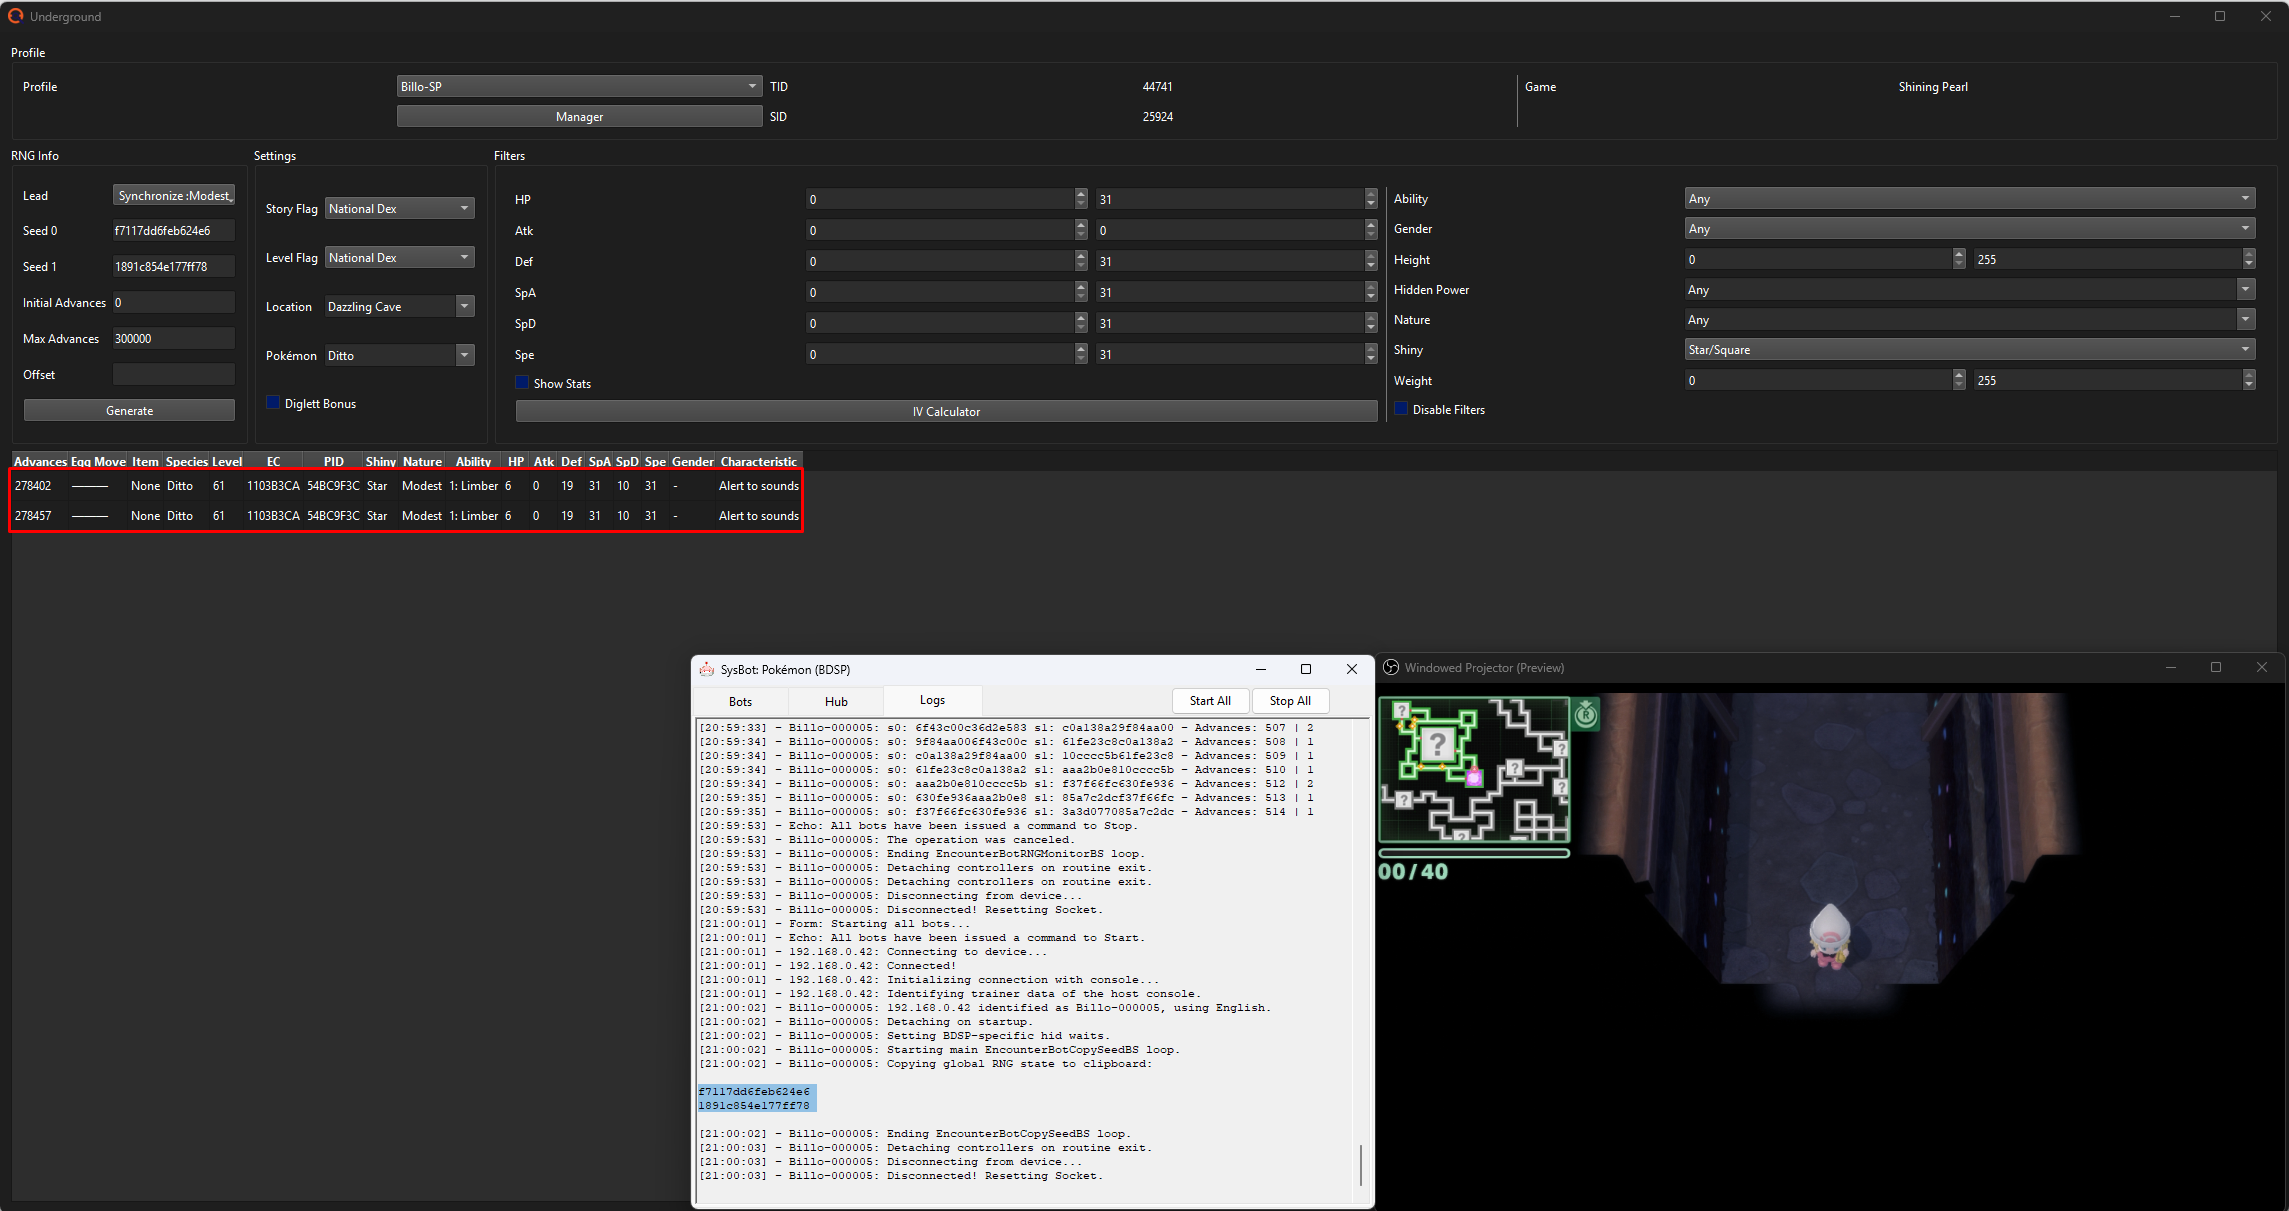
In Figure 5 we can see that a Shiny Ditto will be produced in 278,402 advances. Earlier we calibrated a common offset of 2 and this value has been entered into PokeFinder. Now the goal is to generate the Pokémon inside the Hideaway on the correct frame given by the PokeFinder search results.
To automate the process of advancing the RNG state we will be using the Moarencounterbots EncBotDexFlipBS routine. EncBotDexFlipBS flips back and fourth between Pokédex entries to advance the current seed until a given point. This quickest known method to advance the RNG state in this game.
EncBotDexFlipBS Setup
- Navigate to the
Hubtab and open theEncounterRNGBSdropdown menu. - Set your
MaxTotalAdvancesrelative to the amount needed to reach your target frame. - It is recommended to subtract 10,000 from the total number of required advances to give yourself time to position your character properly after the seed advancing has been completed.
- Head back to the
Botstab and remove any currently active bots. - Add the
EncBotRNGMonitorBSandEncBotDexFlipBSbots instead. - Open the Pokedex in-game in either Sinnoh or National mode.
- Enter a section of the Pokédex that has at least 10 registered Pokémon in a row to increase effectiveness of the DexFlip routine. It is recommended to place cursor somewhere in the middle of the Pokédex if you can.
- Disconnect any controllers, then click the
Start Allbutton on Moarencounterbots. - If everything was done correctly you should now see that the bot has started to flip between Pokédex entries very quickly.
- Navigate to the
Logstab and wait for the DexFlip routine to complete. - Click
Stop Allonce DexFlip has finished to completely stop any active bots.
If the bot does not begin flicking through Pokedex entries after clicking Start All to initiate the DexFlip routine, stop the bot and confirm that all controllers have been fully disconnected and click Start All again. This routine relies on taking control of button inputs and will not work if any other controllers are connected to the device. Controllers can be resynced after the routine has completed.
Figure 6 - Dex Flip Complete
At this point you should be around 10,000 advances or less away from your target. To confirm exactly how far away you are from your target you will need to remove all currently active bots, then add and start EncBotCopySeedBS.
Step-by-Step
- Stand outside the Pokémon Hideaway that contains your target, ensure to use optimal positioning as explained earlier.
- Press the
Homebutton, then runEncBotCopySeedBSand enter your new seed into PokeFinder. Search for your target again to get your new target frame. - Remove
EncBotCopySeedBSand add and startEncBotRNGMonitorBSinstead to begin monitoring your RNG state. - Confirm that you have started a fresh instance of
EncBotRNGMonitorBS. Seed monitoring should begin from advance 0, NOT wherever you left off! - Resume the game open the Pokédex, then manually scroll through until you are within 200-1000 advances away from your target, then open the Switch Home Menu.
- Unpause the game and monitor the RNG state until you reach your target frame, this should match the exact frame shown on PokeFinder's search result table.
- A technique called "Home button mashing" is used to help ensure that we land directly onto our target frame. Quickly pressing the Home button twice will resume, then pause the game. We can use this technique to inch closer to our target frame and land directly onto it in most cases.
- In the event that we cannot land directly onto our target frame this will need to be treated as a failure and you will need to restart the process again by finding a new seed and target frame.
- You should now be on the Home menu and the SysBot
Logstab should indicate that you have reached your target frame. Press theHomebutton again while holding the direction on your control stick that moves you into the loading zone of the Pokémon Hideaway.
Figure 7 - Target Frame Hit
We have resumed the game on our target frame (7270) and pressed the DOWN on the control stick to enter the Pokémon Hideaway. Now it is time to confirm that we have hit the correct target frame by running through the cave and searching for the any Pokémon that matches our target species and encountering it.
Figure 8 - Result Found
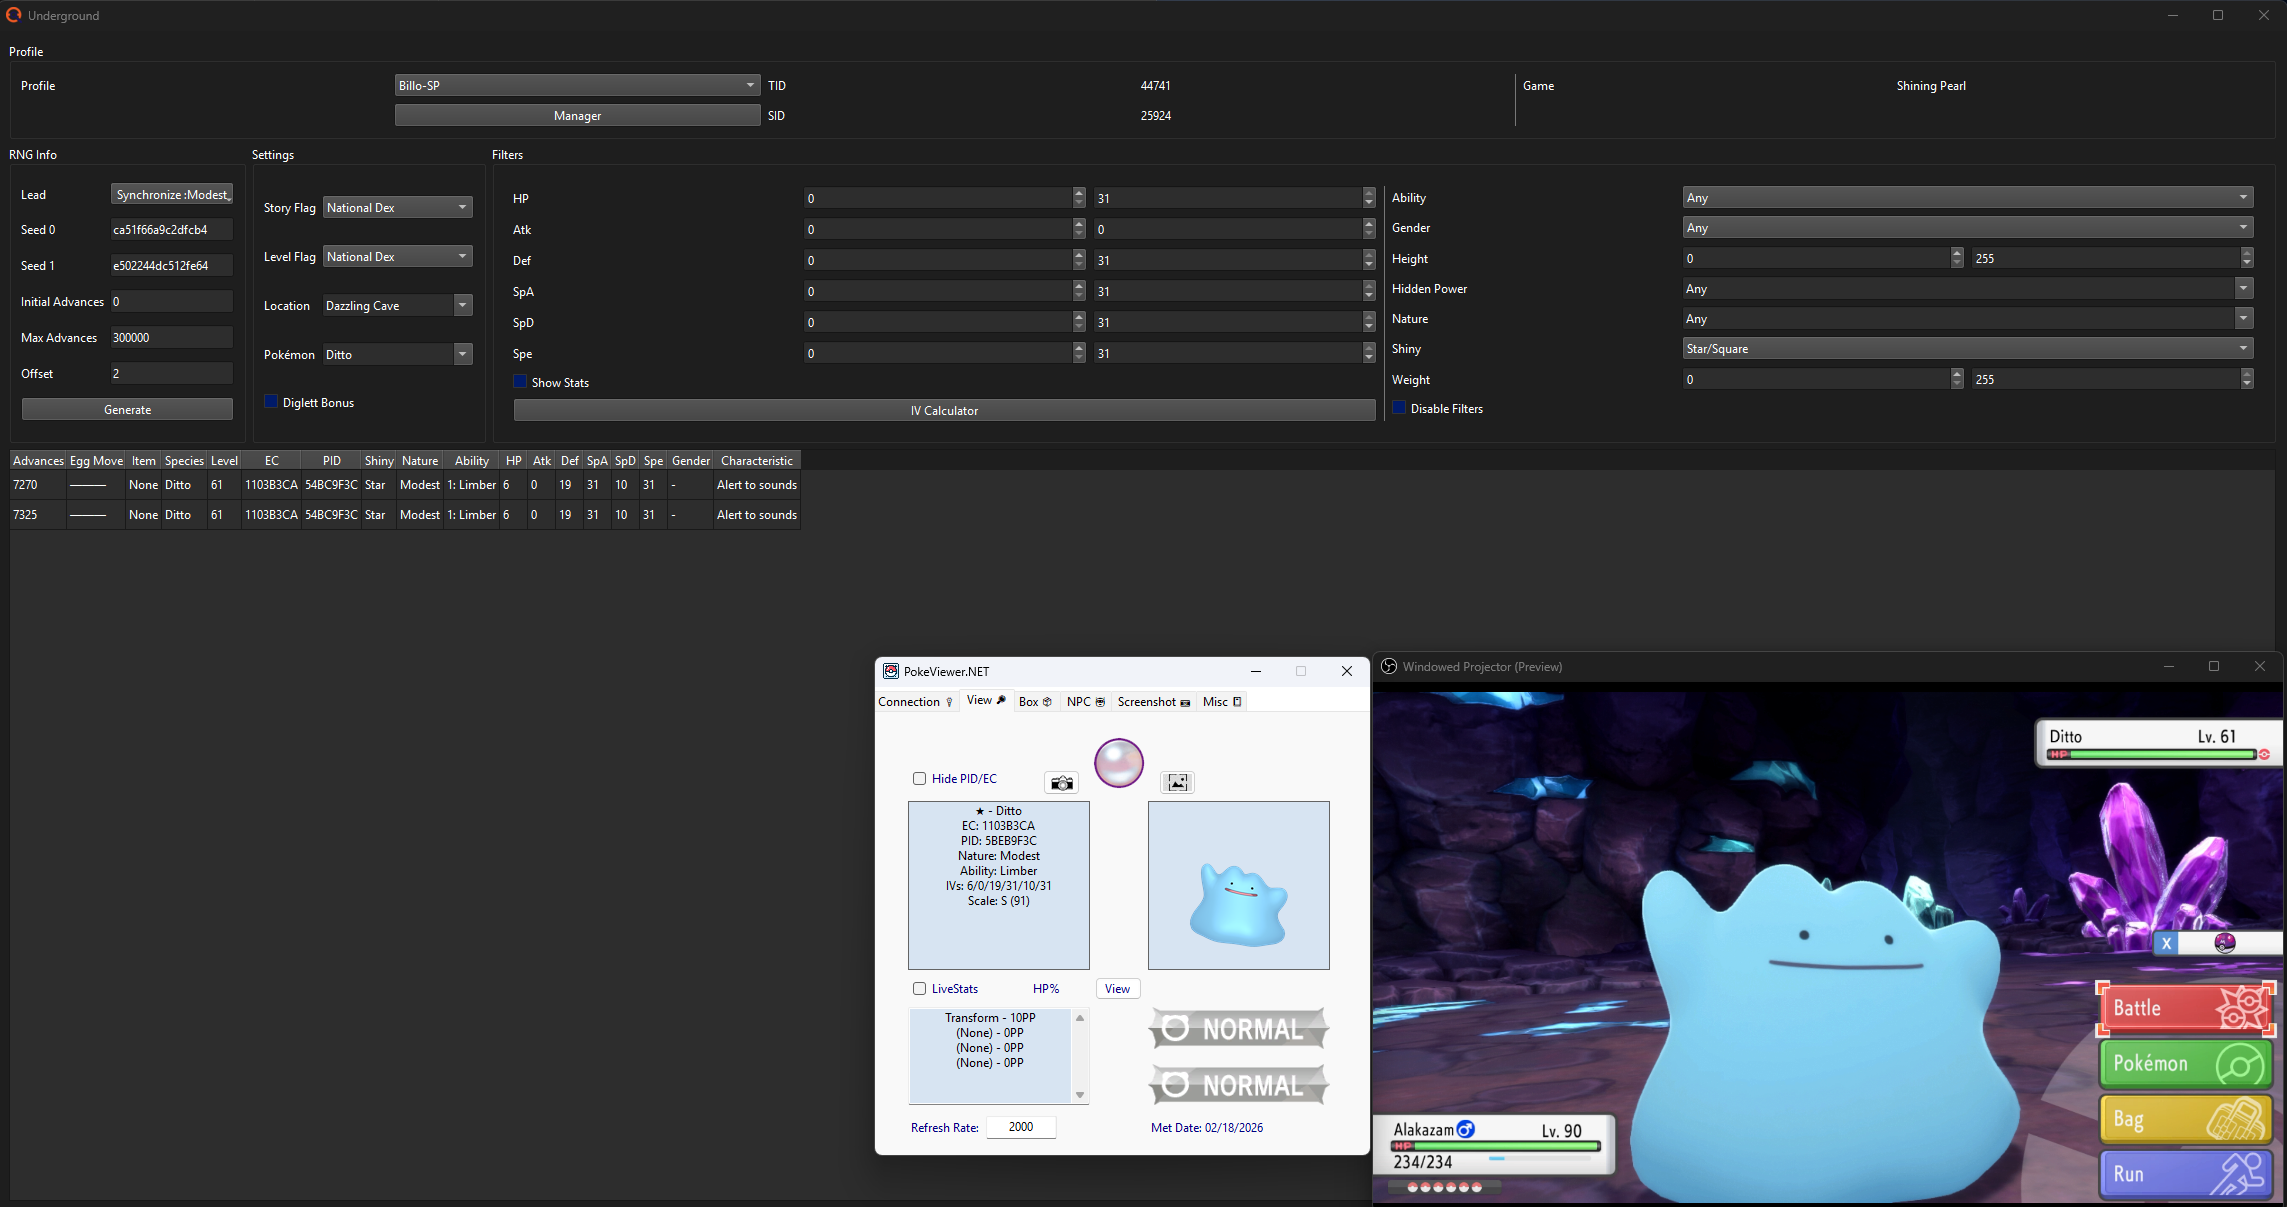
After finding and encountering our target species we can use PokeViewer.NETs Battle Viewer to confirm the internal details match the PokeFinder search results, mission accomplished!