Sword/Shield Roaming RNG
This section explains how to RNG abuse Pokémon from Roaming encounters on retail hardware. It covers the entire process, from choosing a location to obtaining the desired Pokémon.
From here it is assumed that you have read the initial page of this guide and have a general idea of how to use SWSH OWRNG Generator GUI, as well as understanding how to find and monitor your seed.
Picked the wrong type of encounter? Click here to go back!There are a total of 3 "roaming" encounters in the game, these are Galarian Articuno, Zapdos & Moltres. Encounters with these legendary Pokémon are unlocked after completing the Crown Tundra story quest. After completing the quest, each bird will then roam the overworld in their respective Wild Area.
Articuno - Crown TundraZapdos - Galar
Moltres - Isle of Armor
Upon flying into (or entering) the area, the internal details of the bird will be set in stone until leaving, this means that the end goal is to simply spawn the bird in the Wild Area on the correct frame, it can then be encountered at any point before leaving.
These encounters are shiny locked and have 3 guaranteed max IVs! Avoid setting search filters to seek Shiny variants as you will never find results.
Figure 1 - Tool setup

- Open the
Encounter Lookupsub window, then type the species name of your chosen bird. - Confirm that the filters have been set properly inside the Main Window, encounter filters can be found on the left-hand side.
- Set your search filters inside the middle portion of the Main Window. You can filter for specific Marks, IVs, etc. As stated above, these encounters are shiny locked.
Example - Encounter Lookup specifies any for the birds, selecting a row fills in the information automatically inside the main window. The search filters were also manually configured to search for a high IV with a mark.
Figure 2 - Game setup
 Figure 3 - Recommended Fly Points
These three fly points are suggested as they're close to the spawn point of each of the birds, meaning we can encounter them more quickly. This is helpful as it may take several attempts to spawn the bird on the correct frame.
Unlock the above fly points, and have your party Pokemon ready for battle, you can use a Pokemon with the ability Syncronize in the first slot of your party to determine the nature of the encountered bird.
Once you have the fly points unlocked, fly to the area that contains your chosen bird then save the game.
Figure 4 - Seed identification
You cannot search for targets without knowing your current seed. This is achieved by using the Retail Seed Finder window. If you did not read the section of the main page that covers how to find and monitor your seed, go back and do this now.
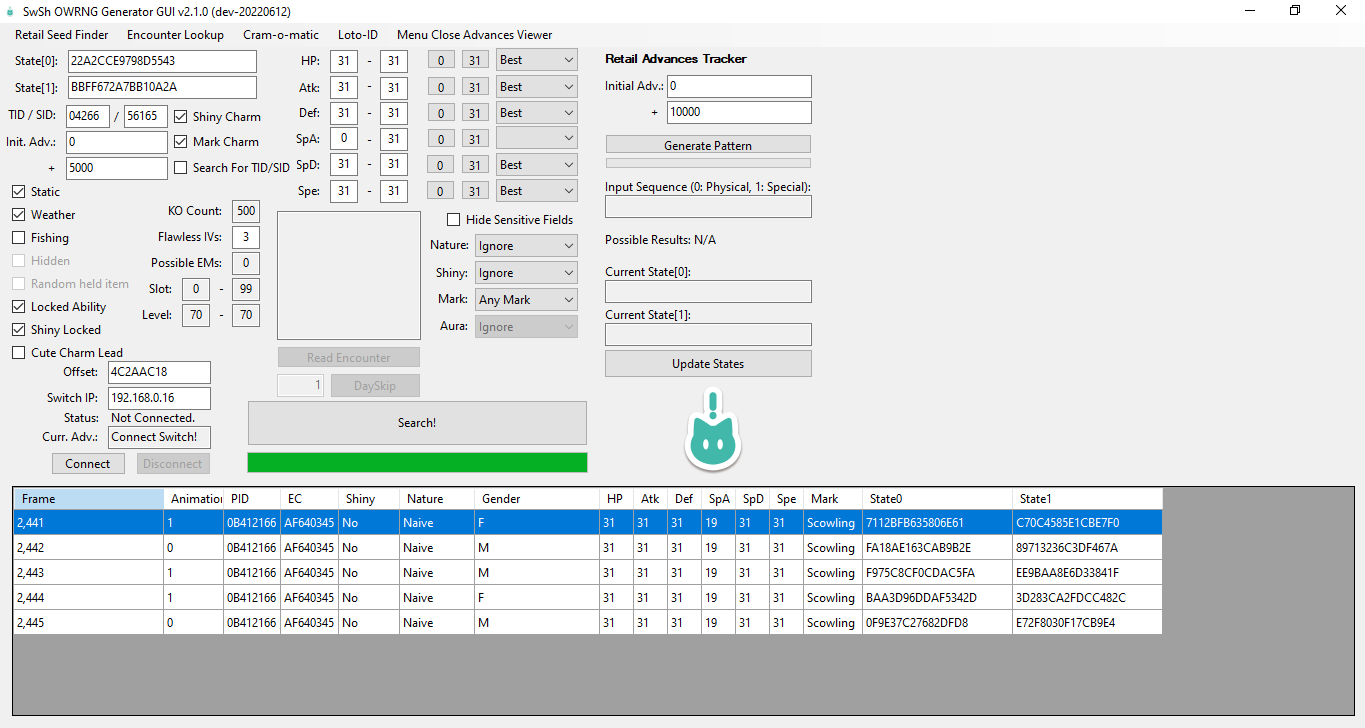
After identifying seeds using the Retail Seed Finder, a Scowling Marked Zapdos-Galar can be found on advance 2441-2445. Target frames can often appear in clusters, which are multiple frames in a row (or close to each other) that produce the same end result.
Due to having multiple frames that can potentially produce your desired Pokemon, searching for clusters is ideal. You may wish to keep searching for target frames until a cluster appears.
Undesirable result?
- Save in the correct position, then close and re-open the game to refresh the seed.
- Identify the seed again using the
Retail Seed Finderfeature. - Search for a new target frame, repeat this process until a desirable result has been found.
Keep the game paused after finding a desirable target frame to avoid any unwanted advancements, as this may cause you to overshoot your target frame depending on location.
Advancing Towards the Target!
First, you will need to calculate the rough delay for the encounter. Doing this step will provide the best possible chances of hitting your target frame. Delay is the difference in advancements between spawning the Pokémon in the overworld and the actual frame the Pokémon was generated on.
Delay Calculation
- When standing at the recommended fly point of your desired bird, pause the game and begin identifying your current seed.
- Open the map without closing the pause menu, then fly into the area that contains your chosen bird.
- Chase it down and initiate the encounter, capture the Pokémon so that you can view the IVs/Nature more accurately.
- After capturing the Pokémon, enter the stats into any IV calculator to get a rough idea of the IVs of the Pokémon you hit. Also take note of the nature of the Pokémon you found.
- Find the Pokémon you hit in the search results of the GUI, this should be relatively close to your start frame. Check to see which advancement generated your Pokémon.
- Subtract the amount of advancements that were consumed by identifying your current seed, if this is your initial identification this will be 128.
- This will be your delay for this encounter, for example, if it took 128 advancements to identify your seed, and your bird was generated on advancement 160, your delay would be 32 (128+32=160).
- Since delay is variable for roaming encounters, it is recommended to repeat this process a few times to get a rough average delay that is consistent for you.
Recommended starting delays:
- Articuno - 130-140
- Zapdos - 20-30
- Moltres - 60-80
Note - The recommended delays assume that you only have one Pokémon in your team/party, adding extra Pokémon causes more variabilities, which influences the delay range.
Take note of the calculated delay, you will need this information in order to reach the correct target frame later. Do not change your fly point after calculating the delay, as this is subject to change depending on positioning.
Step-by-step tutorial:
- Advance towards your target frame using any method listed in the table on the main page (consider date-skipping for long distance-advancements).
- When you are a few hundred-thousand frames away from your target, fly into the recommended fly point of your chosen bird.
- Pause the game and re-identify your seed, search for your target again after doing so.
From here it is recommended to only advance using animations, as this type of advancement is the easiest to keep track of.
- Use animations advancements to hit your target frame, factor in the average delay calculated earlier and open the map on the correct frame.
For example - If you calculated an average delay of 32 earlier, you should now aim to open the map 32 frames before the target frame given by the generator search results.
- Open the map on the calculated target frame after taking delay into consideration, then fly to the recommended fly point of your chosen bird.
- Chase down your bird and initiate the encounter, you will need to capture it to confirm that you hit the correct frame. If the result is not what you expected, find the bird you hit and adjust accordingly.
Do note that it may take a few attempts to hit your target frame, this is due to a variable delay. If you have found a delay that is consistent for you, stick with it until you eventually reach your goal.
Figure 6 - Target Frame Hit!
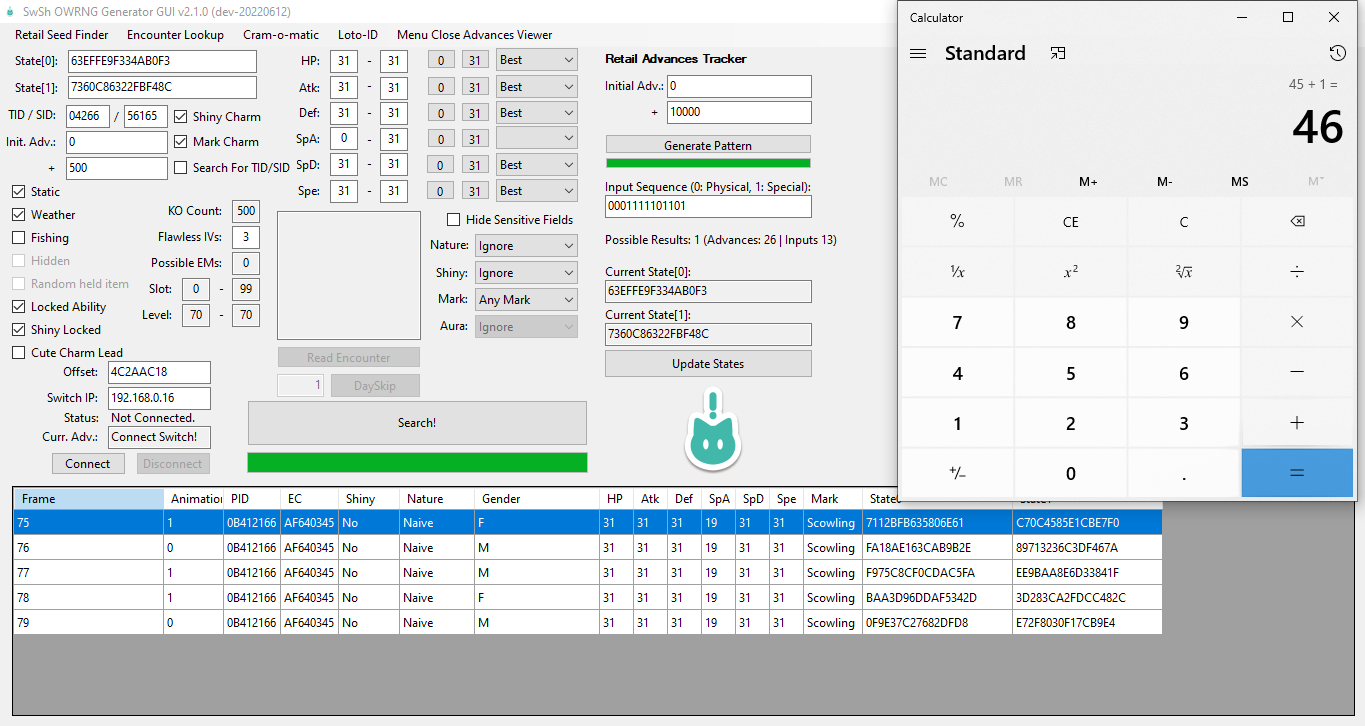
By using animations and a standard calculator to keep track of inputs, we were able to hit out target frame!
Figure 7 - Result Found!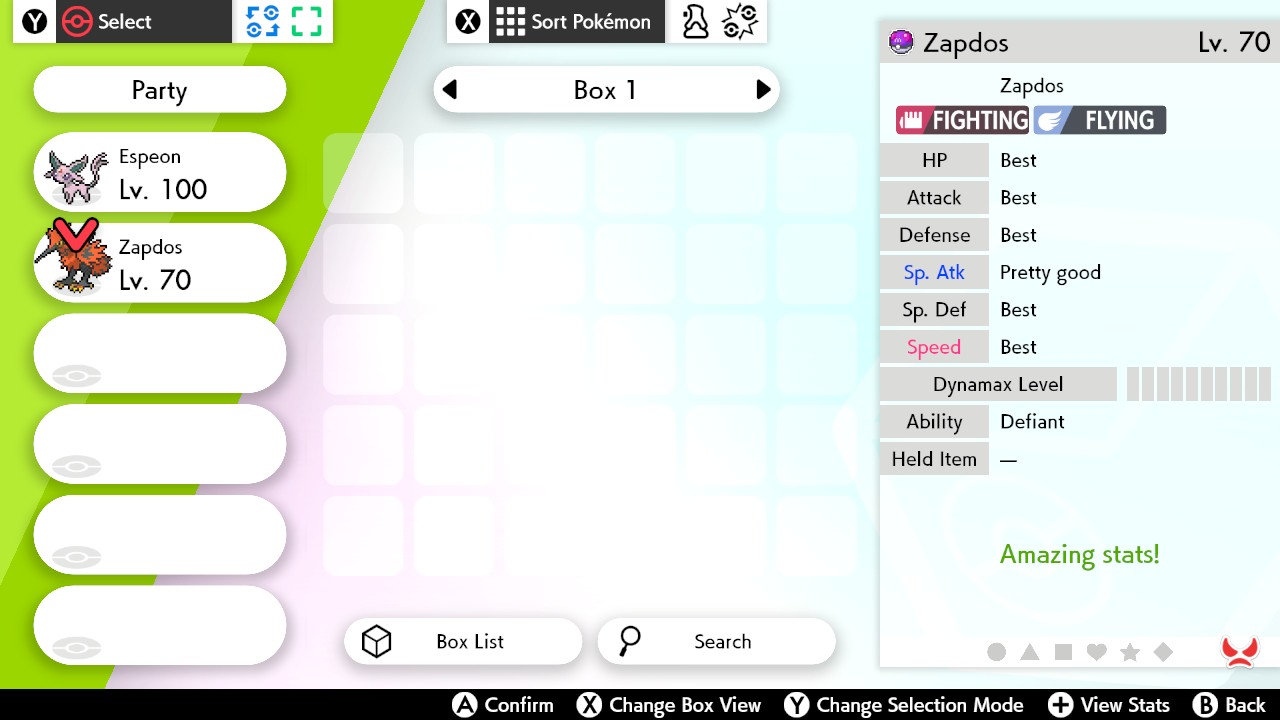
The Zapdos-Galar matches what is expected by the tool, you should now understand how to RNG abuse Pokémon from Roaming encounters.
Different areas & environments can have a drastic influence on delay, if you are missing targets when you believe you should be finding results, you should consider reading the Troubleshooting Encounters page by clicking the button directly down below.