Overworld RNG Guide (CFW)
This guide provides in-depth coverage of how to use SWSH OWRNG Generator GUI by LegoFigure11 to RNG abuse wild encounters in Sword/Shield. With overworld RNG abuse, you can obtain Shiny or Marked Pokémon and calculate IVs, Nature, and Gender.
From here it is assumed you are using a CFW Switch console running Atmosphere.
Don't have CFW installed? Click here for the retail focused guide!You will need:
Note - ldn_mitm is technically optional. If you choose to not install ldn_mitm you will need to connect to the internet via the Y-Comm instead, which lengthens and complicates the process.Installation Instructions:
- Extract
SWSH_OWRNG_Generator_GUI.zipinto an empty folder on your PC in a known location. - Extract the contents of both
ldn-mitm.zip&Luxray.zipinto the same folder as the above. - You should now see an
atmosphere&switchfolder inside this folder. Drag these folders to the root of your Switch SD card. - If done correctly your SD card should look similar to this gif. Plug the SD card back into the console and reboot SysCFW.
RNG Tool Setup
This section will cover the essential details you need to know in order to use the Generator. If you do not yet have a complete understanding of how each of the tabs, follow along with this section for relevant information & usage tips.
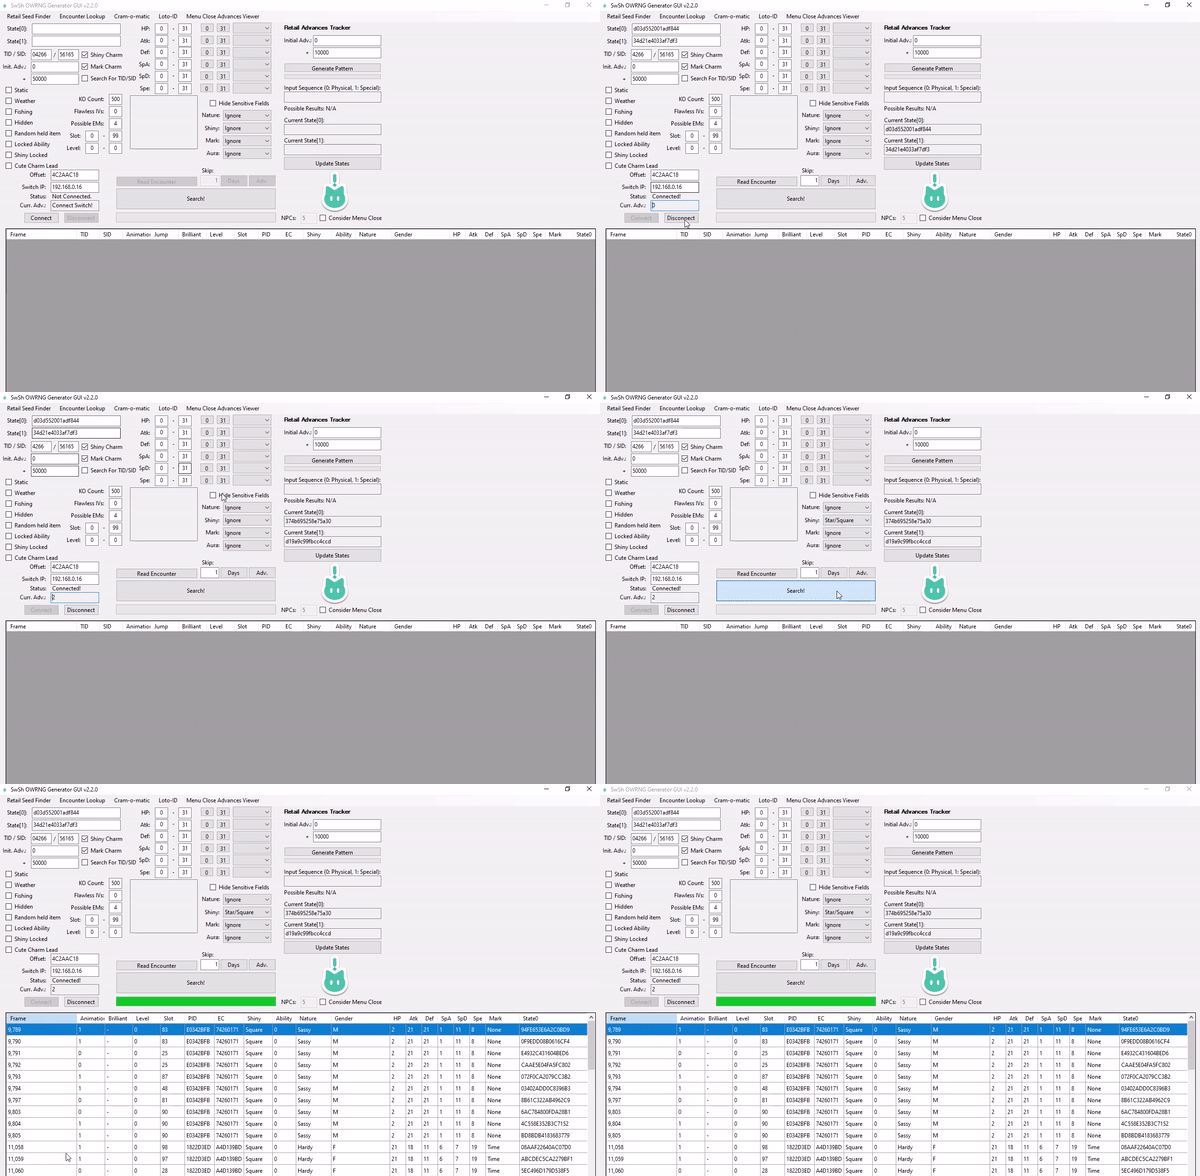
Figure 1 - Program Connectivity
The main window (pictured above), calculates upcoming target frames based on your search parameters. Here, you can connect the console to the program and automatically track your current RNG seed in real-time.
Connecting to the program:
Type the local IP address of your Switch console into the Switch IP: field, then open the game and enter the overworld. Once you are in the overworld click the Connect button, you should now notice your current seed is being monitored.
You may notice that your 5 digit TID/SID have been entered into the designated fields automatically. Avoid tweaking these values after connecting to the program.
Feature descriptions:
Init. adv.displays the amount of advances that have passed since connecting to the program.- The
+field is the amount of frames to search through, set this to a comfortable amount. - Click the
Shiny Charmcheckbox if you have the Shiny Charm in your save file, otherwise leave unchecked. - Click the
Mark Charmcheckbox if you have the Mark Charm in your save file, otherwise leave unchecked. - The middle section contains search filters, here you can set filters for specific Shininess, IVs, Nature, Marks, etc.
Read Encounteris used to read the details of wild Pokémon while in-battle, useful for troubleshooting delays.Skipis used to automate the process of advancing frames.
The rest of the information on the left hand side can be automatically filled using the Encounter Lookup sub window (explained below).
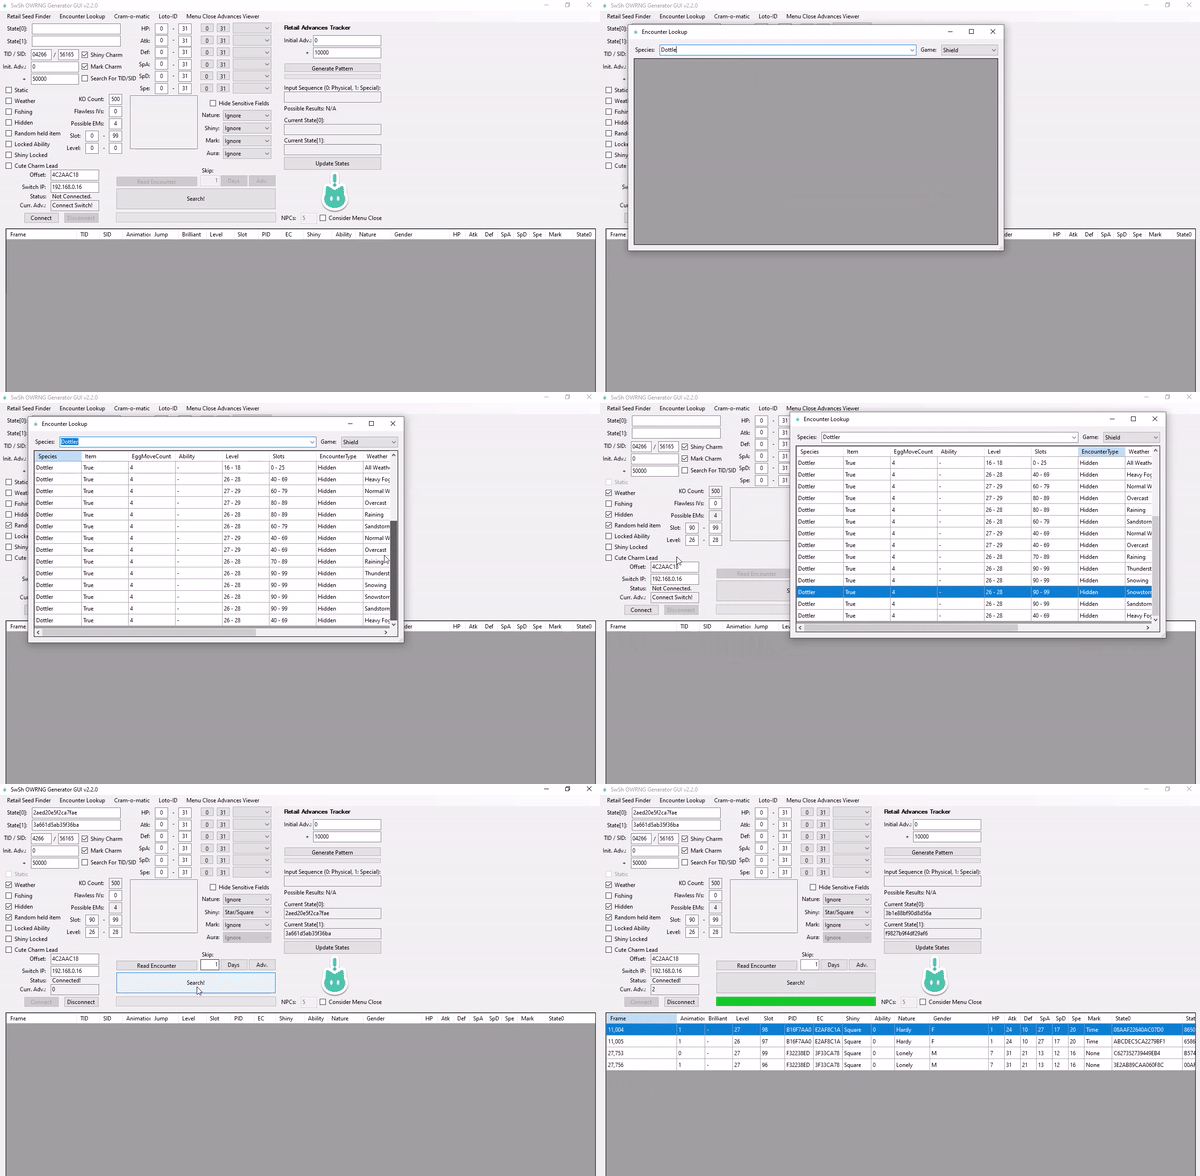
Figure 2 - Encounter Lookup Overview

The Encounter Lookup tab (pictured above), allows you to search for the encounter details of specific Pokémon and generate a list of every possible encounter for that Pokémon in the game.
How to use Encounter Lookup:
- Open the
Encounter Lookuptab and set the correct game version. - Type the species name of your target Pokémon, then select it from the dropdown menu to produce a list.
- Choose an encounter type: Static, Symbol, or Hidden. Select a row from the list by single-clicking on it.
After selecting your desired encounter, the details will be entered into the Main Window automatically and the Encounter Lookup tab can be closed.
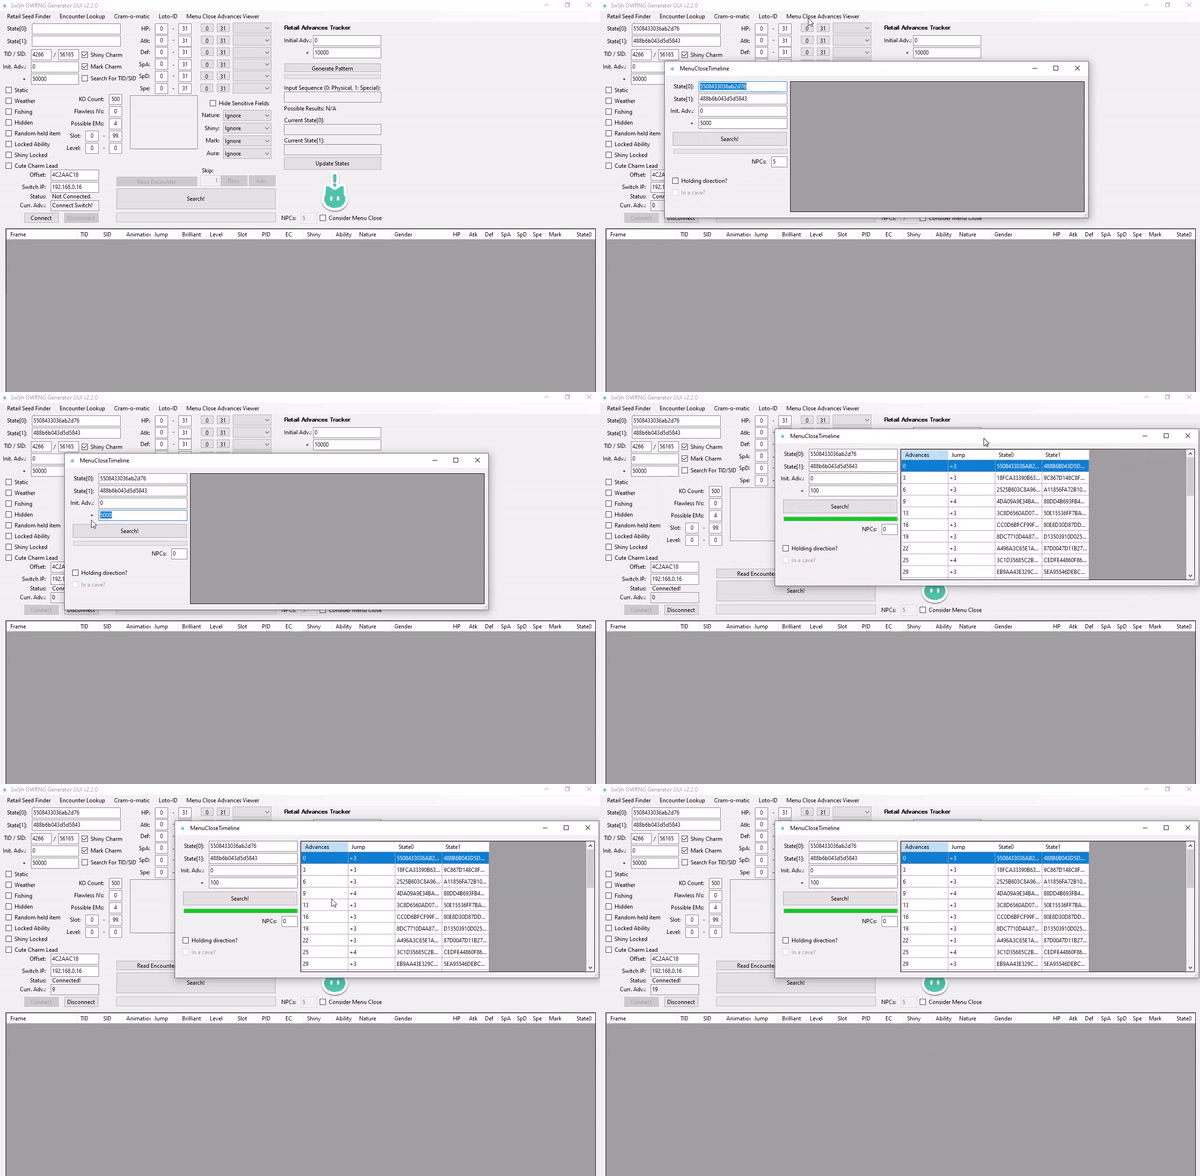
Figure 3 - Menu Close Advances Viewer Overview

The Menu Close Advances Viewer tab (pictured above), predicts the number of advancements from closing the pause menu. This advancement method is recommended as closing the pause menu freezes the RNG state for a few seconds, making it an extremely consistent method of hitting an exact target frame.
After entering your seeds and hitting search, a table will appear. The Jump column of the table displays the amount of advancements that will occur from closing the pause menu, this number varies based on the amount of NPCs in your area.
An area may have a higher NPC count than what is currently visible on screen, it’s important to calibrate your NPC count accurately for an accurate Jump prediction.
How to calibrate NPC count:
- Pause the game then disconnect and reconnect to the program, if done correctly, the number inside the
Curr. Advfield of the Main Window should now be 0. - Click the
Menu Close Advances Viewerbutton at the top of the Main Window to open the sub window. Your seeds should be visible in the correct fields automatically. - Close the pause menu then re-open it, take note of the number of advancements that have occurred according to the
Curr. Advfield after doing so. - Type 0 into the
NPCsfield and search. Gradually increase by 1 until the number inside the top row of theJumpcolumn matches the number inside theCurr. Advfield. - Close and re-open the pause menu a few times to make sure that the calculated NPC count is correct.
We recommend testing this method of calibrating NPC count before continuing with the guide. Calibrating NPC count is required regardless of the Pokémon you plan to hunt and method you plan to use.
Advancing The RNG State
The RNG state advances naturally based on your location, the weather, and the presence of spawned Pokémon & NPCs. Ideally, you should target a Pokémon in an area where the RNG state advances slowly. However, in some cases you may be forced into unstable conditions depending on the Pokémon you are hunting.
In-game actions can also be used to advance the RNG state with varying influence, the most useful actions can be found in the table below.
| Type of action | Description of action | Adv. influence |
|---|---|---|
| Player Movement | Moving the control stick, then letting it fall back into it's resting state (includes whistle & bike bell). | 1-3 Advancements per input. |
| Rotom Bike | Mounting and dismounting the bike with the + button. |
Variable depending on location and environment. |
| Menu Close | Opening and closing the pause menu using the X button. |
Variable depending on location and environment, predictable. |
| NPC Activation | Standing close to an an NPC to make them notice the player. Used to cover short distances quickly. | ~2500 advancements per minute. |
| Town Map | Opening the map and flying into an area. This is only used for roaming encounters. | Can be influenced by the amount of Pokémon in your party. |
| Animations/Motions | Pressing the L3 button on the party menu or summary screen, or by using the Skip feature to make your Pokémon perform an action. |
+1 per animation on the summary screen. +1 per input on the party menu. |
| Date Skipping | Using Luxray or the Skip feature of the GUI to advance towards targets, this is the quickest way to advance frames. |
Variable influence based on the amount of Pokémon stored inside boxes, up to 15,000~ per day skipped. |
You can automate the date-skipping process using CFW, which is useful for covering large advancements while idle. Ensure time and date are synced via the internet in the Switch system settings to use this feature.
The number of frames advanced by date-skipping varies depending on the number of Pokémon in your boxes. Fill your boxes with Pokémon (NOT EGGS) to maximize this feature. Track the rough amount of frame advancements per day skipped to avoid overshooting target frames.
It is recommended to date-skip at an indoor location (e.g House or PokeCenter), as skipping >1000 days inside a Wild Area may cause the game to crash.
Skipping using Luxray (recommended):
Luxray is a calculator-style application that can be launched through the Switch Homebrew Menu. It has a variety of features, such as:
- Set - Sets the network time to a desired date, based on the figure typed into the calculator. Useful for changing the weather.
- Step - Initiates date skipping, based on the figure amount typed into the calculator. Used to automate date-skipping.
- NTP - Sets the date and time back to network time, this should be done after every date-skipping session.
Skipping using OWRNG tool:
To skip using SWSH_OWRNG_Generator_GUI, type the number into the Skip, then click the Days button. You will need to wait for the countdown to finish before attempting to day-skip again.
This method does not include an NTP function, you will also need to set the correct weather condition after finishing the date skipping process. This can be done safely by changing the date backwards until the correct weather conditions have been met. Changing the date backwards will not cause unwanted advancements.
Encounter Information
There are four types of encounters: Static, Symbol, Hidden, & Fishing. It's important to understand the types of encounters before making attempts. See the table below for the different types of encounters and their definitions.
| Encounter | Description | Difficulty |
|---|---|---|
| Static Symbol | Encounters in grass/water/caves that are guaranteed to produce a specific species, provided weather conditions remain unchanged. | Beginner |
| Random Symbol | Encounters in grass/water/caves where the species is determined at random by an encounter slot value (0-99) and current weather. | Beginner |
| Hidden | Random encounters in grass that do not have an overworld model, species is determined at random by an encounter slot value (0-99) and current weather. | Advanced |
| Fishing | Encounters in fishing pools where the species is determined at random by an encounter slot value (0-99) and current weather. | Intermediate |
Search the species you wish to hunt on the Encounter Lookup tab, then pick one of the encounters from the list. Take note of the type of encounter you have chosen and click on one of the buttons below to be sent to the page that applies to you!
STATIC ENCOUNTER!
SYMBOL ENCOUNTER!
HIDDEN ENCOUNTER!
FISHING ENCOUNTER!
ROAMING LEGENDARY ENCOUNTER!