Dialga/Palkia RNG Abuse
This section of the guide aims to provide a worked example for how to RNG abuse Dialga/Palkia (Origin Form and Base Form). Ensure that the Autosave is disabled and that you have a full team of 6 Pokémon before beginning this portion of the guide. This provides a safety net for failed targets and makes it easier to check results using PokeViewer.
Choose the method you prefer for this encounter; Dialga/Palkia are generated at different times depending on the method used. The two available methods will be named the Cutscene Method and the Death Method. After reviewing the descriptions of each method, choose the one that best suits your preferences and click the hyperlink to jump to the relevant section.
Cutscene Method
Can be used for base form and origin form Dialga/Palkia, suitable for more experienced players.
Cutscene method requires skipping a cutscene at a precise moment in order to initiate a battle with Dialga/Palkia. The internal details of the Pokémon will be generated after skipping the cutscene and entering the battle.
If you choose this method for origin form Dialga/Palkia, it's crucial to be capable of consistently defeating the boss battle without losing. Losing to the boss will cause the Pokémon to regenerate, causing you to miss your target frame.
Death Method
Only useable for origin form Dialga/Palkia. This method is beginner friendly.
The Death Method involves intentionally losing towards the end of the battle with Dialga or Palkia. The internal details of the Pokémon will regenerate after re-entering the battle from the continue screen. This allows you to retain your boss battle progress and defeat the boss more easily.
This method is more forgiving because you're allowed to lose to the boss battle without missing your target. However, it will involve waiting for a longer time period before reaching your target frame.
Cutscene Method
If you are reading this text you have decided to use the Cutscene Method, here you can find a worked example of how to RNG abuse Dialga/Palkia using this method.
You will need to calculate the rough delay for this encounter. The term 'delay' refers to how long it takes for the Pokémon to generate after the final A Press. Defeating the boss may be difficult at first, so the delay calculation process can also be used to become familiar with how to win the boss battle.
Reach the screen of the the screen of the final A press, from here, pick the method you want to use.
Method 1 (Immediate Cutscene Skip)
This method is simpler since you only target one delay, but will require you to be consistent at skipping the cutscene.
- Press the
Home button (⌂)to pause RNG advances, then check your current seed by runningEncBotCopySeedLAin Moarencounterbots. - Paste your current seed into the Main RNG script, then search without filters. This will provide the starting frame.
- Press the
Home button (⌂)to unpause the game and quickly press theA button. The cutscene will begin and then fade out to a black screen. - Once the next part of the cutscene loads, attempt to skip it as fast as possible by pressing the
+ buttonfollowed by theX button. - Defeat the boss (origin form) or enter the battle (base form) and inspect the result using PokeViewer to find the frame it was generated on. That will be your delay for this attempt.
Method 2 (Targeted Cutscene Skip)
This method is more consistent, but requires approximating the first delay in order to more precisely hit a second delay. The suggestion is to press A on the final screen when you are roughly 130 advancements away from your target frame.
- Press the
Home button (⌂)to pause RNG advances, then check your current seed by runningEncBotCopySeedLAin Moarencounterbots. - Unpause the game, then advance the RNG state until you are ~130 advances away from the target, then press the
A buttonto start the cutscene. - Press the
+ buttonto open the option to skip the cutscene, observe theLogsof Moarencounterbots until 110-120 frames have passed. - Press the
Home button (⌂)to pause RNG advances, then check your current seed by runningEncBotCopySeedLAin Moarencounterbots. - Unpause the game while quickly press the
X buttonto skip the cutscene when you are around 0-5 frames away from your target. - Defeat the boss (origin form) or enter the battle (base form) and inspect the result using PokeViewer to find the frame it was generated on. That will be your delay for this attempt.
The "delay" for either form is variable, for this reason it is recommended to repeat this process a few times to see which delay you are most commonly experiencing.
The example will continue with the Immediate Cutscene Skip method, but you can use the Targeted Cutscene Skip in a similar fashion, and both methods can be used for Origin and non Origin form Dialga/Palkia respectively.
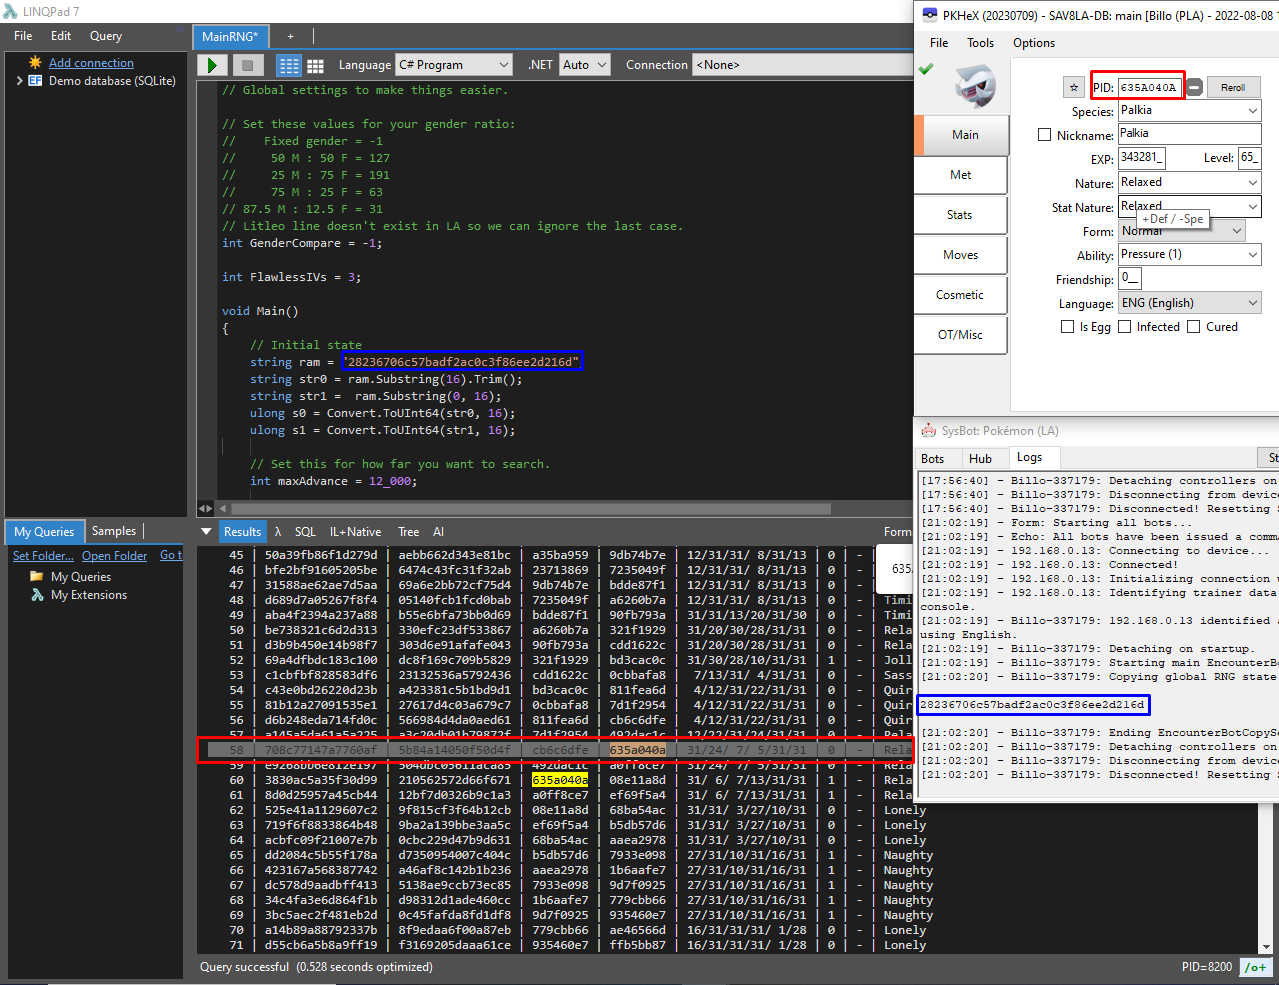
After following the delay calculation steps and searching for the PID of the encountered Pokémon, we find that it was generated on frame 58. Therefore, our delay for this attempt is 58. After 5 attempts, we have the following delay values:
| Attempt | Delay Value |
|---|---|
| Attempt 1 | 58 |
| Attempt 2 | 57 |
| Attempt 3 | 65 |
| Attempt 4 | 62 |
| Attempt 5 | 58 |
This means a safe delay value to target in future attempts is 58-65. The delay values shown here are based on how quickly I was able to skip the cutscene and enter the battle with Palkia; your values may vary depending on the speed at which you skip the cutscene or if you choose not to skip it at all.
After finding your delay range, take note of the most common value for future attempts. You will now need to set your search filters to match your desired target.
Figure 2 - Setting Search Filters
In this example, the filters are configured to search for any Palkia with 6 perfect IVs (31/31/31/31/31/31). You can further customize the filters if desired, such as specifying a particular nature or optimizing for 0 IV values, such as 0 Attack.
After setting your search filters, add EncBotCopySeedLA to the list of active bots, then start. Paste your seed into the script to begin searching for targets. If you do not find a suitable target, reset the game to refresh your seed and try again.
Great! We discovered a 6IV Docile Palkia after 24,864 advances within a cluster of 4. A cluster refers to a group of frames that produce the same end result; the larger the cluster, the greater the chances of hitting the correct target frame.
Now, we need to advance close to our target frame. Monitor your RNG state by running EncBotRNGMonitorLA in Moarencounterbots; this will track the number of advancements that occur in real time.

The RNG state at the Spear Pillar advances at a slow rate. Moving to a more populated area allows you to advance the RNG state much more quickly. In the example image above, the player is standing next to a large body of water in an area densely populated with Pokémon.
Consider leaving Spear Pillar and heading to a location where the RNG state advances more rapidly if you need to cover a large amount of frame advancements. If you have moved locations, make sure to leave enough time to reposition yourself to avoid overshooting your target frame.
Example
If it takes you roughly 3,000 frames to get back to Spear Pillar from your position, and roughly 7,000 frames to defeat Palkia, start to head back to Spear Pillar at roughly 10,000 frames away from your target, leave enough time to reposition yourself to avoid overshooting!
We are now back at Spear Pillar and approximately 2253 frames away from the target. Earlier, we calculated a rough delay of 58-65, which means the goal now is to press the A button on frame approximately 2188-2195, then skip the cutscene as quickly as possible.
2253 (target) - 58 (delay) = 2195 (new target)
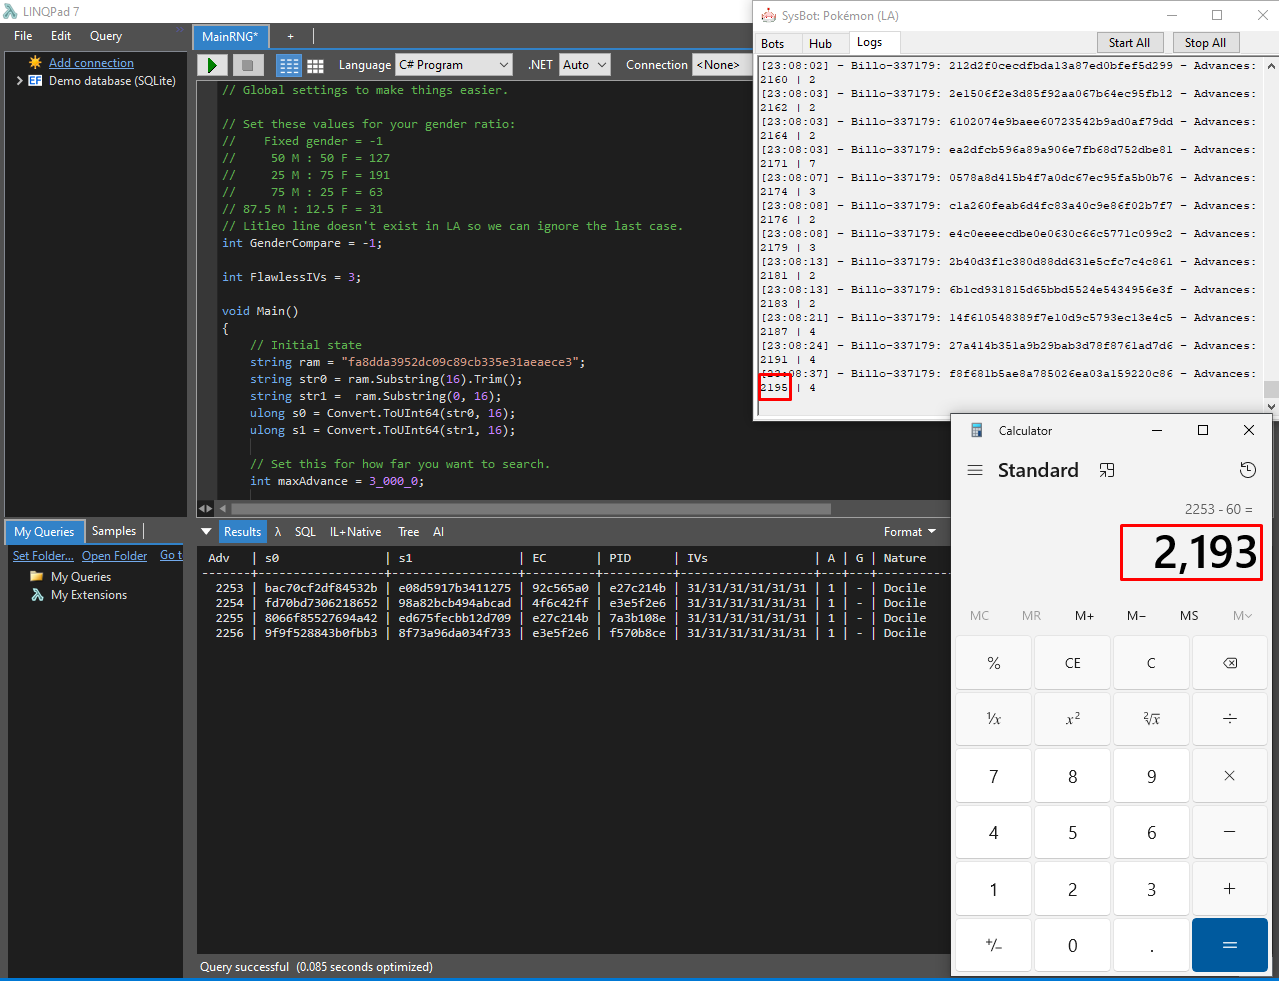
Get to the screen of the final A press, and let EncBotRNGMonitorLA run until the Logs tab displays the correct target frame, then press the A button, then skip the cutscene as fast as possible for the best chances of hitting the correct target frame.
It is now time to defeat the boss, then inspect the Palkia using PokeViewer.NET Box Viewer to see if we hit the correct target. If you are targeting the base form Dialga/Palkia you can use the basic Battle View function instead.
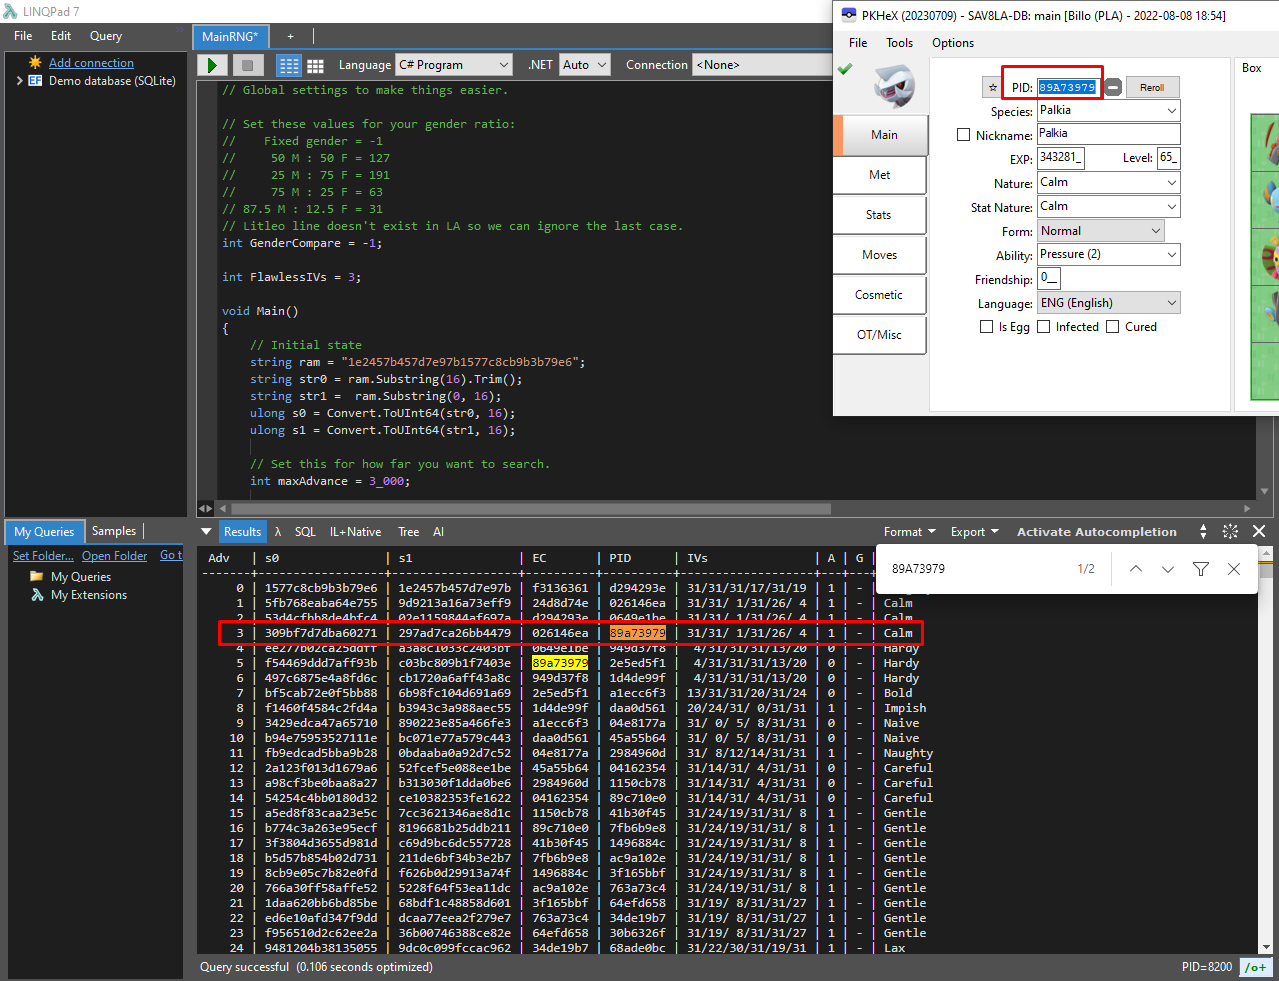
Figure 7 - Result Found!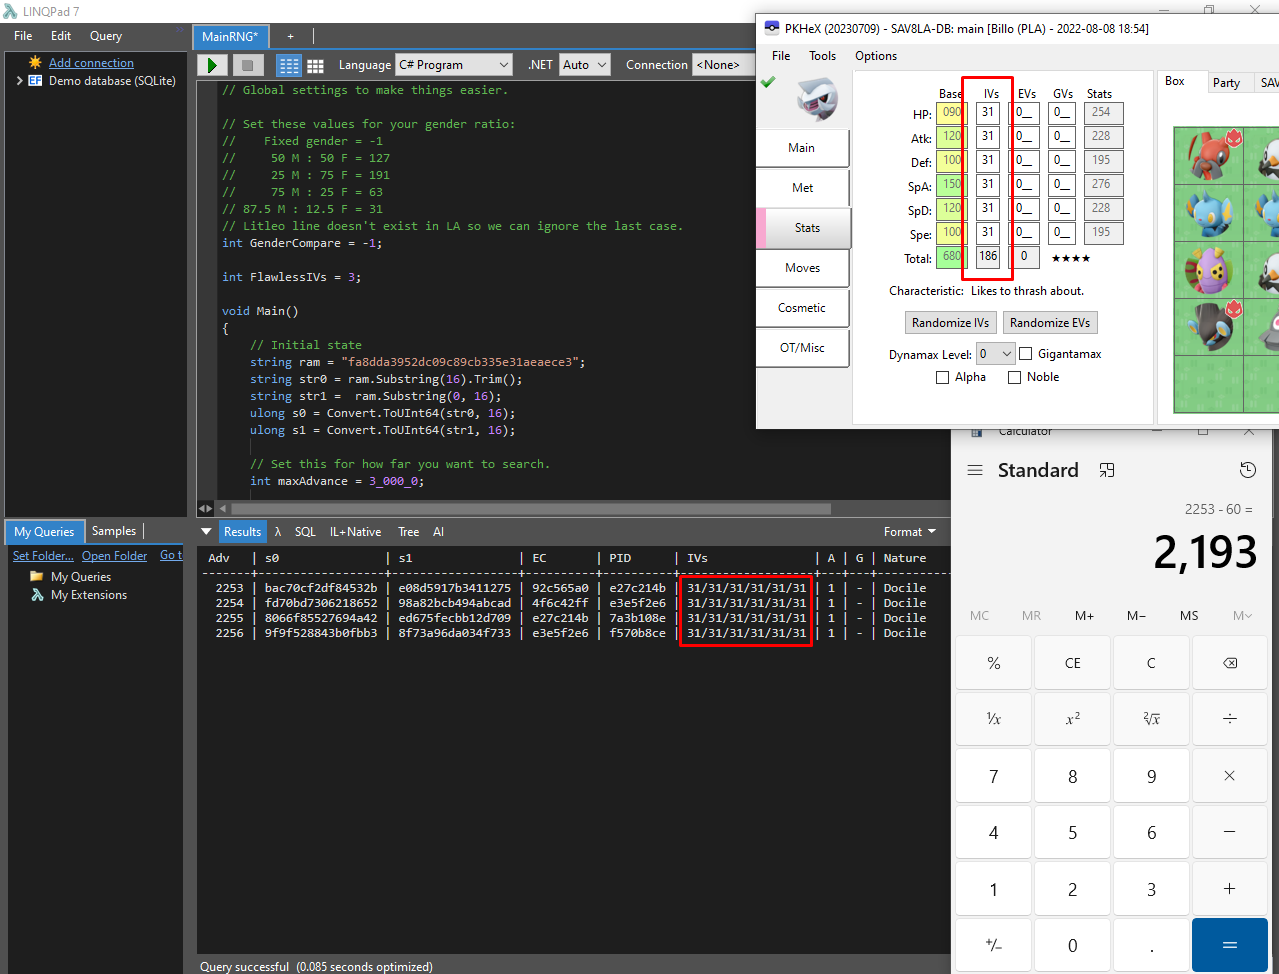
We hit our target frame and have secured a Palkia with 6 perfect IVs! That's all there is to it!
Death Method
If you are reading this text you have decided to use the Death Method, here you can find a worked example of how to RNG abuse Origin Dialga/Palkia using this method.
You will need to calculate the rough delay for this encounter. The term 'delay' refers to how long it takes for the Pokémon to generate after the final A Press. Defeating the boss may be difficult at first, so the delay calculation process can also be used to become familiar with how to win the boss battle.
Delay Calculation Method
- Enter the boss battle, then whittle the HP of the boss down to a single bar, then intentionally take damage and lose the fight. Now skip through the dialog until you reach the screen of the final A press.
- Enter the Switch Home Menu to pause RNG advances, then check your current seed by running
EncBotCopySeedLAin Moarencounterbots. - Paste in your current seed into the RNG script, then search without filters. This will provide the starting frame.
- Press the
Home button (⌂)again to unpause the game and quickly press theA button. This will put you back into battle with a freshly generated boss. - Defeat the boss and inspect the result using PokeViewer to find the frame it was generated on. That will be your delay for this attempt.
Figure 1 - Calculating Delay (Death Method)
After following the delay calculation steps and searching for the PID of the encountered Arceus, we find that it was generated on frame 34. Therefore, our delay for this attempt is 34. After 5 attempts, we have the following delay values:
| Attempt | Delay Value |
|---|---|
| Attempt 1 | 4 |
| Attempt 2 | 3 |
| Attempt 3 | 3 |
| Attempt 4 | 2 |
| Attempt 5 | 3 |
This means a safe delay value to target in future attempts is 34-40. The delay values shown here are based on how quickly I was mash through the final screen before Arceus was generated; your values may vary depending on how quickly you are able to mash the A button to generate Arceus.
After finding your delay range, take note of the most common value for future attempts. You will now need to set your search filters to match your desired target.
Figure 2 - Setting Search Filters
In this example, the filters are configured to search for any Palkia with 6 perfect IVs (31/31/31/31/31/31). You can further customize the filters if desired, such as specifying a particular nature or optimizing for 0 IV values, such as 0 Attack.
After setting your search filters, add EncBotCopySeedLA to the list of active bots, then start. Paste your seed into the script to begin searching for targets. If you do not find a suitable target, reset the game to refresh your seed and try again.
Great! We discovered a 6IV Hardy Arceus after 49,350 advances within a cluster of 9. A cluster refers to a group of frames that produce the same end result; the larger the cluster, the greater the chances of hitting the correct target frame.
Now, we need to advance close to our target frame. Monitor your RNG state by running EncBotRNGMonitorLA in Moarencounterbots; this will track the number of advancements that occur in real time.
The RNG state at the Spear Pillar advances at a slow rate. Moving to a more populated area allows you to advance the RNG state much more quickly. In the example image above, the player is standing next to a large body of water in an area densely populated with Pokémon.
Consider leaving Spear Pillar and heading to a location where the RNG state advances more rapidly if you need to cover a large amount of frame advancements. If you have moved locations, make sure to leave enough time to reposition yourself to avoid overshooting your target frame.
Example
If it takes you roughly 3,000 frames to get back to Spear Pillar from your position, and roughly 7,000 frames to defeat the boss, start to head back to Spear Pillar at roughly 10,000 frames away from your target, leave enough time to reposition yourself to avoid overshooting!
We are now back at Spear Pillar and ~10000 frames away from the target, it can take up to 10,000 advances to defeat the boss on average. It is recommended to check how long it takes you to win, as any time during or after the battle will advance the RNG state slowly.
On average it takes me 5,000-7,000 frames to defeat the boss, so there is enough time to defeat it and position myself on the screen of the final A press and ultimately to avoid overshooting the target frame.
Figure 6 - Getting Into Position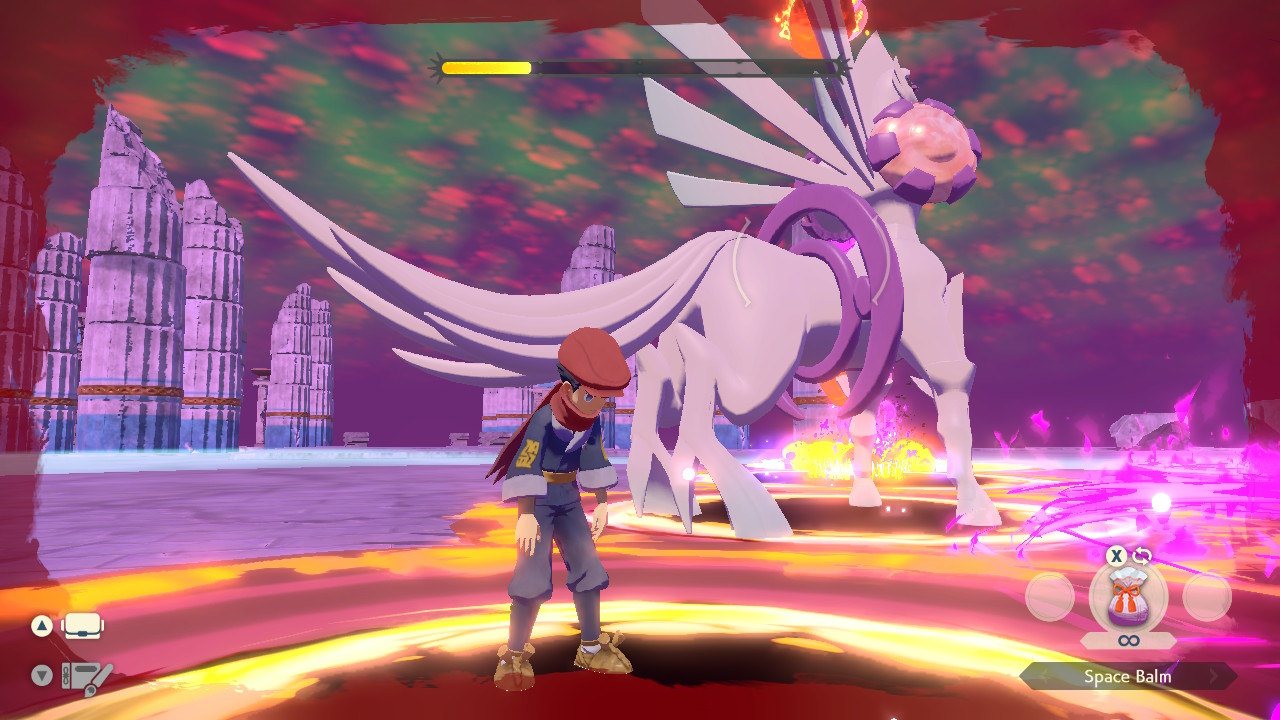
Intentionally lose to the boss at this point, then get to the screen of the the screen of the final A press. Let EncBotRNGMonitorLA run until the logs show that you are close to the target frame. After doing so, press the Home button (⌂) to pause RNG advances. You will now need to remove and re-add the bot, then start it again to begin monitoring the seed from advance 0.
Paste the new seed into the script and take note of the new target frame, keep the game on the Home menu after doing so, you will now need to prepare to hit your target.
Figure 7 - Hitting The Target Frame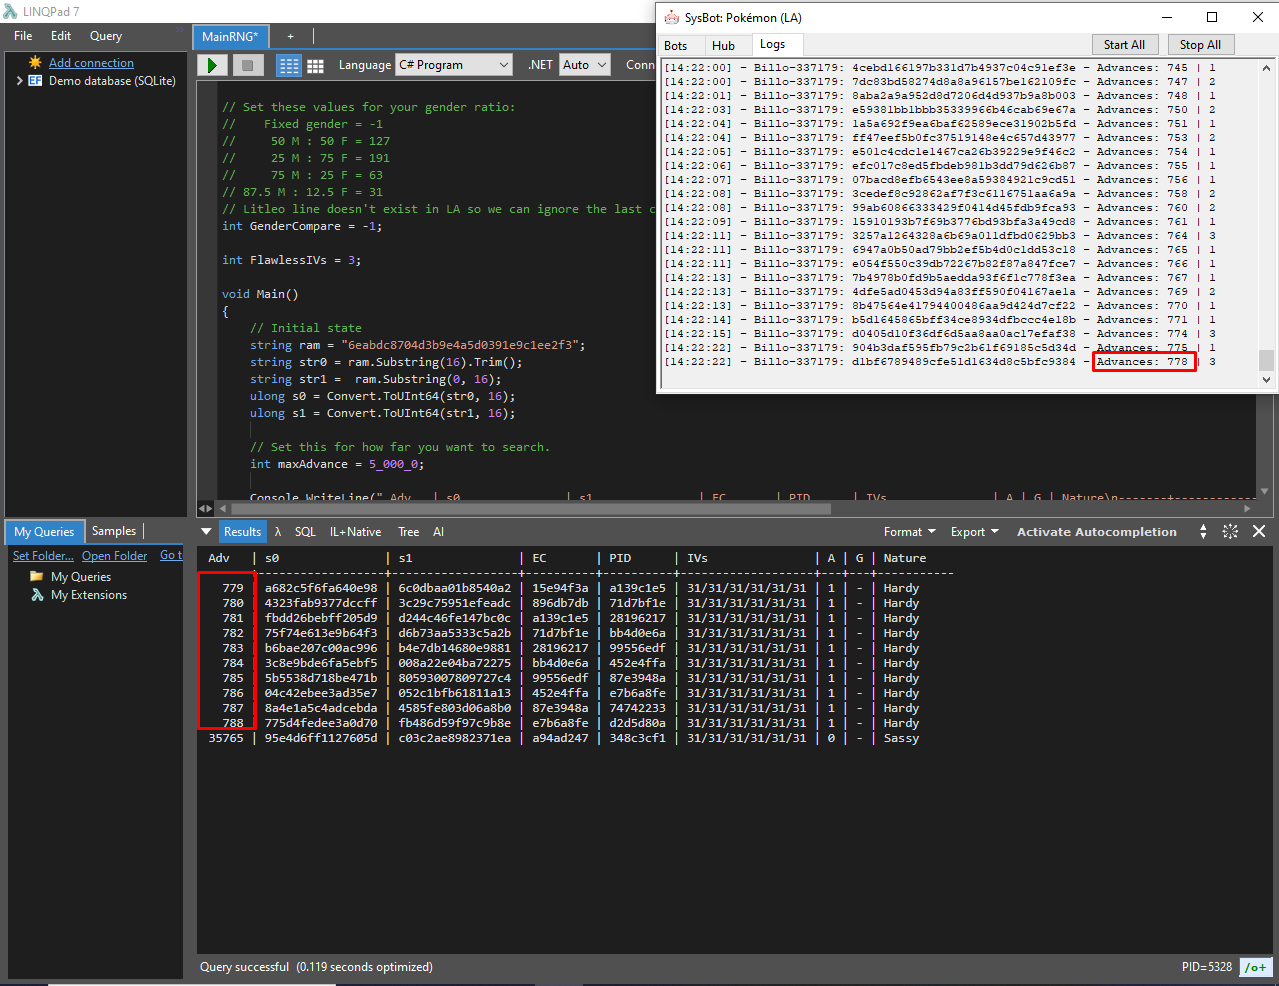
After searching for our target using the script once more, we can now see that the target is on advance 779. Earlier, the calculated delay is roughly ~3, this means that once we have reached frame ~776. We have advanced the seed to the correct point and can begin mashing the A button as quickly as possible.
x (earliest target frame) - y (delay) = z (frame to press A)
Defeat the boss, then use PokeViewer.NET Box Viewer to confirm that the correct target has been hit.
Figure 8 - Result Found!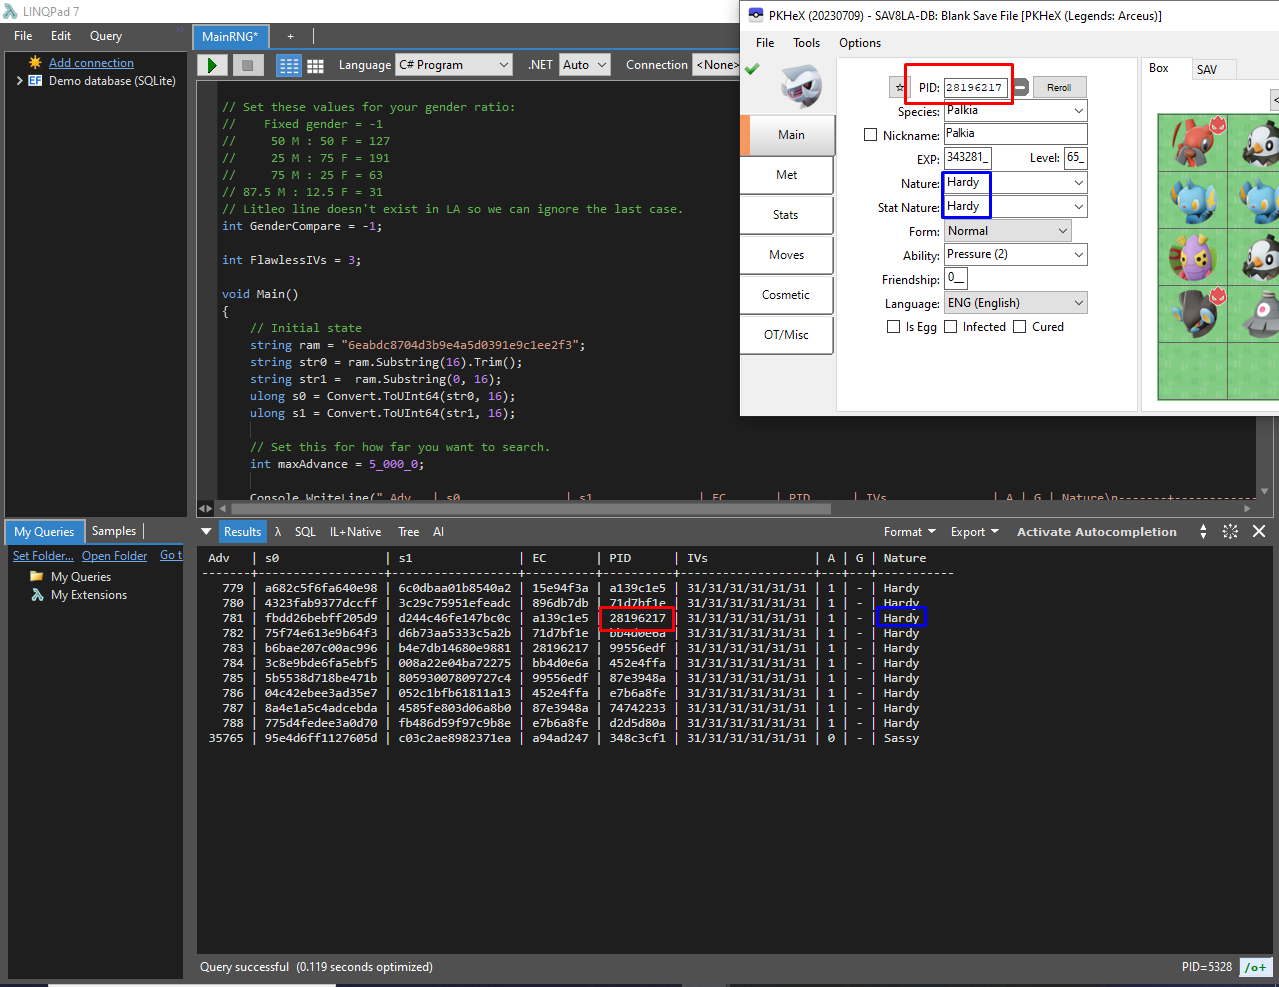
We hit our target frame and have secured a Palkia with 6 perfect IVs! That's all there is to it!