Legends: Arceus Spawner RNG
This page covers setup instructions for manipulating Pokémon that are generated via Spawner RNG. From here it is assumed that you have followed all of the setup instructions found on the main page. As a reminder, the Pokémon that can be manipulated this way are:
- Uxie, Mesprit & Azelf
- Tornadus, Thundurus, Landorus & Enamorus
- Heatran
- Cresselia
- Manaphy & Phione
- Shaymin
- Darkrai
If your desired target is not in this list then you are in the wrong place. Your target Legendary/Mythical is associated with Main RNG.
In the wrong place? Visit the Main RNG guide!Script & Program Overview
Figure 1 - Spawner RNG Script Setup
LINQPad is used as an RNG tool for the purposes of this guide (as mentioned on the main page). We can use the Overworld Legendary Calculator (Spawner RNG) script to calculate results based off of a given seed. It can also be used to keep track of the required number of advances required to reach a specific target frame.
Work through these setup instructions carefully to ensure that the script is functional:
- Launch LINQPad, then change the
Languagein the header toC# Program. DELETE THE EXTRA CODE THAT APPEARS AFTER DOING SO. - Paste the contents of the
Spawner RNGscript into the main window of LINQPad. This is demonstrated in the above image. - Press F4 to open the
Query Propertiessubwindow, then click theAdd/Browsebutton to open file explorer. - Navigate to the folder that contains the SysBot.NET download (this should be in a known location), then find and select
PKHeX.Core.dll. - Open the
Namespace Importstab, then typePKHeX.Core, then click theOKbutton to close the sub window. - Enable compiler optimizations by pressing the button on the bottom-right of the main window, then run the script by pressing the
▶button at the top of the window. - Avoid applying any search filters. By default the script does not have any specific filters applied, which is what we want as Moarencounterbots handles the process of finding a desired result.
If done correctly, when pressing the ▶ button you should see a list of advances, this shows that the script is working as intended. Save the changes after confirming that the script is working properly.
Figure 2 - SysBot Setup
Moarencounterbots (SysBot.NET) is used to automate the process of finding a desirable seed that matches your search conditions. You should have already configured the bot mode to work for Legends: Arceus, if you skipped this step you will need to revisit the material found on the main page.
Spawner RNG Setup
- Open Sysbot.NET and click the
Hubtab, then open theEncounterLAdropdown menu to reveal the settings. - Set the
OWLegendaryto match your desired target, this will determine the routine the bot uses. - Set the
SearchDepthto an amount you are comfortable with, this is the amount of advances you wish to search through. - For Uxie, Mesprit, Azelf, Heatran & Cresselia, advancing the seed once takes around 30-60 seconds as they immediately respawn.
- For Phione, Manaphy, Shaymin, Darkrai, Tornadus, Thundurus, Landorus & Enamorus, advancing the seed once can take up to 5 minutes.
- It may take a long time to reach your target frame. It is recommended to have a
SearchDepthof 10-100 depending on the rarity of your target. - For Phione specifically, set
CheckAllPhioneLayerstoTrueif you have NOT caught any Phione, otherwise set this value toFalse(More Information).
Most of these encounters have an initial in-game cutscene the first time you interact with them. It is recommended to interact with your desired target at least once, then leave back to Jubilife and save the game. This will remove the intro cutscene and refresh your seed.
Figure 3 - PokeViewer Setup
The main use of PokeViewer.NET is to read the details of the Pokémon we are in battle with, this can then be compared with the Spawner RNG LINQPad script to track current advances. This helps to avoid overshooting your target frame.
- Open
PokeViewer.exeand type the IP address of your console into the assigned field. - Click
Connect, doing this should display the trainer information of your save file. - Navigate to the
Viewtab and enter a battle in-game, then click theViewbutton. - If everything is working as intended you should now see the details of the Pokémon you are in battle with.
Worked Example
The instructions for hitting a target frame depend on your target Pokémon and exactly how that Pokémon is generated. For example, encounters that are found in caves are generated when the player enters the cave, and encounters found in the Overworld will be set as soon as the player enters the map from Jubilife.
Figure 1 - In-game Setup (Cave)

Resources
It is recommended to stack plenty of resources before getting started, as you will be unable to leave the area back to Jubilife after you have found a desirable target seed. Examples of good resources to bring along include:
- Throwable items (e.g Ball of Mud, Sticky Glob) - Used to remove the protective barrier surrounding a Pokémon.
- Poké Balls (e.g Ultra, Gigaton, Jet Balls) - You will need enough to be able to capture your target Pokémon.
- Healing items (e.g Max Potions, Elixirs) - We can revisit camp at any time, so carrying spare healing items is optional but recommended.
Party Members:
You should bring along party members that are capable of consistently knocking out your target Pokémon within 1-2 turns to speed up the process of advancing your spawner seed. Alongside an attacking Pokémon you may wish to bring along a party member that can weaken your target Pokémon and make capture easier by inflicting status conditions.
Character Positioning:
- Gather the required resources and party members, then navigate to the cave that contains your target.
- Stand outside the cave facing the entrance, close enough so that the
A Entertext box appears (see above image). - Save the game in this state, then disconnect any extra controllers or attach your JoyCons to the console (required to use SysBot routines).
Figure 2 - Bot Setup (Cave)
At this stage your bot should already be configured to search for your desired target, refer to the SysBot Setup instructions above if you have not already done so. In this instance, our bot is configured to search for Heatran with a SearchDepth value of 10.
Stop Conditions
After completing all of the initial bot configurations you will need to set your StopConditions. This essentially decides when the bot will stop searching for a target (result has been found). To set your Stop Conditions do the following:
- In the
Hubtab of SysBot, navigate to theStopConditionsdropdown menu. Here we can see various different fields. - If you wish to filter for a specific nature, set the
TargetNature. - You can only target one specific nature! Set this to
Randomif you do not care or wish to target more than 1 nature. - If you wish to filter for IVs, set the
TargetMinIVs&TargetMaxIVs. - IVs are listed in this order: HP/ATK/DEF/SPATK/SPDEF/SPE. IVs you do not wish to check can be set to an
x. - You can also search for 0 OR 31 by entering
sinto your desired IV field (e.g setting Speed toswould search for a result that has 0 OR 31 in the Speed IV). - Keep
ShinyTarget&HeightTargetdisabled in all cases. - All of the encounters are shiny locked with fixed height, activating these filters will cause you to never find a result.
- After you have set your desired conditions you will need to restart the program by closing and re-opening
SysBot.exe. - Restarting the program will save any changes you have made to your
StopConditions. This is a required step that should not be skipped.
Adding & Starting Your Bot
After confirming your EncounterLA settings and StopConditions have been set properly you will need to add the EncBotOWLCheckRNGLA bot by doing the following:
- Head back to the
Botstab and selectEncBotOWLCheckRNGin the dropdown menu on the right. - Type the IP address of your console into the IP field and add the bot, you are now ready to hunt for your target Pokémon.
- Ensure that your in-game position is correct by orienting yourself with Figure 1, then click the
Start Allbutton. - If everything is done correctly you should now see that your bot has begun searching for a target. Wait until a result has been found.
Figure 3 - Target Found (Cave)
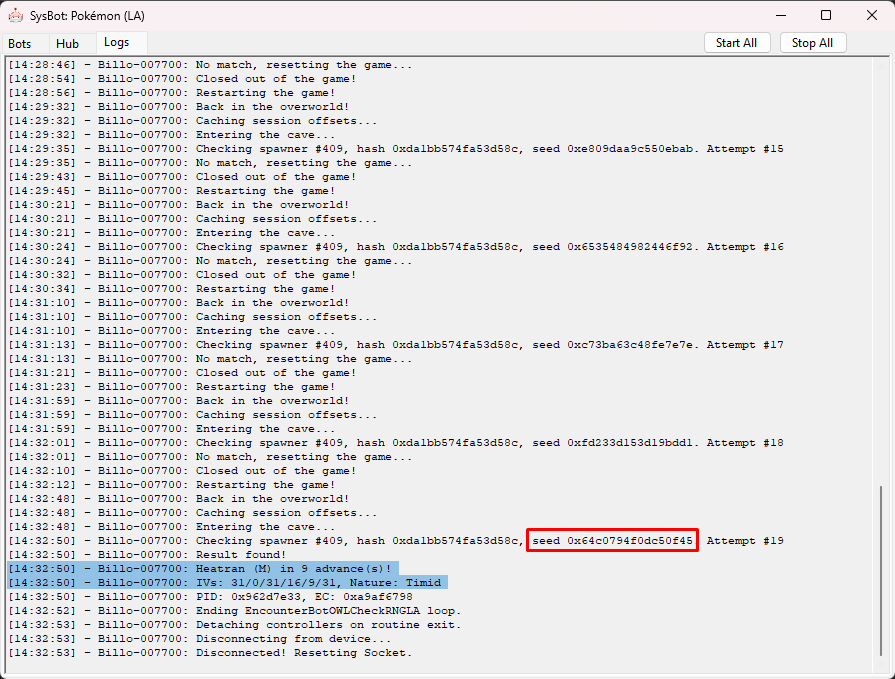
A Heatran that matches our StopConditions will appear after 9 advances. You will need to advance the spawner seed at least once to be able to track your current seed using the Spawner RNG Script. For Uxie, Mesprit, Azelf & Heatran you can advance the spawner seed by doing the following:
Advancing The Spawner Seed
- Engage your target Pokémon in battle.
- Knock it out.
- You should now see that the Pokémon has immediately respawned.
Each time the Pokémon is knocked out and respawned the spawner seed will advance by +1. This can be repeated until you hit your target frame.
Figure 4 - Tracking Spawner Seed (Cave)
To track your spawner seed you will first need to paste your spawner seed from the SysBot logs into the Spawner RNG script. The script should have been properly setup earlier, if you need to set the script up again for whatever reason do this now (see here), then revisit this section after you have done so.
- Open the
Logstab of SysBot and copy the seed from your spawner. - Open the LINQPad script and paste the group seed into the following section:
- Now set your search range into the following section:
- Now press the
▶at the top of the LINQPad to see a list of upcoming advances. You should see your target Pokémon in the search results. - Engage in battle with your target Pokémon and open PokeViewer.NET, then connect to the program and navigate to the
Viewtab. - Inspect the Pokémon you are in battle with and confirm that the PID/IVs/Nature match the first result of the LINQPad script output.
- As stated above, you must have advanced the spawner seed at least once and re-engage in battle with your target Pokémon to track your spawner seed.
// Set your group seed here.
ulong group_seed = seedhere;
// Set this for how far you want to search.
int maxAdvance = searchrangehereseedhere;
Once you have confirmed and are tracking your spawner seed you can continue advancing the seed until you reach your target frame by knocking the Pokémon out the required number of times.
Figure 5 - Result Found (Cave)
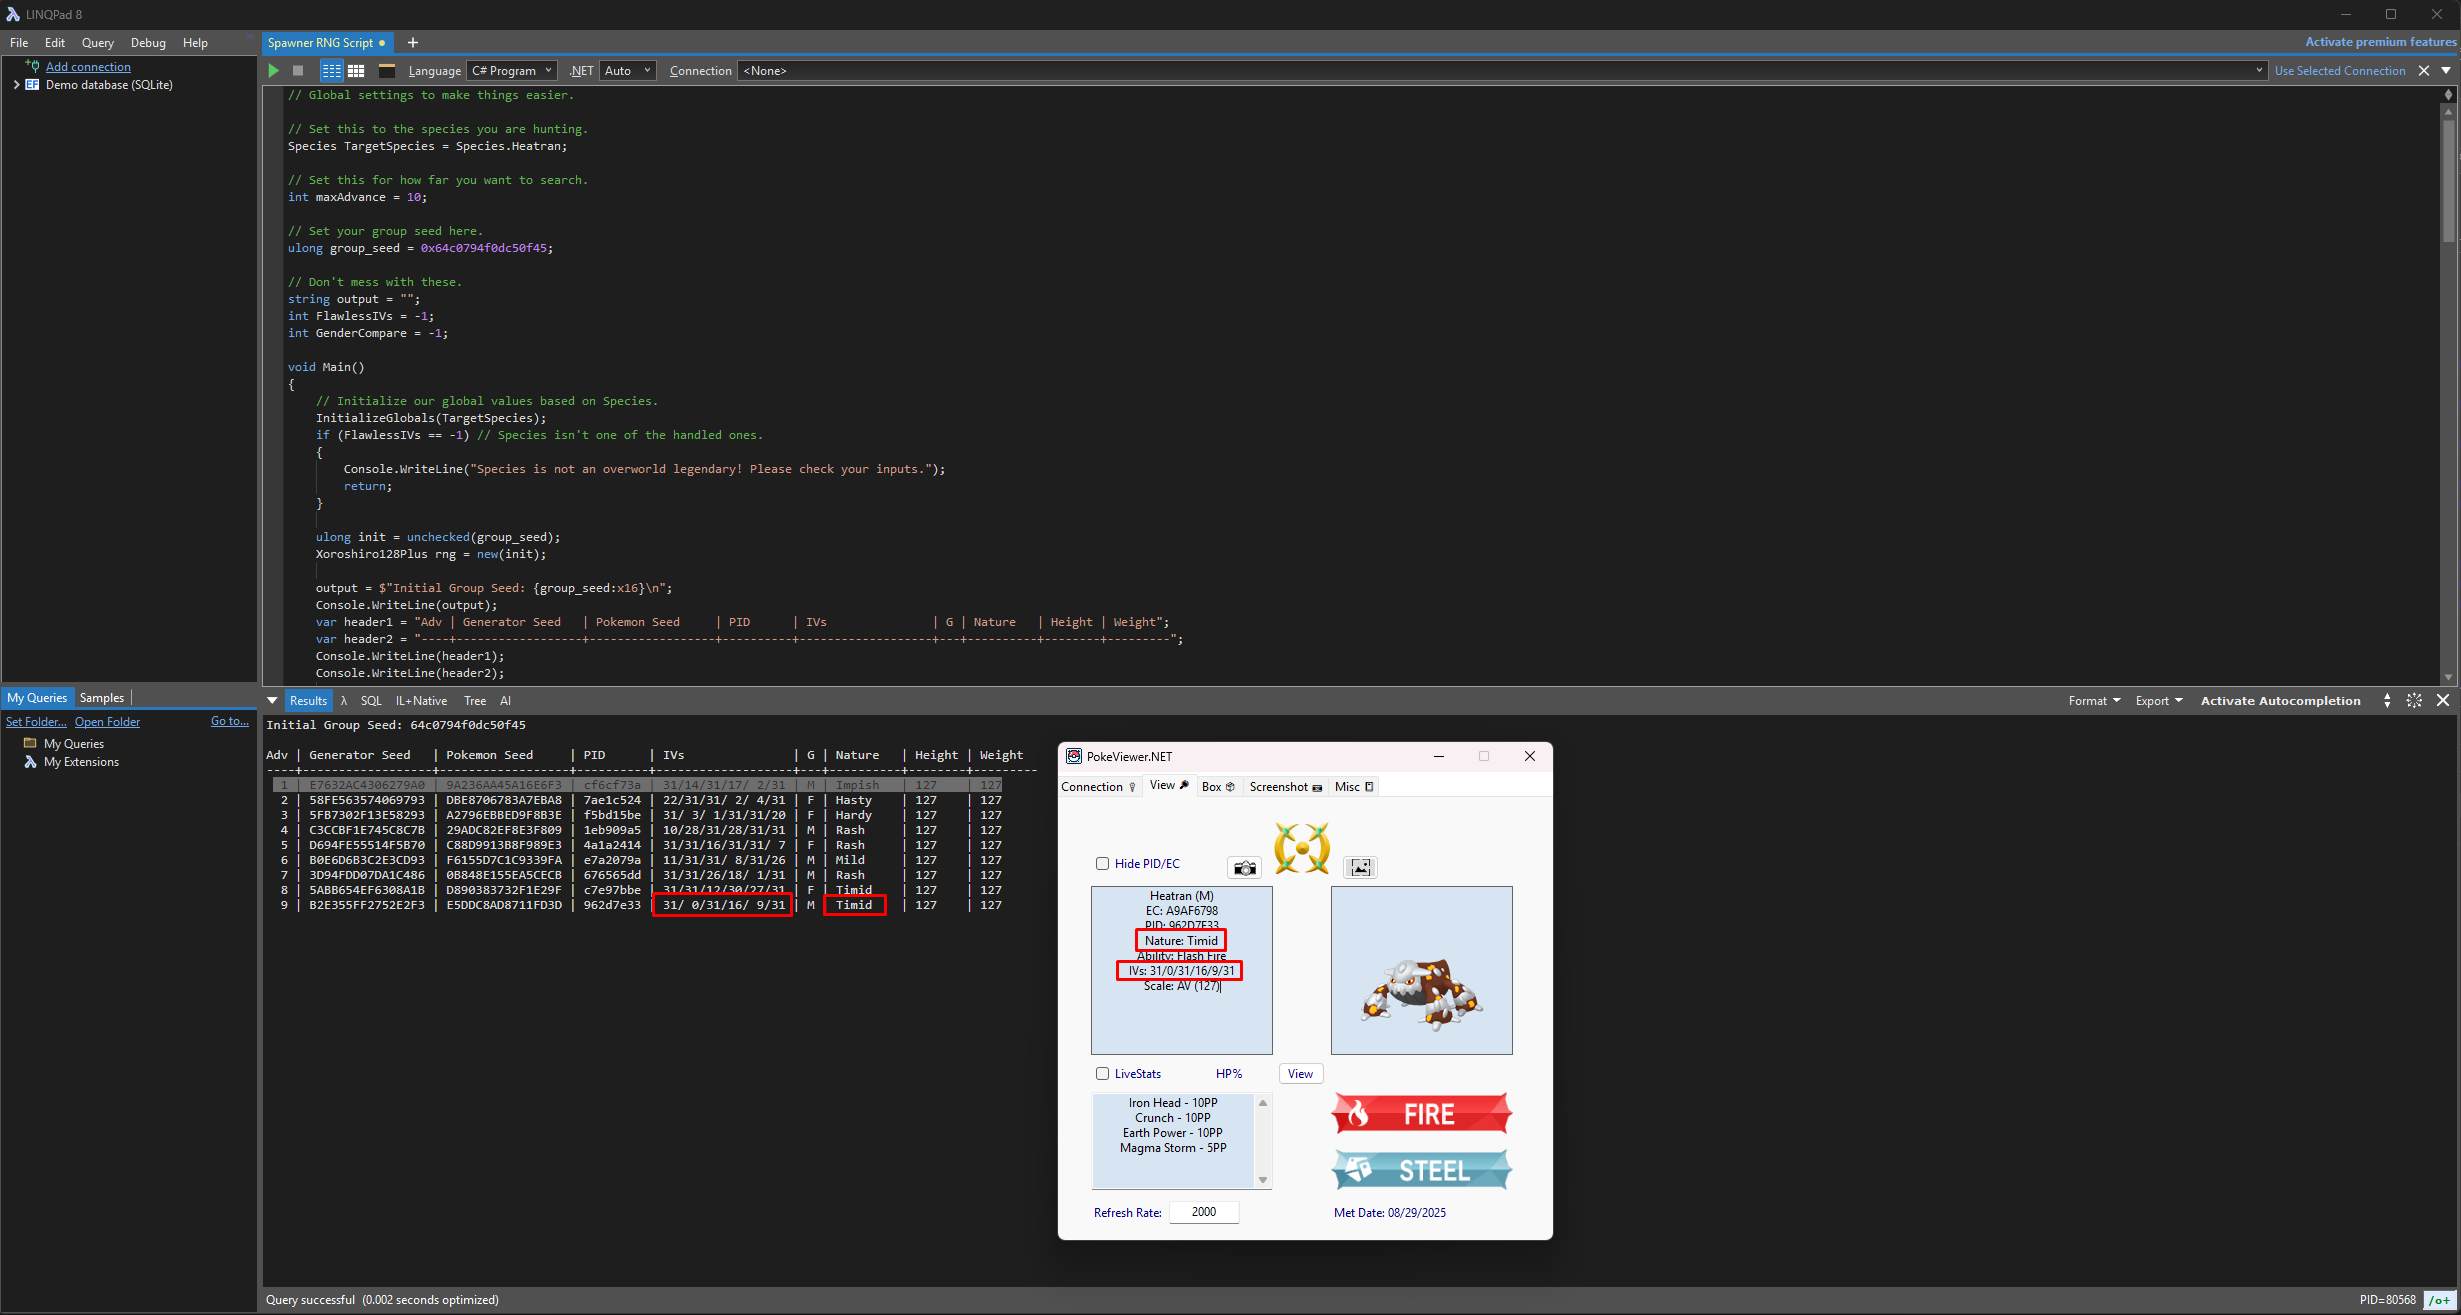
After advancing the spawner seed 9 times and engaging Heatran in battle we can see that the details match what is expected by the spawner script. That's all there is to it!
Figure 1 - In-game Setup (Overworld)
Resources
It is recommended to stack plenty of resources before getting started, as you will be unable to leave the area back to Jubilife after you have found a desirable target seed. Examples of good resources to bring along include:
- Throwable items (e.g Ball of Mud, Sticky Glob) - Used to remove the protective barrier surrounding a Pokémon.
- Poké Balls (e.g Ultra, Gigaton, Jet Balls) - You will need enough to be able to capture your target Pokémon.
- Healing items (e.g Max Potions, Elixirs) - We can revisit camp at any time, so carrying spare healing items is optional but recommended.
- Stealth items (e.g Stealth Spray, Smoke Ball) - These items are incredibly useful for the weather genies and Darkrai in particular.
Party Members:
You should bring along party members that are capable of consistently knocking out your target Pokémon within 1-2 turns to speed up the process of advancing your spawner seed. Alongside an attacking Pokémon you may wish to bring along a party member that can weaken your target Pokémon and make capture easier by inflicting status conditions.
Character Positioning:
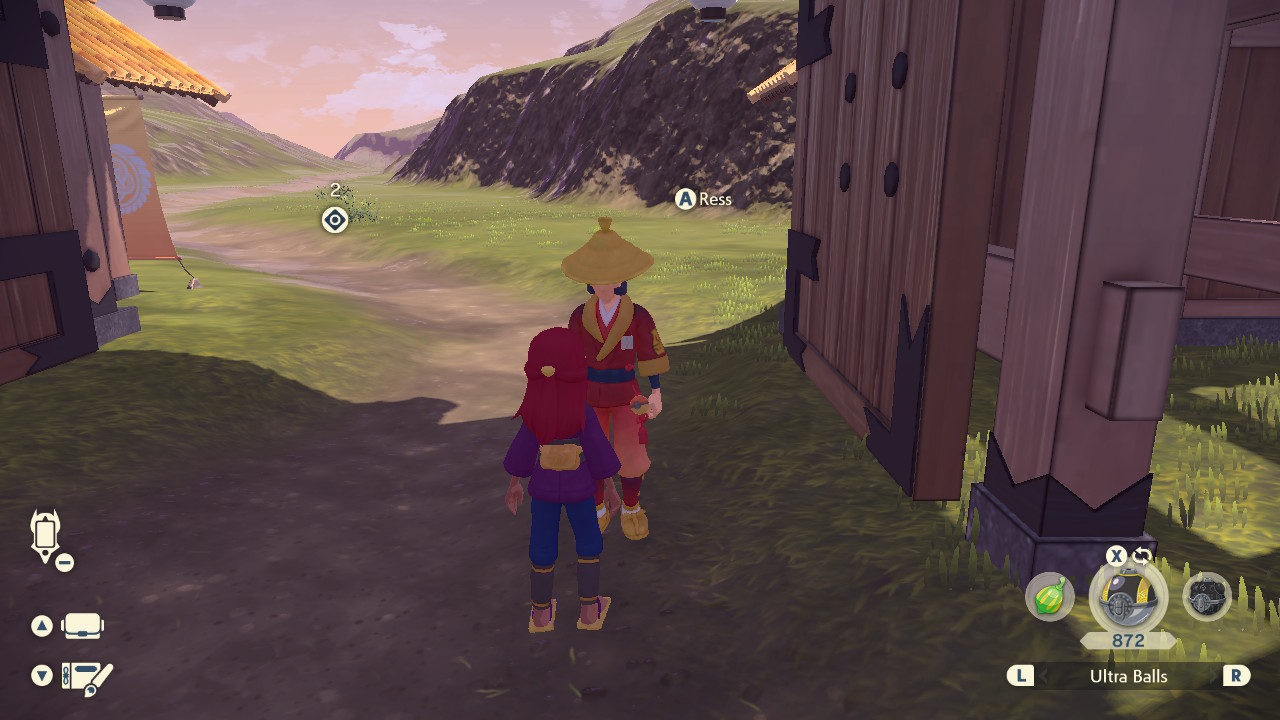
- Gather the required resources and party members, then navigate to the Guard Ress on the outskirts of Jubilife.
- Stand directly facing Guard Ress, close enough so that the
A Resstext box appears (see above image). - Save the game in this state, then disconnect any extra controllers or attach your JoyCons to the console (required to use SysBot routines).
Figure 2 - Bot Setup (Overworld)
At this stage your bot should already be configured to search for your desired target, refer to the SysBot Setup instructions above if you have not already done so. In this instance, our bot is configured to search for Enamorus with a SearchDepth value of 10.
Stop Conditions
After completing all of the initial bot configurations you will need to set your StopConditions. This essentially decides when the bot will stop searching for a target (result has been found). To set your Stop Conditions do the following:
- In the
Hubtab of SysBot, navigate to theStopConditionsdropdown menu. Here we can see various different fields. - If you wish to filter for a specific nature, set the
TargetNature. - You can only target one specific nature! Set this to
Randomif you do not care or wish to target more than 1 nature. - If you wish to filter for IVs, set the
TargetMinIVs&TargetMaxIVs. - IVs are listed in this order: HP/ATK/DEF/SPATK/SPDEF/SPE. IVs you do not wish to check can be set to an
x. - You can also search for 0 OR 31 by entering
sinto your desired IV field (e.g setting Speed toswould search for a result that has 0 OR 31 in the Speed IV). - Keep
ShinyTarget&HeightTargetdisabled in all cases. - All of the encounters are shiny locked with fixed height, activating these filters will cause you to never find a result.
- After you have set your desired conditions you will need to restart the program by closing and re-opening
SysBot.exe. - Restarting the program will save any changes you have made to your
StopConditions. This is a required step that should not be skipped.
Adding & Starting Your Bot
After confirming your EncounterLA settings and StopConditions have been set properly you will need to add the EncBotOWLCheckRNGLA bot by doing the following:
- Head back to the
Botstab and selectEncBotOWLCheckRNGin the dropdown menu on the right. - Type the IP address of your console into the IP field and add the bot, you are now ready to hunt for your target Pokémon.
- Ensure that your in-game position is correct by orienting yourself with Figure 1, then click the
Start Allbutton. - If everything is done correctly you should now see that your bot has started cycling through Jubilife and whichever map contains your target. Wait until a result has been found.
Figure 3 - Target Found (Overworld)
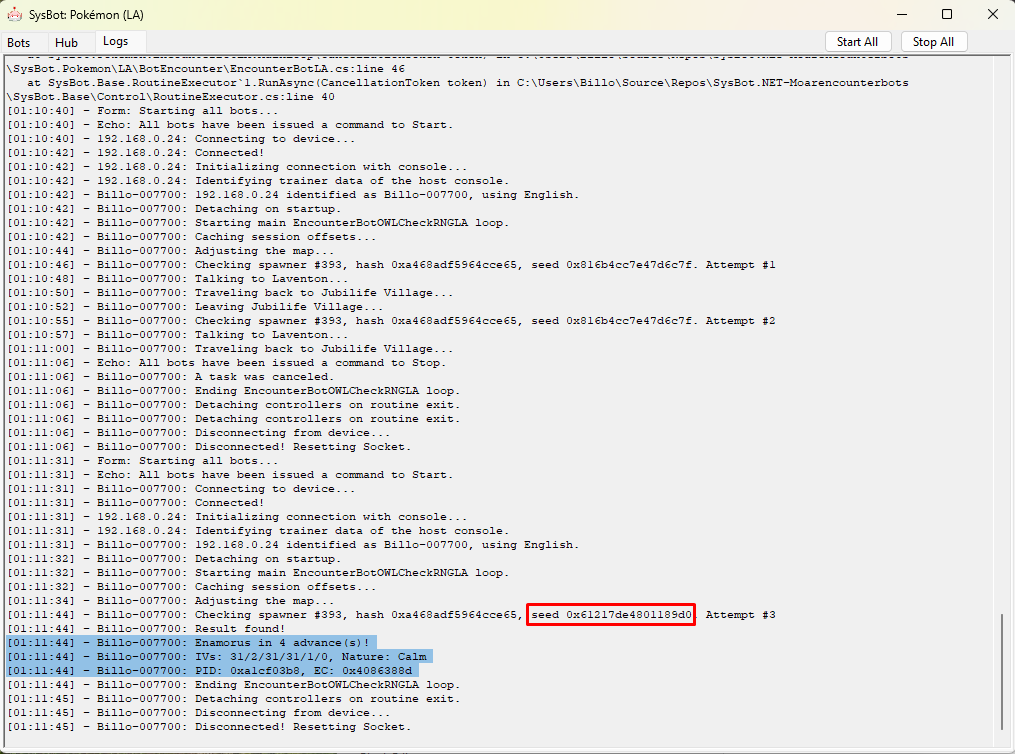
An Enamorus that matches our StopConditions will appear after 4 advances. You will need to advance the spawner seed at least once to be able to track your current seed using the Spawner RNG Script. The spawner seed can be advanced by doing the following:
- Engage in battle and knock out your target Pokémon. Use a super effective move to quickly knock the Pokémon out.
- Teleport to a campsite and set the time of day to evening. Evening -> Night has the shortest cycle (3 minutes), making it optimal for advancing the spawner seed.
- If your target is Tornadus you must sleep repeatedly until the weather is a blizzard or Tornadus will never spawn.
- If your target is Thundurus you must sleep repeatedly until the weather is a thunderstorm or Thundurus will never spawn.
- If your target is Cresselia it will respawn immediately after knocking it out, you do not need to teleport to a campsite. Go to step 6.
- Enter the closest subzone (cave) on the map before the time of day turns to night, then wait inside until night time.
- For Obsidian Fields (Shaymin/Landorus), head to the cave at Lake Verity.
- For Crimson Mirelands (Enamorus), head to the cave at Lake Valor.
- For Cobalt Coastlands (Thundurus), head to the cave at Firespit Island.
- For Alabaster Icelands (Tornadus), head to the cave at Lake Acuity.
- For Coronet Highlands (Darkrai), head to either side of Wayward Cave.
- Set a map marker in the area that contains your target Pokémon to make it easier to relocate after leaving the cave (optional).
- Once the time of day turns to night, leave the cave and teleport to the closest campsite to your target, then use Braviary to make your way back.
- Your Pokémon should have respawned, causing the spawner seed to advance by +1. Repeat this process until you reach your target frame.
Figure 4 - Tracking Spawner Seed (Overworld)
An Enamorus that matches our StopConditions will appear after 4 advances. To track your spawner seed you will first need to paste your spawner seed from the SysBot logs into the Spawner RNG script. The script should have been properly setup earlier, if you need to set the script up again for whatever reason do this now (see here), then revisit this section after you have done so.
Tracking Spawner Seeds
- Open the
Logstab of SysBot and copy the seed from your spawner. - Open the LINQPad script and paste the group seed into the following section:
- Now set your search range into the following section:
- Now press the
▶at the top of the LINQPad to see a list of upcoming advances. You should see your target Pokémon in the search results. - Engage in battle with your target Pokémon and open PokeViewer.NET, then connect to the program and navigate to the
Viewtab. - Inspect the Pokémon you are in battle with and confirm that the PID/IVs/Nature match the first result of the LINQPad script output.
- As stated above, you must have advanced the spawner seed at least once and re-engage in battle with your target Pokémon to track your spawner seed.
// Set your group seed here.
ulong group_seed = seedhere;
// Set this for how far you want to search.
int maxAdvance = searchrangehereseedhere;
Once you have confirmed and are tracking your spawner seed you can now advance the spawner seed by knocking the Pokémon out and respawning it the required number of times (see above).
Figure 5 - Result Found (Overworld)
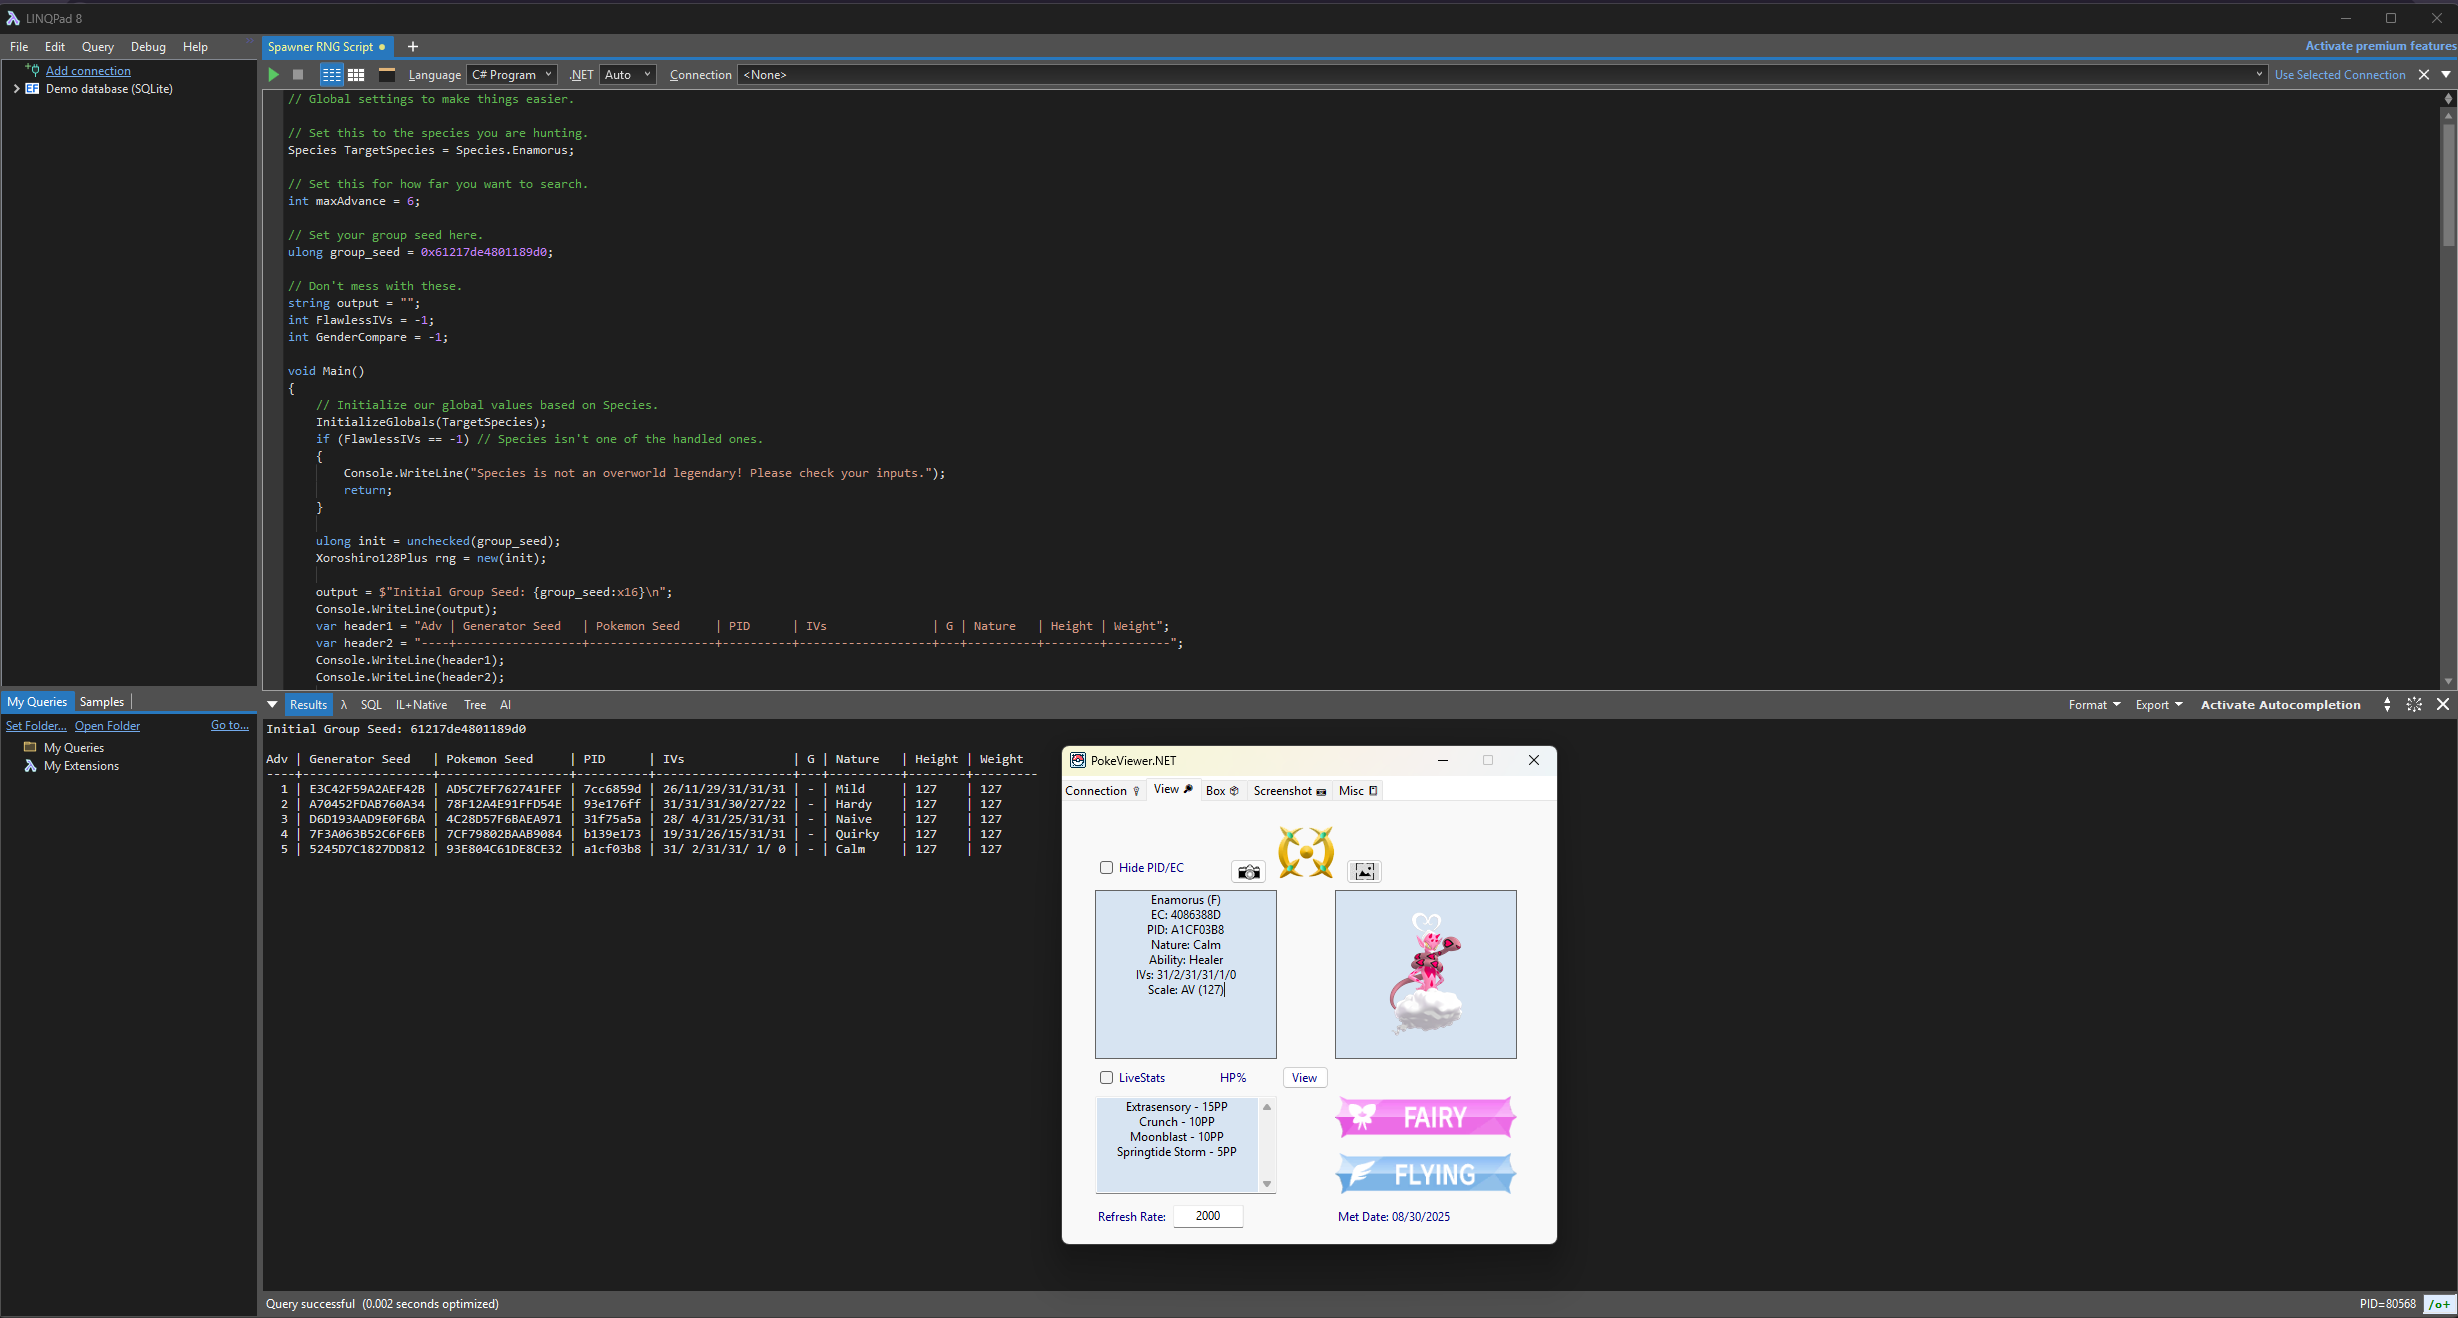
After advancing the spawner seed 4 times and engaging Enamorus in battle we can see that the details match what is expected by the spawner script. That's all there is to it!
Figure 1 - In-game Setup (Manaphy/Phione)

Resources
It is recommended to stack plenty of resources before getting started, as you will be unable to leave the area back to Jubilife after you have found a desirable target seed. Examples of good resources to bring along include:
- Throwable items (e.g Ball of Mud, Sticky Glob) - Used to remove the protective barrier surrounding a Pokémon.
- Poké Balls (e.g Ultra, Gigaton, Jet Balls) - You will need enough to be able to capture your target Pokémon.
- Healing items (e.g Max Potions, Elixirs) - We can revisit camp at any time, so carrying spare healing items is optional but recommended.
Party Members:
You should bring along party members that are capable of consistently knocking out your target Pokémon within 1-2 turns to speed up the process of advancing your spawner seed. Alongside an attacking Pokémon you may wish to bring along a party member that can weaken your target Pokémon and make capture easier by inflicting status conditions.
Character Positioning:
- Gather the required resources and party members, then navigate to the cave that contains your target.
- Stand outside the cave facing the entrance, close enough so that the
A Entertext box appears (see above image). - Save the game in this state, then disconnect any extra controllers or attach your JoyCons to the console (required to use SysBot routines).
Figure 2 - Bot Setup (Manaphy/Phione)
At this stage your bot should already be configured to search for your desired target, refer to the SysBot Setup instructions above if you have not already done so. In this instance, our bot is configured to search for Phione with a SearchDepth value of 10. We have also set CheckAllPhioneLayers to True as no Phione have been caught on this save file.
Stop Conditions
After completing all of the initial bot configurations you will need to set your StopConditions. This essentially decides when the bot will stop searching for a target (result has been found). To set your Stop Conditions do the following:
- In the
Hubtab of SysBot, navigate to theStopConditionsdropdown menu. Here we can see various different fields. - If you wish to filter for a specific nature, set the
TargetNature. - You can only target one specific nature! Set this to
Randomif you do not care or wish to target more than 1 nature. - If you wish to filter for IVs, set the
TargetMinIVs&TargetMaxIVs. - IVs are listed in this order: HP/ATK/DEF/SPATK/SPDEF/SPE. IVs you do not wish to check can be set to an
x. - You can also search for 0 OR 31 by entering
sinto your desired IV field (e.g setting Speed toswould search for a result that has 0 OR 31 in the Speed IV). - Keep
ShinyTarget&HeightTargetdisabled if you are hunting Manaphy. - For Phione you can set a
HeightTargetif you wish to search for a Phione that qualifies for the Jumbo or Mini mark when transferred to Scarlet/Violet. - Both Manaphy and Phione are shiny locked, so keep
ShinyTargetdisabled for both cases or you will never find a result. - After you have set your desired conditions you will need to restart the program by closing and re-opening
SysBot.exe. - Restarting the program will save any changes you have made to your
StopConditions. This is a required step that should not be skipped.
Adding & Starting Your Bot
After confirming your EncounterLA settings and StopConditions have been set properly you will need to add the EncBotOWLCheckRNGLA bot by doing the following:
- Head back to the
Botstab and selectEncBotOWLCheckRNGin the dropdown menu on the right. - Type the IP address of your console into the IP field and add the bot, you are now ready to hunt for your target Pokémon.
- Ensure that your in-game position is correct by orienting yourself with Figure 1, then click the
Start Allbutton. - If everything is done correctly you should now see that your bot has begun searching for a target. Wait until a result has been found.
Figure 3 - Target Found (Manaphy/Phione)
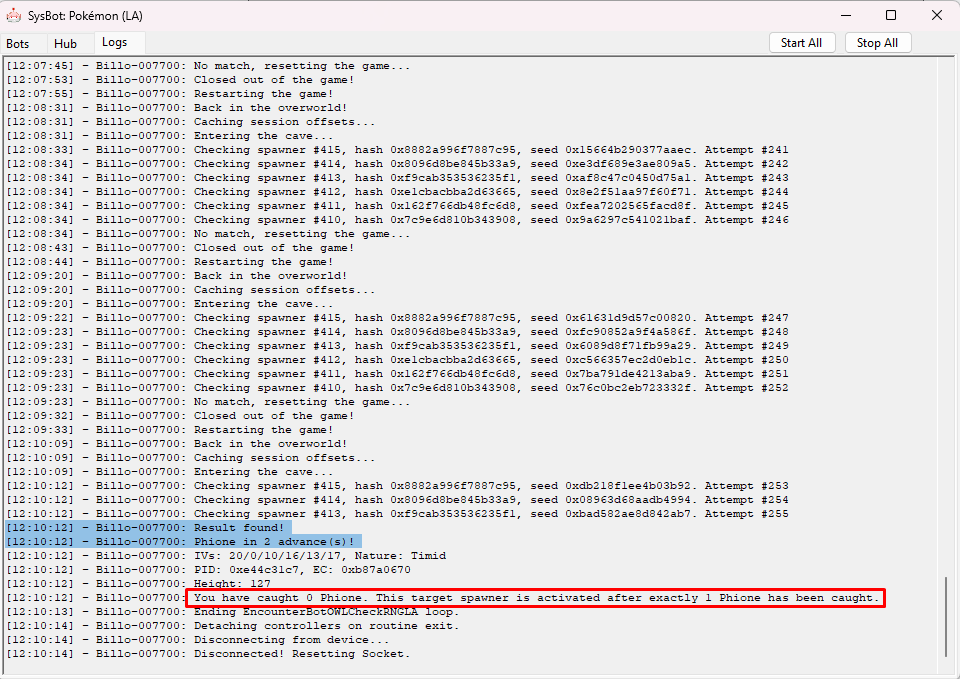
A Phione that matches our StopConditions will appear after 2 advances. If your desired target is Phione you should read the information in the "Phione Specifics" section below as it contains important information specific to Phione. If your target is Manaphy you can move straight onto "Advancing The Spawner Seed".
Phione Specifics
If the bot logs indicate that a certain number of Phione must be captured before accessing the correct spawner, you must do this first. The game tracks a total of six Phione spawners and unlocks specific ones depending on how many Phione have been caught.
- Capturing 1 Phione leaves 2 in the cave, unlocking two different spawners.
- Capturing 2 Phione leaves 1 in the cave, unlocking one different spawner.
- Capturing none keeps the original 3 spawners active.
In our example, we must capture 1 Phione before proceeding. Once the required number of Phione have been caught we then need to leave the cave and re-enter to unlock the correct Phione spawners (this is not required if you do not need to capture any Phione).
Advancing The Spawner Seed
You will need to advance the spawner seed at least once to be able to track your current seed using the Spawner RNG Script. For both Manaphy & Phione the spawner seed can be advanced by doing the following in-game actions:
- Engage in battle and knock out your target Pokémon.
- If your target is Phione knock out all of them. If your target is Manaphy you can knock out only Manaphy if you wish.
- Leave the cave, then Teleport to a campsite and set the time of day to evening.
- Overworld legends respawn after the day cycle changes, Evening -> Night has the shortest cycle (3 minutes), making it optimal for advancing the spawner seed.
- Open the map and place a map pin on Seaside Hallow, then Teleport to Firespit Island.
- This is the quickest route back to the cave at Seaside Hallow, ensuring we have enough time to make it into the cave before evening turns to night.
- Use Braviary to fly back to Seaside Hallow and enter the cave before night time.
- Keep in mind that any existing Manaphy/Phione in the cave will be aggressive and try to attack you.
- Wait until night time for Manaphy/Phione to respawn.
- This process will advance the spawner seed by +1, and can be repeated until you reach your target frame.
Figure 4 - Tracking Spawner Seed (Manaphy/Phione)
To track your spawner seed you will first need to paste your spawner seed from the SysBot logs into the Spawner RNG script. The script should have been properly setup earlier, if you need to set the script up again for whatever reason do this now (see here), then revisit this section after you have done so.
- Ensure that you have advanced the spawner seed at least once. This is required as the initially spawned Pokémon is not tracked by the script.
- Open the
Logstab of SysBot and copy the seed from your spawner. If your target is Phione then you will need to copy the seed from the final spawner. - Open the LINQPad script and paste the group seed into the following section:
- Now set your search range into the following section:
- Now press the
▶at the top of the LINQPad to see a list of upcoming advances. You should see your target Pokémon in the search results. - Engage in battle with your target Pokémon and open PokeViewer.NET, then connect to the program and navigate to the
Viewtab. - Inspect the Pokémon you are in battle with and confirm that the PID/IVs/Nature match the first result of the LINQPad script output.
- If there are multiple Phione on the field you will need to find the one that matches the script output. Each Phione has an independent spawner seed.
// Set your group seed here.
ulong group_seed = seedhere;
// Set this for how far you want to search.
int maxAdvance = searchrangehereseedhere;
Once you have confirmed and are tracking your spawner seed you can continue advancing the seed until you reach your target frame. For Phione it is recommended to only knock out the required Phione as this will make it easier to track as it will be the only Phione that actually respawns.
Figure 5 - Result Found (Manaphy/Phione)
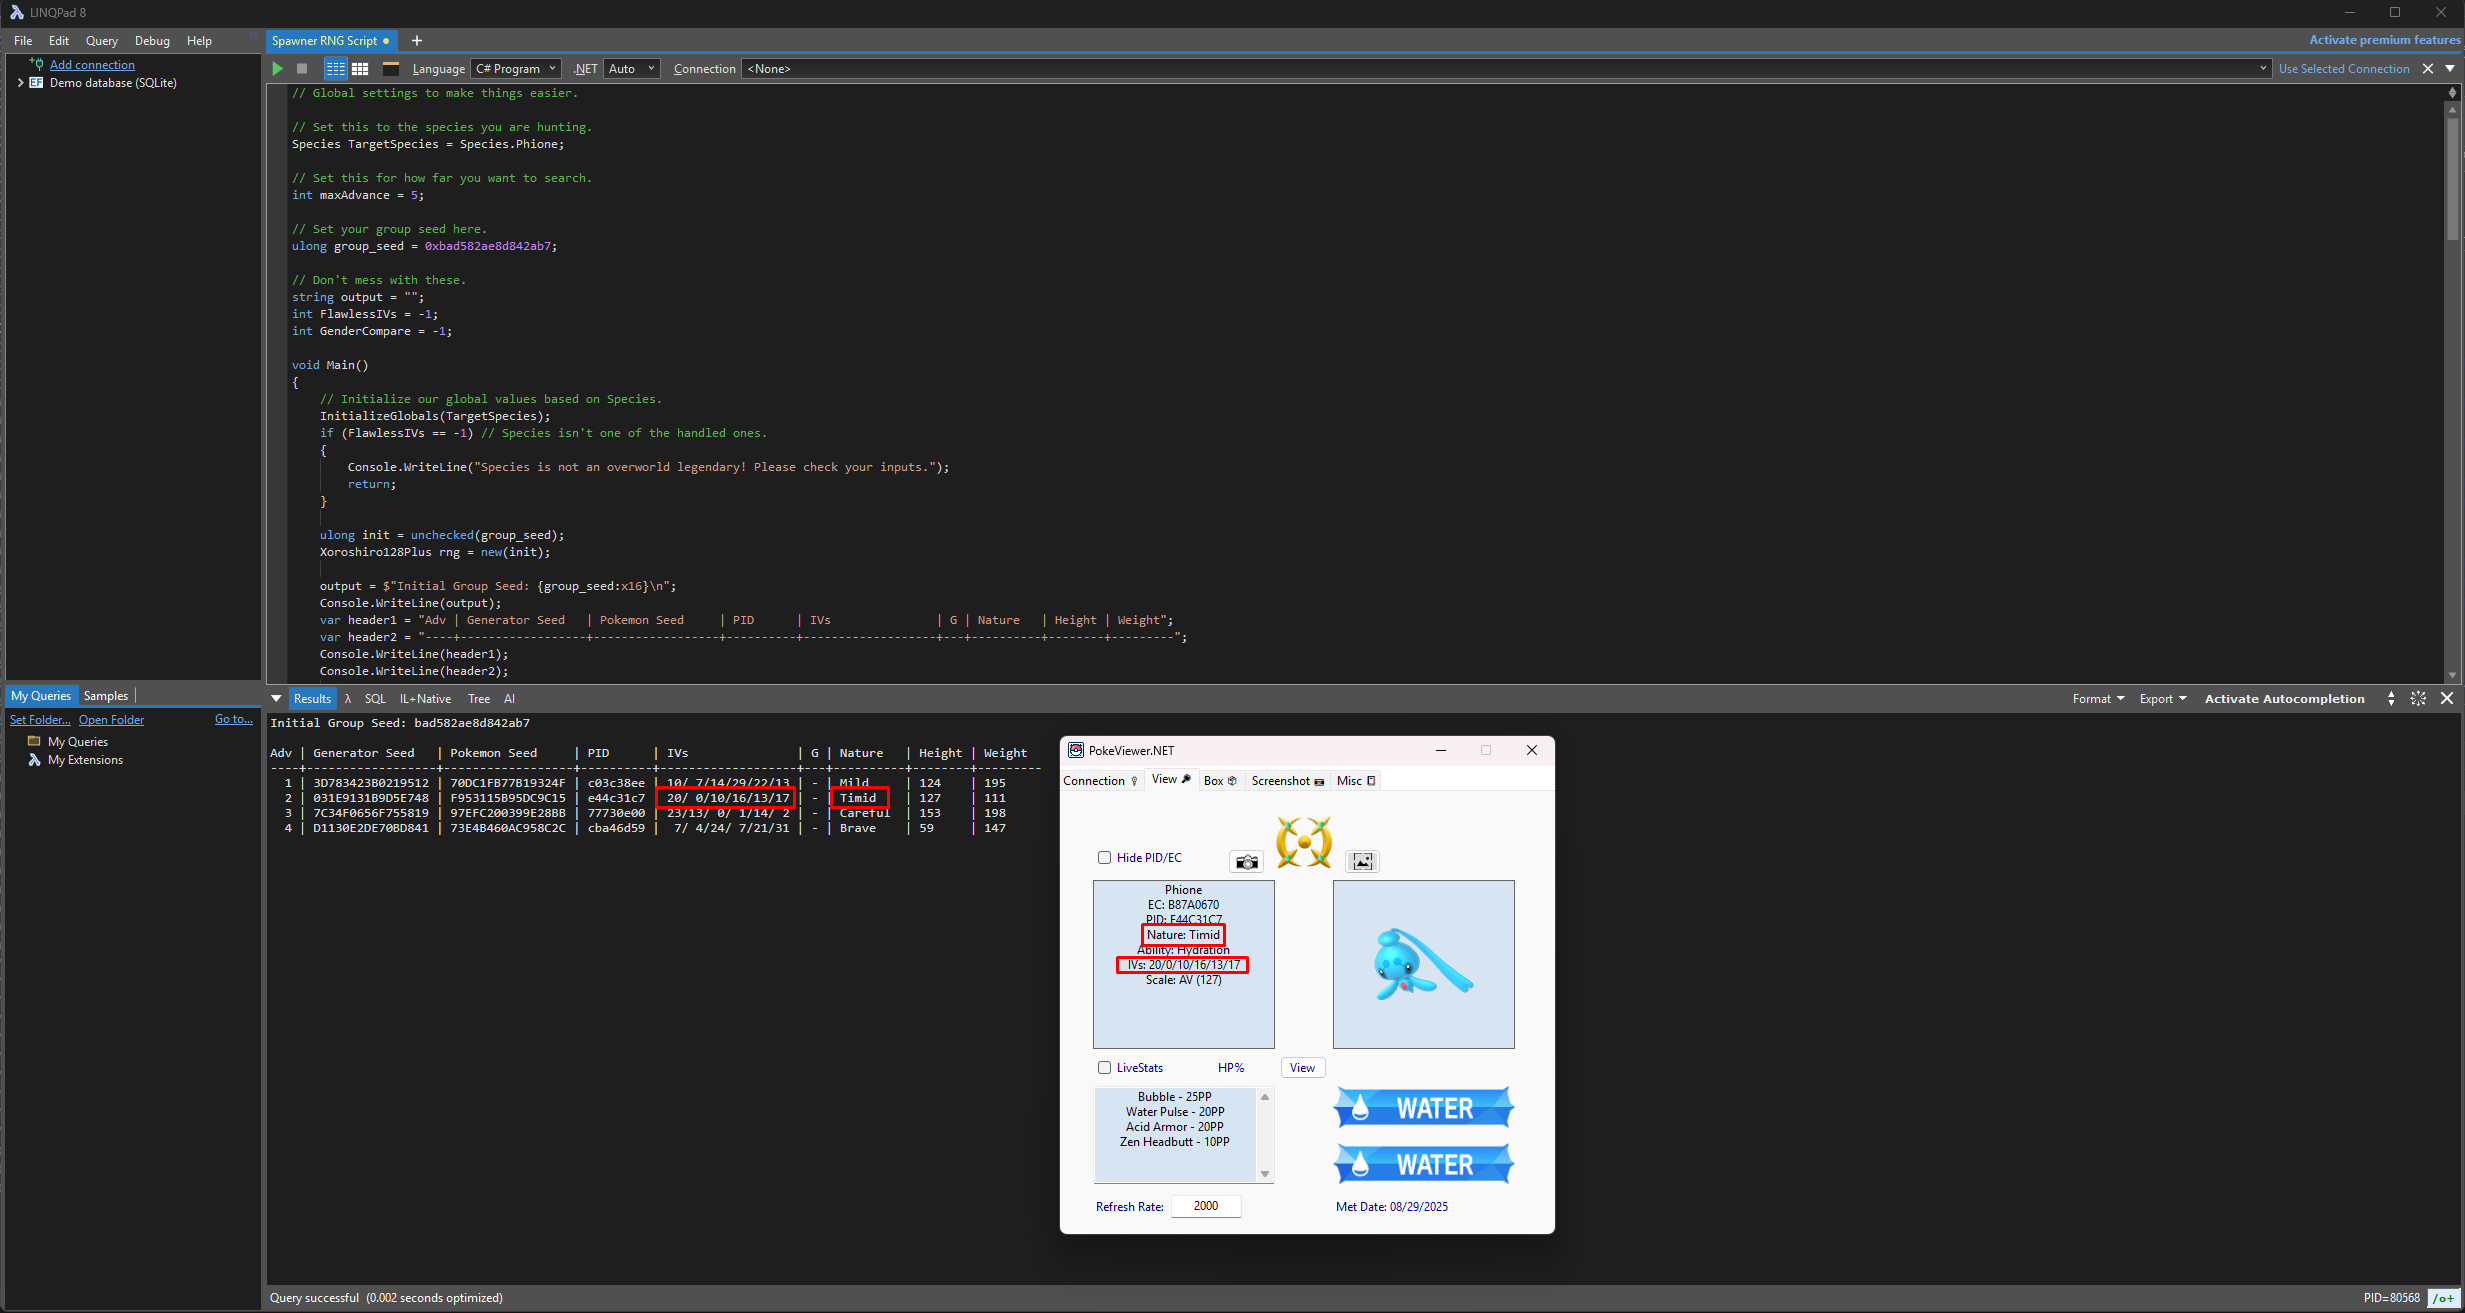
After advancing the spawner seed 2 times and engaging Phione in battle we can see that the details match what is expected by the spawner script. That's all there is to it!