Overworld Symbol Encounters
Random Symbol spawners generate different species of Pokémon from an encounter table. A random number from 0 to 99 determines the encounter slot. The encounter tables are weather-dependent and remain the same until the weather in the area changes. Since the weather can change if the console date rolls past midnight (00:00), consider setting your system time before starting to avoid unexpected RNG advancements and Pokémon spawns.
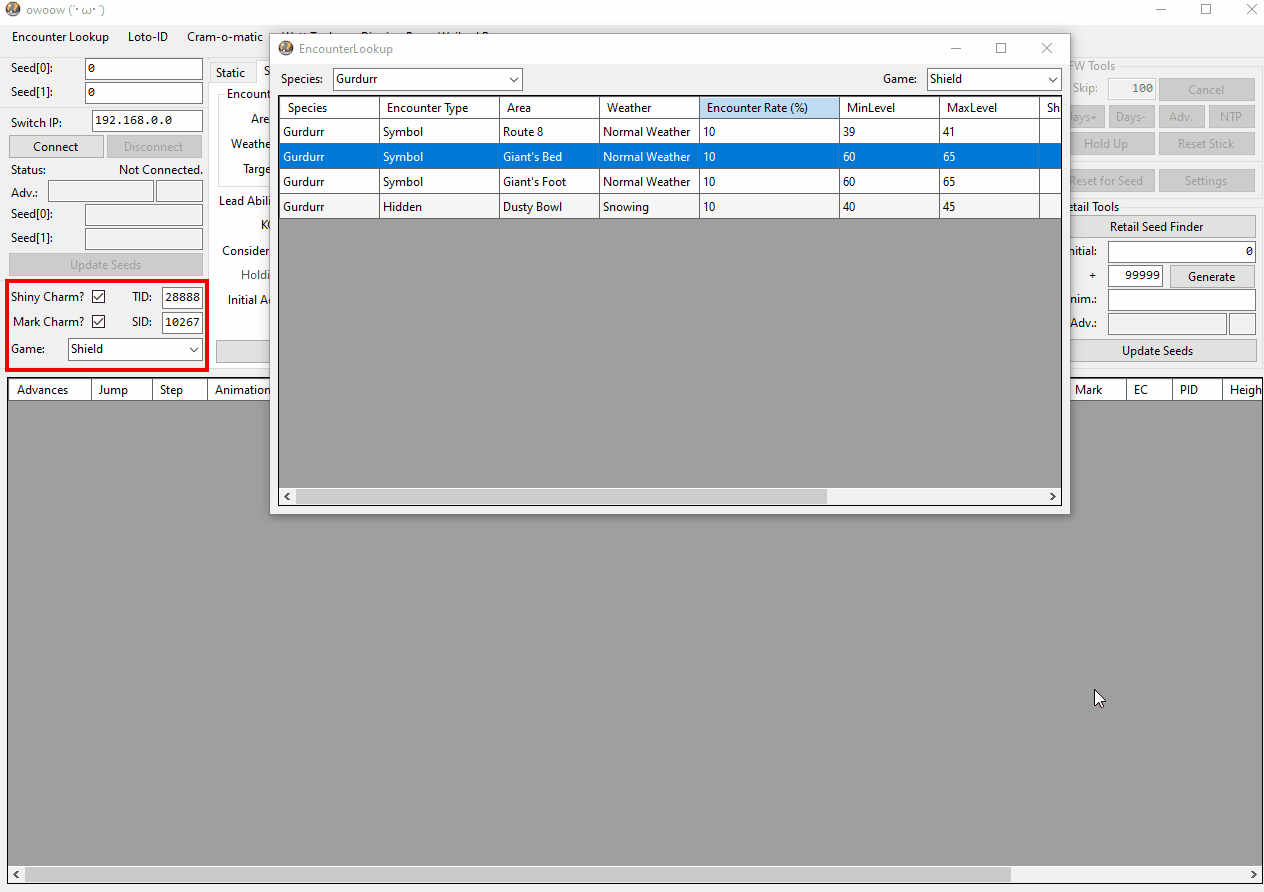
Figure 1 - RNG Tool Setup
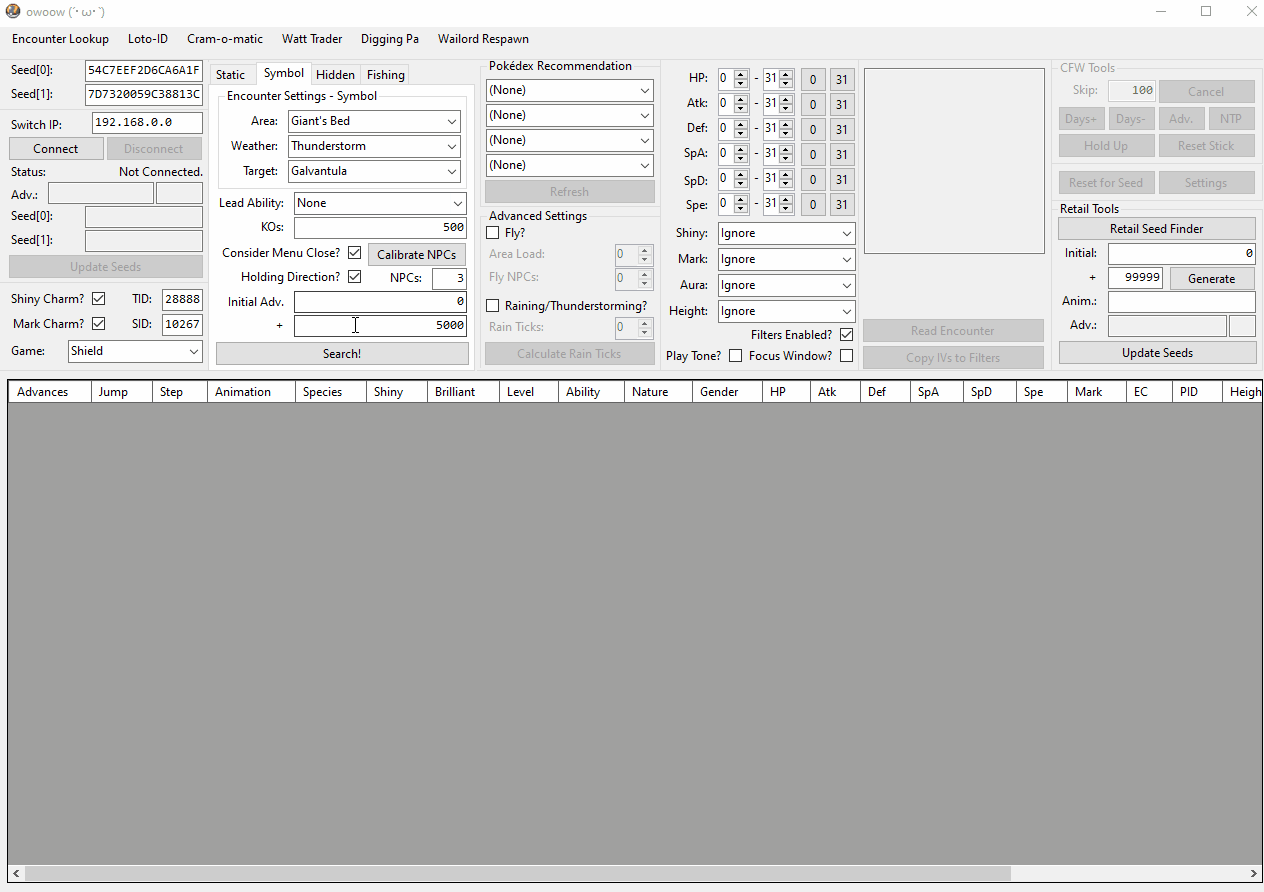
Required Setup
- In the main window, enter your TID/SID, select your game version, and check the
Shiny Charm?/Mark Charm?checkboxes if these items are present in your save file. - Click
Encounter Lookupin the top toolbar to open a subwindow. Enter the desired species name in the search field and select a SYMBOL encounter. - Close the
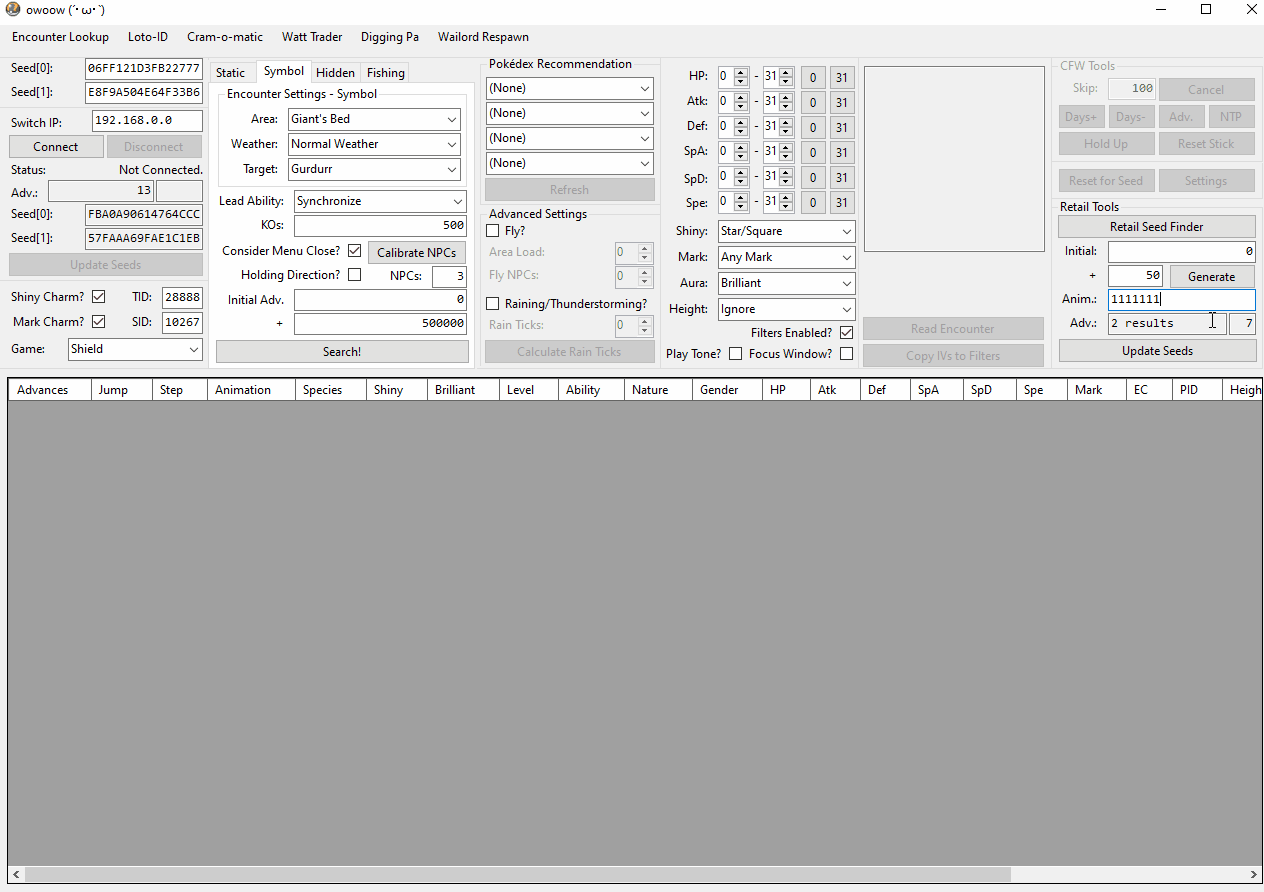
Encounter Lookupwindow, then input the relevantLocation,Weather, andSpeciesinformation into theEncounter Settingssection. - Enter the KO count for the Pokémon you are hunting into the
KOsfield. This ensures accurate prediction of extra shiny rolls from Brilliant Aura boosts. - Adjust your search range using the
+field inEncounter Settings, then configure additional search filters such as Shiny, Marks, IVs, Brilliant Aura, or Height.
KO Mechanic & Brilliant Pokémon
Brilliant Pokémon appear with a golden aura in the overworld. They have a higher shiny rate and 2-3 guaranteed perfect IVs, making them ideal for high IV shiny hunting. These boosts depend on how many of that species that you have knocked out, which can be checked by viewing the Pokédex entry.
At least 500 KOs on the target species are required to maximize Brilliant Aura bonuses. A more practical alternative is 100 KOs with Shiny Charm boosts, improving shiny rates from 1/1024 to 1/683.08. This provides a significant advantage with much less effort. For more details on Brilliant Aura and Shiny rates, refer to Bulbapedia.
Note that even though this value is frequently called the "KO count," the Pokédex actually includes all completed battles whether they were captures or true KOs. The number by Number Battled in the Pokédex should be entered in owoow.
KO COUNT MUST BE CONFIGURED PROPERLY IN OWOOW TO AVOID POTENTIAL ISSUES.
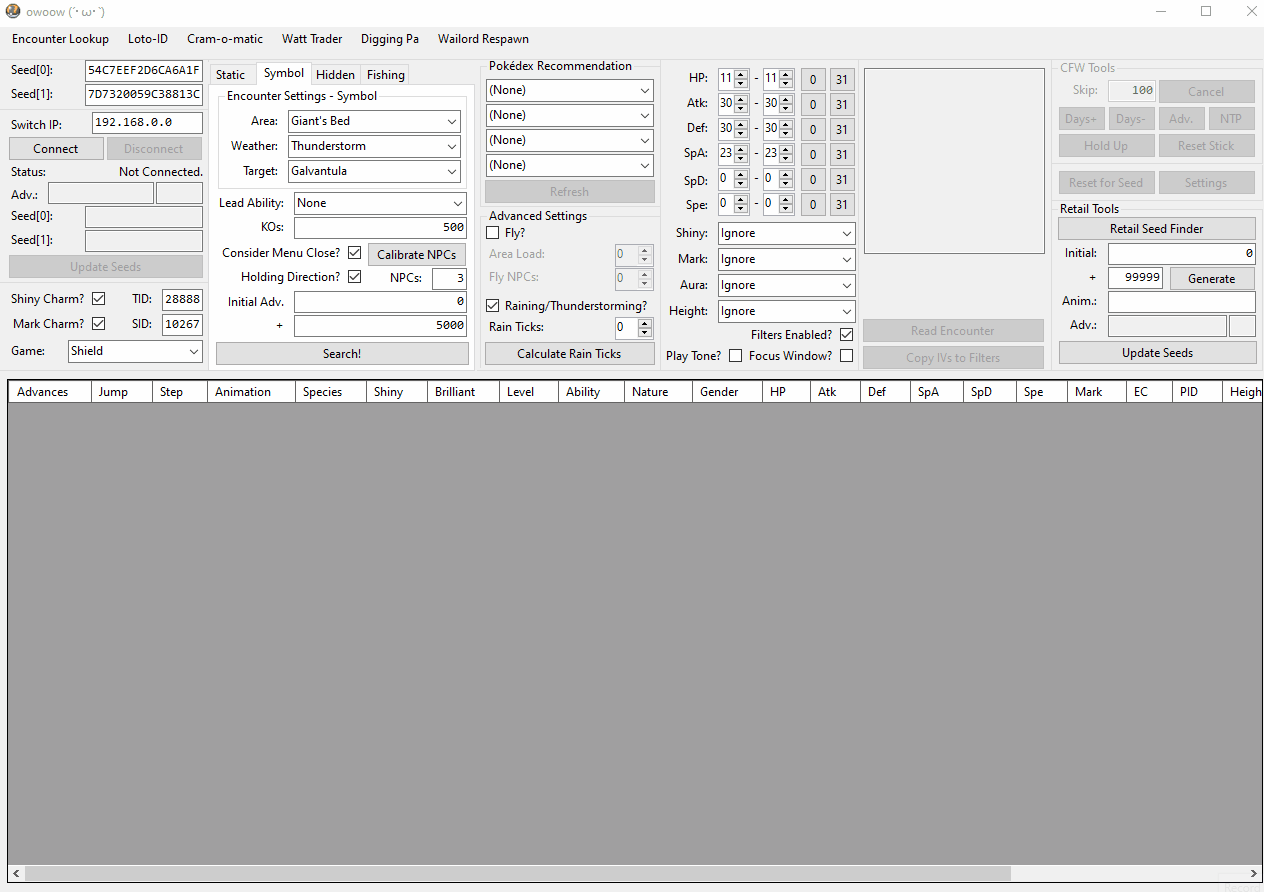
Figure 2 - Game Setup

- Remove any Pokémon currently stored in either Nursery.
- Prepare your party so you have the correct lead Pokémon and any catchers you plan to use.
- If you opened the Pokédex at any point, such as when checking your KO count, this will generate Pokédex Recommendations which alter the RNG. You should perform a date skip, reset the game to before you opened the Pokédex, or account for it in the program.
- Make sure your current console date has the correct weather condition to spawn your Pokémon.
- You can use LegoFigure11's SwSh Weather Finder to find a date that produces your desired weather in the area of your target Pokémon.
- Go to the the area with the random spawner for your target Pokémon. If your spawner is in grass, try to pick the largest grass patch in the area where you can position comfortably and approach it from a wide border.
- Move far enough away to despawn all Pokémon at the spawner you are targeting. Position yourself as close to the spawner as possible without actually spawning anything in the overworld.
- IMPORTANT: To confirm that the Pokémon has been fully despawned, look for a dust cloud or puddle beneath the Pokémon when it spawns. This may not be possible to see if the Pokémon is flying or in tall grass. It is not enough for the Pokémon's model to disappear! Make sure you are past the range where its model shrinks down and disappears from view. If you stand too close to the spawner and the Pokémon is still spawned into the game, your RNG manipulation attempt will fail since a new Pokémon cannot spawn in its place.
- Consider performing a test run to confirm your positioning. Move to a spot where you think the Pokémon is fully despawned. Take note of this position. Run towards the spawner and make sure the Pokémon appears correctly. You can then run far back to make sure it fully despawns and then go back to the original position you started from.
- Try to find a position where few or no overworld Pokémon are spawned. This is to reduce the chance of extra advances when you are performing the RNG manipulation attempt. You can despawn any static spawners nearby or in your way. These will remain despawned as long as you do not let the date advance.
- Save the game.
Unsure about lead abilities & spawn boosting? click here to learn more
Advancing Towards a Target
The instructions for hitting a target frame depend on the selected weather condition. Rain/Thunderstorm are considered "advanced" and may be challenging for beginners. If this is your first time attempting this type of RNG manipulation, we recommended you start with a different weather condition to familiarize yourself with the general process.
Figure 3 - Relevant Calibration
- Now that you are standing in the correct position, open the
X Menuand identify your seed. Keep theX Menuopen after doing so to avoid unwanted advances. - Calibrate your NPC count, then close the
MenuCloseTimelinesubwindow. Verify that your NPC count has been entered into the main window andConsider Menu Close?is checked. - Search for a target frame. If you do not find a result, try with
Holding Direction?checked. This will slightly alter the results and may help with finding a target that is hittable using menu close prediction. - If you still do not see any target frames in the search results with both checkboxes active, your options are restarting the game to reset your seed, increasing your search range, or applying less strict search filters.
- Once you have found a target frame that can be reached using menu close prediction, take note of your positioning if you plan to leave the area for advancements. If you change location or move the character, you will need to recalibrate your NPC count again.
The calibration checkboxes (Consider Menu Close? / Holding Direction?) account for the advances consumed when closing the X Menu. The number of advances varies depending on whether you are holding a direction on your control stick when unpausing. Make sure you have the correct boxes checked; the search result table uses these checkboxes to calculate the exact frame on which to close the X Menu and spawn your target Pokémon.
Forgot how to calibrate NPC count? click here for a refresher
Figure 4 - Target Frame Found
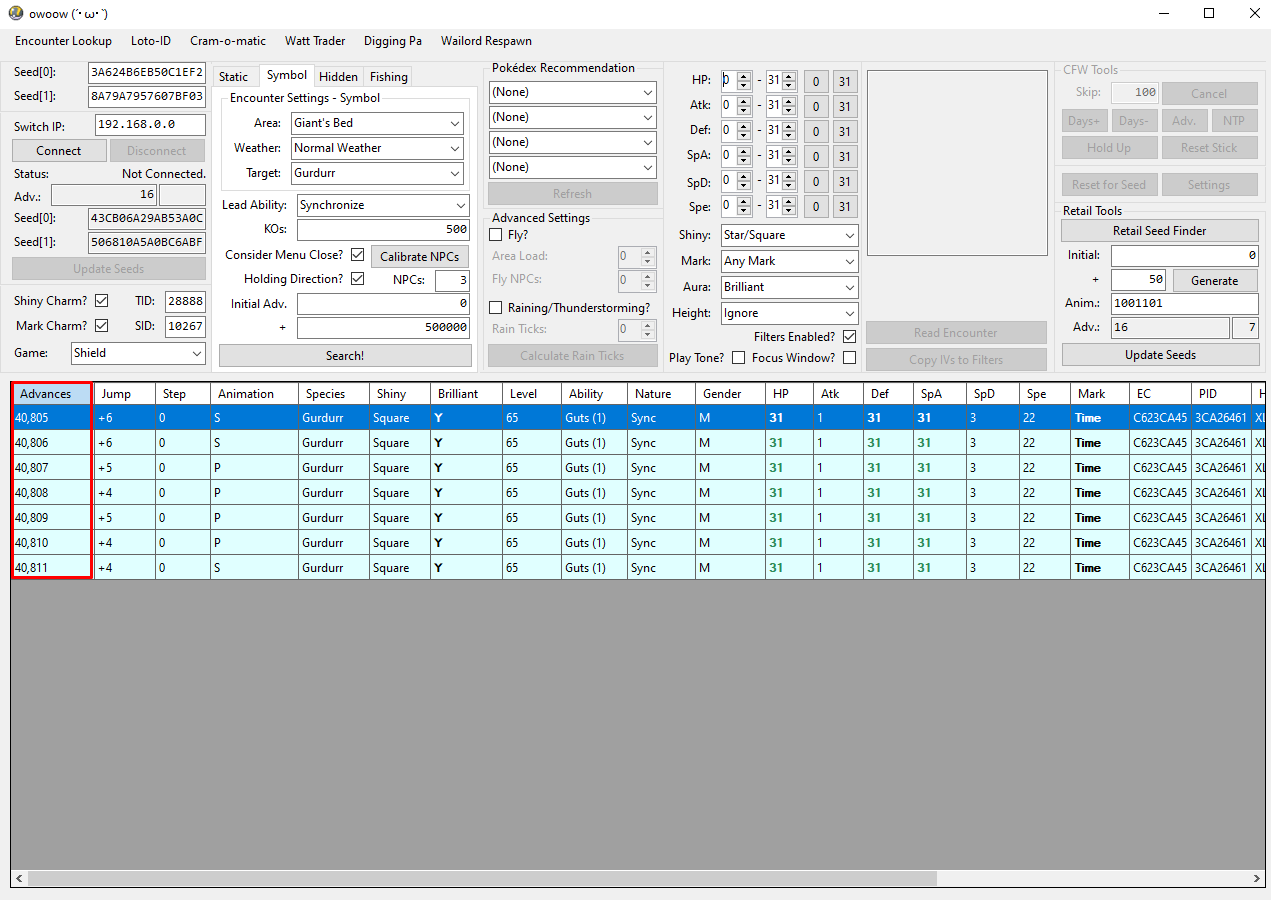
In this example, a shiny, Time Mark Gurdurr appears in a cluster
from advances 40,805-40,811. The calibrated NPC count is 3 and a direction should be held when closing the X Menu.
We find that holding a direction reduces the chance of random RNG noise after closing the X Menu, which can disrupt your attempt depending on your configuration. Your experience using menu close prediction may vary.
Step-by-Step
- Advance toward your target using any of the methods listed on this page. Consider using wet weather or date skipping to speed through a large number of advances efficiently.
- Reidentify your seed periodically to avoid overshooting, and stop advancing the RNG state once you are roughly 1000-3000 advances away from your target.
- Go back to your original position by the spawn point if you have moved. Ensure that the weather condition is correct both in-game and on owoow.
- Ensure the
Consider Menu Close?checkbox is checked, and verify that your NPC count is calibrated correctly. Search for your target again after calibration if needed. - Use attack animations / menu close to advance the RNG state until 100-300 advances remain, then pause the game by opening the
X Menuand navigate to the Pokémon party list. - Use attack animations to reach the exact target frame. Each
L3button input on the party list advances the RNG state by +1 (100 inputs = 100 advances). - When you are under 100 advances, you can consider unticking the
Filters Enabled?checkbox and clickingSearch!. This will generate the next 100 frames and allow you to see the predicted attack animations corresponding to each frame until you reach your target. - You are now ready to perform the random symbol RNG manipulation. Back out to the main
X Menu. - Unpause the game by pressing
B. If you checked theHolding Direction?checkbox, hold a direction on the joystick toward the spawner when unpausing; otherwise, do NOT touch the joystick when unpausing. - Quickly head toward the target Pokémon to spawn it in the overworld.
- Once you see the Pokémon spawn, it has already been fully generated. As long as you do not let the Pokémon despawn, you can take this time to:
- Save the game for multiple attempts to catch it.
- Change out your party with the PC Box Link if you need to bring in catchers or a Synchronize lead.
- Change the console date to the current date or to one with more convenient weather/terrain for catching.
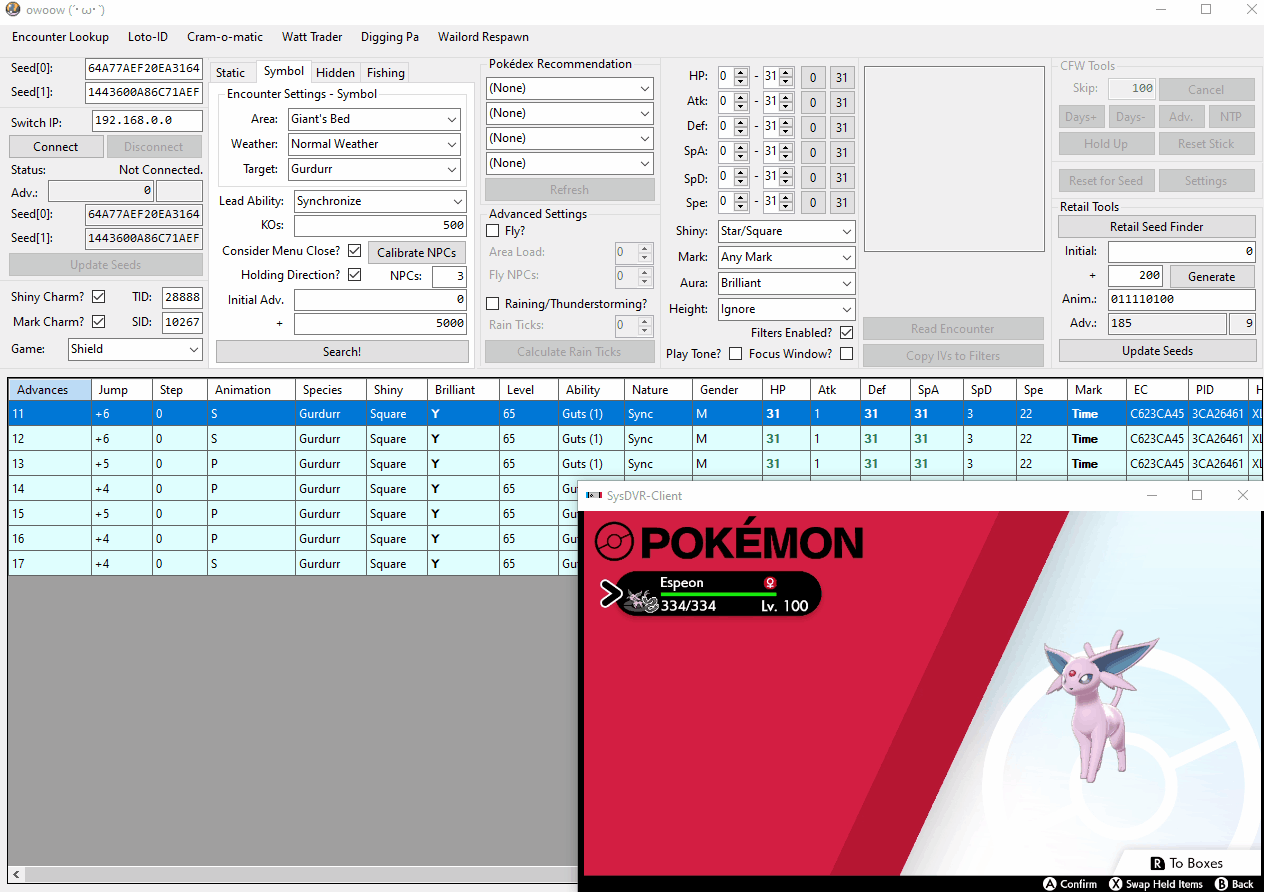
- When you are ready, encounter the Pokémon and verify that your result matches what is expected.
Figure 5 - Result Found!
That's all there is to RNG manipulating Random Symbol encounters in calm weather (RETAIL)!
Head back to the main pageFigure 3/4 - Calibrating Necessary Values
What Are Rain Ticks?
Rain Ticks refer to the RNG advances that occur when Rain or Thunderstorm are the active weather condition. The advances are used to randomly place raindrops on screen. Despite the sheer speed of RNG advances caused by wet weather, the number of advances remains predictable through proper calibration. We will perform this calibration using the Advanced Settings section in the main window.
Rain Tick Calibration
- Stand as close as possible to the Pokémon spawner without spawning it in. Save the game once you are in this position. Do not reposition yourself after this point.
- One method to do this is to tap the joystick towards the Pokémon and save the game each time it does not spawn. The target position is such that a single, gentle tap immediately spawns the Pokémon.
- If you plan to perform the RNG manipulation on a bike, you should make sure you are calibrating rain ticks while on the bike.
- Pause the game by opening the menu and identify your seed using the
Retail Seed Finder. - Calibrate your NPC count in any weather that is NOT Rain or Thunderstorm. After you close the
MenuCloseTimelinesubwindow, verify that your NPC count has been entered into the main window and you have checked both theConsider Menu Close?andHolding Direction?checkboxes. - Set your weather back to Rain/Thunderstorm on both owoow and in-game.
- In the
Advanced Settingssection, check theRaining/Thunderstorming?checkboxes. For the calibration, set theRain Ticksvalue to 0. - Open the Pokémon party list, then reidentify your seed to reset your advances to 0. This step is important for accurate calibration.
- Back out from the party list to the main menu, then hold a direction on your joystick toward your target Pokémon.
- Unpause the game by pressing
Bwhile holding the correct direction on your joystick. If your positioning earlier was perfect, it should immediately spawn. - Start the encounter and capture the Pokémon. Inspect the IVs using a calculator (e.g. Serebii or Showdown Teambuilder), then enter them into the search filters of owoow.
- If the encountered Pokémon is a different species from what is currently configured in the
Encounter Settingscolumn, update theTargetandKO Countaccordingly. - Under
Advanced Settings, click theCalculate Rain Ticksbutton. If you did this correctly, you should see a result pop up. Enter the calibrated value into theRain Ticksfield. - If your positioning was excellent, you should get a Rain Tick value of 20 or less. If your number is very high, consider repositioning so that you are closer.
- Once you have calibrated your NPC count and Rain Ticks, restart the game and find your seed again. You can now begin searching for target frames.
The calibration fields (Consider Menu Close? / Holding Direction? / Rain Ticks) account for the advances consumed when leaving the party list and closing the X Menu. Make sure you have the correct boxes checked; the search result table uses these checkboxes to calculate the exact frame on which to close the party list and spawn your target Pokémon.
Figure 5 - Target Found
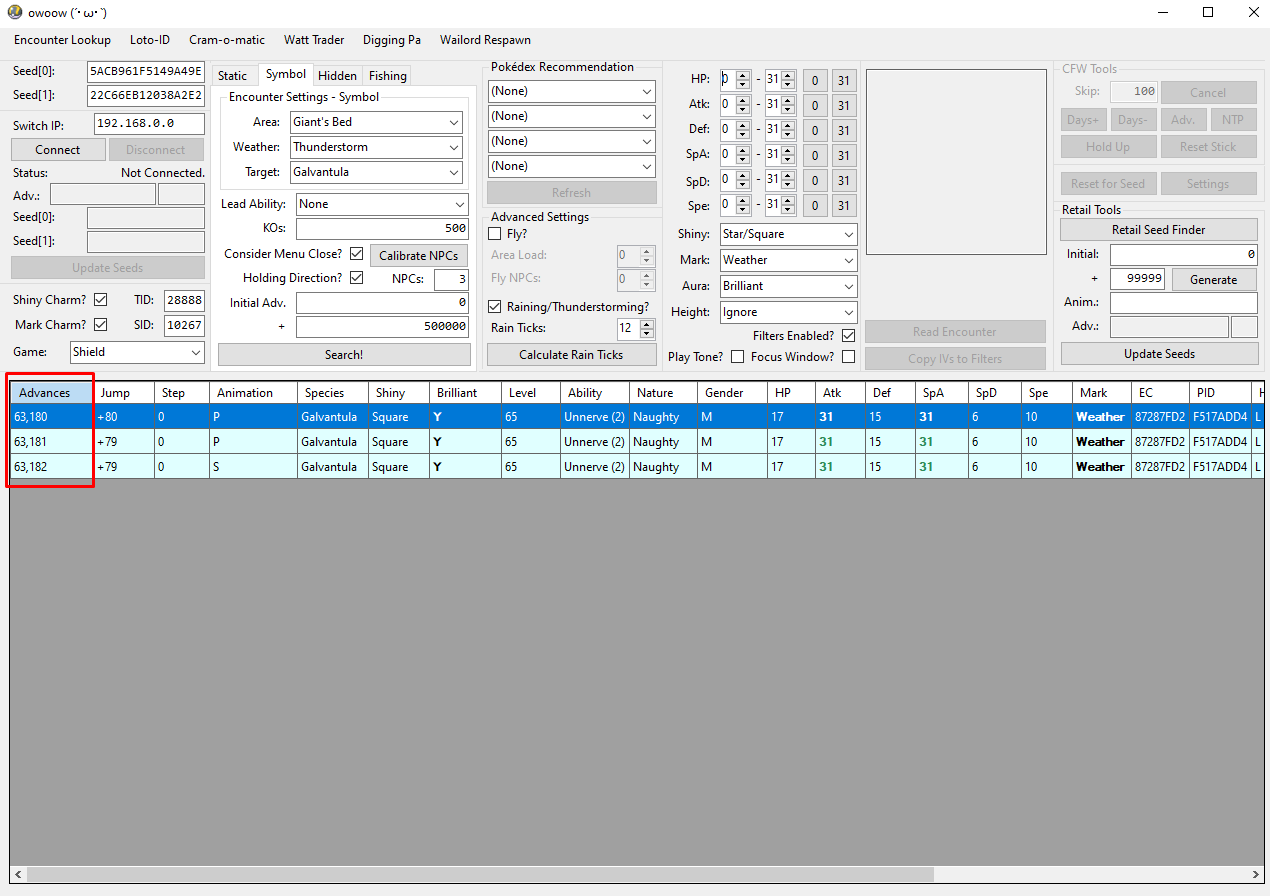
In this example, a shiny, Weather Mark Galvantula appears in a cluster
from advances 63,180-63,182. The calibrated NPC count is 3 and the current Rain Tick value is 12. Holding a direction when closing the X Menu is mandatory for Rain/Thunderstorm targets as this helps to keep the Rain Tick value as consistent as possible between attempts.
Recalibrate your NPC count if you have reset the game after a date skip. Rain Ticks should remain consistent if you have not changed position.
Step-by-Step
- Confirm that the
Consider Menu Close?&Holding Direction?boxes have been checked, and that your NPC count and Rain Ticks have been entered properly. - Advance towards your target using wet weather or date skipping to maintain your current positioning and Rain Tick calibration. Do NOT move the player.
- Reidentify your seed periodically to avoid overshooting. Stop advancing once you are about 1000 frames before your target. Open the
X Menuto pause the game. - If you calibrated rain ticks while on the bike, make sure you are on the bike before you open the
X Menu. If you calibrated them while on foot, then you should be on foot. - Use wet weather menuing until you are about 100-300 away from your target. Open the Pokémon party list.
- Reidentify your seed on this screen and search for your target frame again. This should reset your advances to 0.
- You should be on the Pokémon party list, not a Pokémon summary page! Use attack animations to reach the exact target frame. Each
L3button input on the party list advances the RNG state by +1 (e.g., 100 inputs = 100 advances). Stay on the Pokémon party list menu when done. - When you are under 100 advances, you can consider unticking the
Filters Enabled?checkbox and clickingSearch!. This will generate the next 100 frames and allow you to see the predicted attack animations corresponding to each frame until you reach your target. - You are now ready to perform the random symbol RNG manipulation in wet weather.
- Exit the party list back to the main
X Menu, then hold a direction on your joystick toward the spawner of the target Pokémon. - Unpause the game by pressing
B. Since you are holding a direction, you should immediately spawn the target Pokémon in the overworld. - Once you see the Pokémon spawn, it has already been fully generated. As long as you do not let the Pokémon despawn, you can take this time to:
- Save the game for multiple attempts to catch it.
- Change out your party with the PC Box Link if you need to bring in catchers or a Synchronize lead.
- Change the console date to the current date or to one with more convenient weather/terrain for catching.
- When you are ready, encounter the Pokémon and verify that your result matches what is expected.
Figure 6 - Result Found!
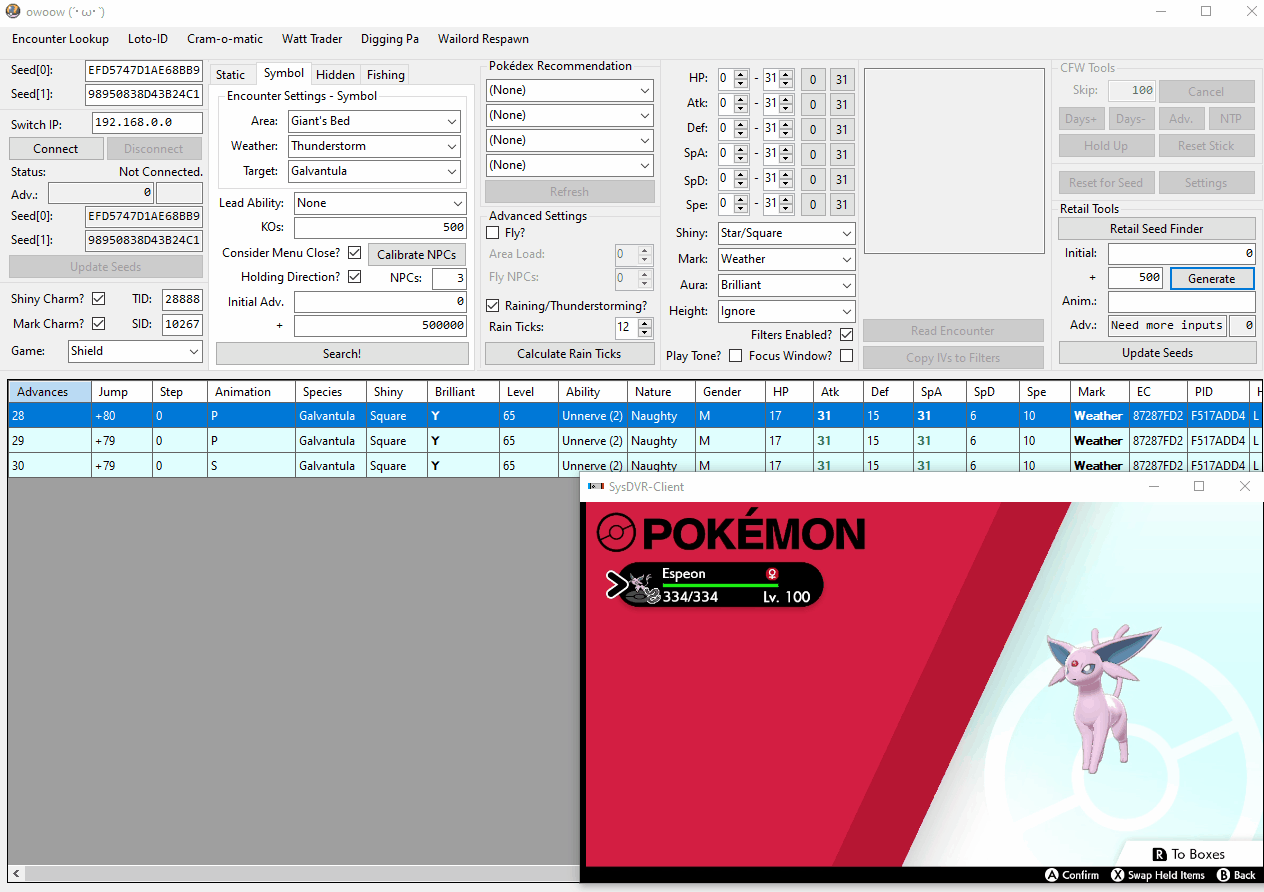
That's all there is to RNG manipulating Random Symbol encounters in wet weather (RETAIL)!
Head back to the main page