BDSP Static RNG
The term "Static" is used to describe encounters or gifts that are generated upon clicking the A button. These Pokémon are located in specific (fixed) locations. An example of a static encounter would be Dialga/Palkia at Spear Pillar, and an example of a static gift would be Jirachi/Mew in Floroma Town.
In Brilliant Diamond/Shining Pearl the game determines the outcome of "random" events using a constantly advancing RNG seed. Using tools like PokeFinder and SysBot.NET we are able to predict the outcome of these random events and understand exactly when a desirable result will be produced and take advantage of this.
Moarencounterbots is able to track and monitor RNG seeds in real time as well as advance the RNG state until a given point, removing the vast majority of work that would otherwise be tedious. This allows the player to put their efforts into more important factors like hitting their target frame instead.
For most statics you will need to consider the "Offset". Offset is the number of frames the game takes to generate a Pokémon after the final button input. For example:
- Our target is on advance 100 and our Offset is 85.
- We subtract 85 from 100, which leaves us with 15.
- We should now aim to press the
Abutton to remove the final text box on advance 15. - 85 advances will now be consumed by the game, then the Pokémon will be generated.
- This means our Pokémon was generated on the correct target advance (85+15=100).
Recommended starting Offset and the screen of the final button input are listed inside the table below. sometimes the Offset may have some variation, it is recommended to start with the lower end first and increase your Offset if you end up missing your target.
| Pokémon | Offset | Noise |
|---|---|---|
| Starters | 64 | Quiet |
| Honey Tree | 0-2 | Location Specific |
| Dialga/Palkia | 84 | Quiet |
| Uxie/Mesprit/Azelf | 85 | Quiet |
| Giratina | 84-85 | Quiet |
| Heatran | 84-85 | Quiet |
| Regigigas | 85-86 | Quiet |
| Cresselia | 102-104 | Quiet |
| Rotom | 89-90 | Quiet |
| Ramanas Park Legends | 84 | Quiet |
| Shaymin | 1340-1385 (Variable) | Noisy |
| Darkrai | 84-85 | Quiet |
| Arceus | 84-85 | Quiet |
| Drifloon | 84 | Noisy |
| Spiritomb | 84 | Noisy |
| Mew/Jirachi | 0 | Noisy |
| Eevee (Bebe) | 0 | Noisy |
| Happiny (Hiker) | 0 | Noisy |
| Riolu (Riley) | 0 | Noisy |
| Fossils | 0 | Noisy |
| Mystery Gift | 1 | Quiet |
Figure 1 - PokeFinder Setup
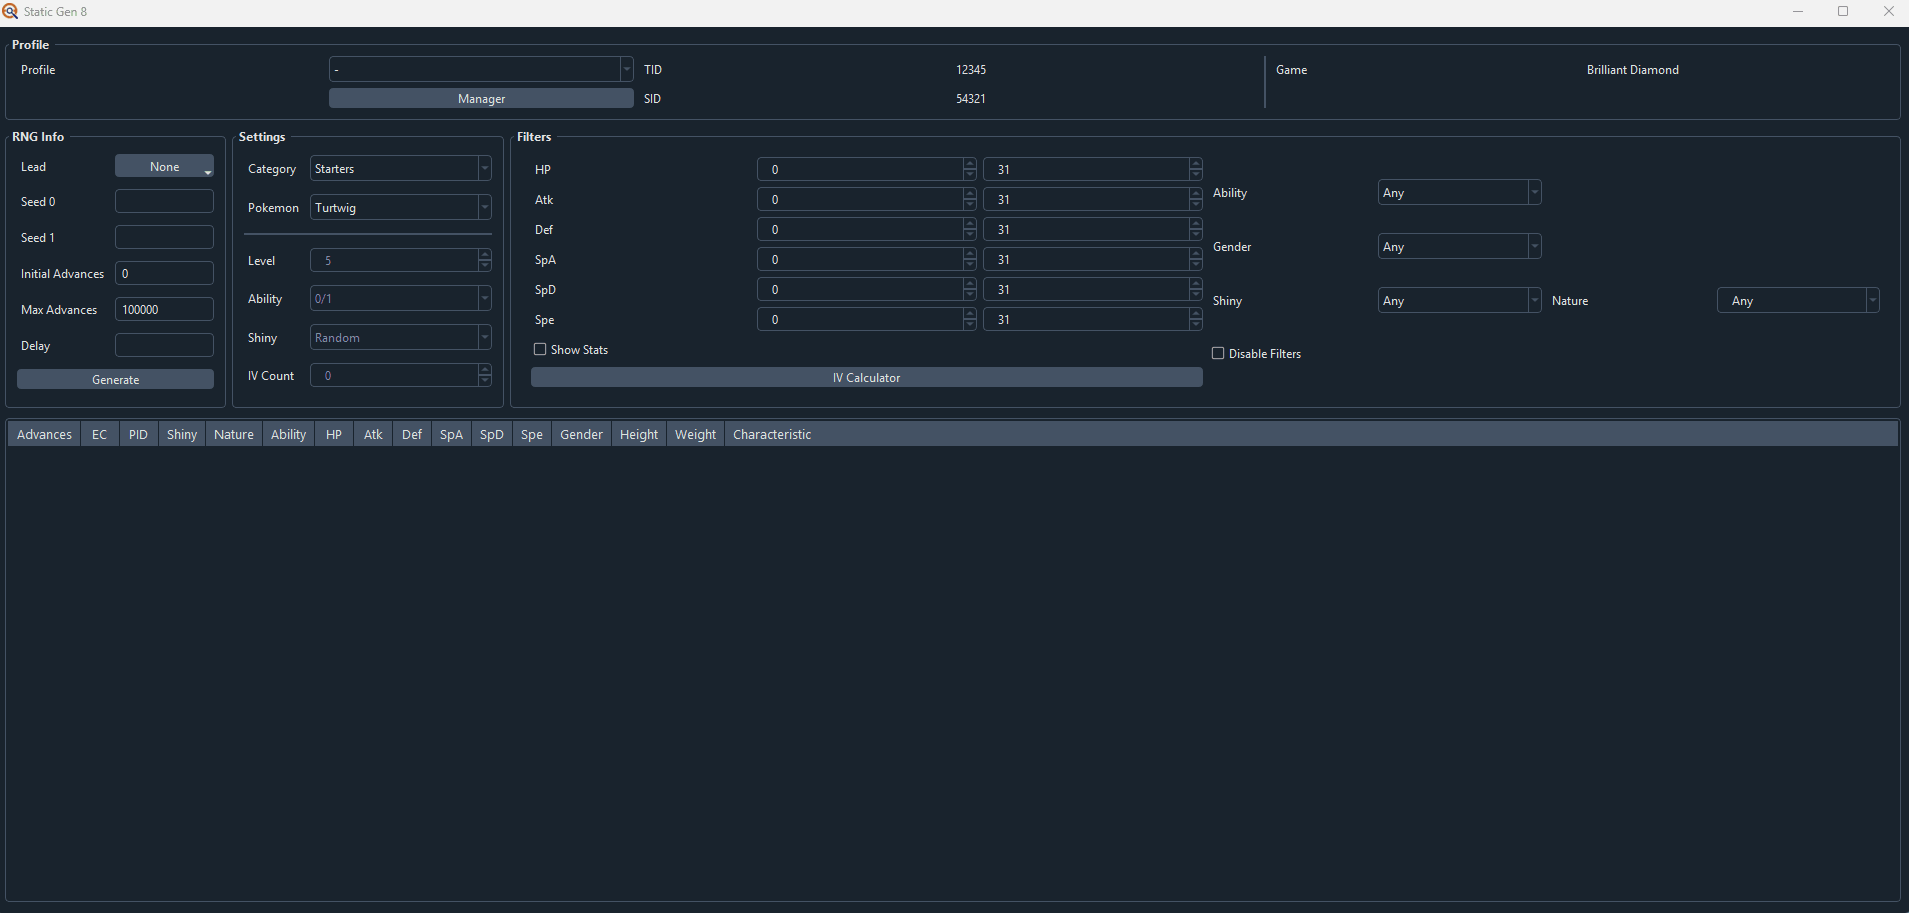
Click the Gen 8 -> Static button after launching PokeFinder to open the main window for static Pokémon. Here is where we will fill in all the details about the Pokémon being hunted.
RNG Setup
- Select the correct
Profilein the dropdown menu at the top. - Select
Leadif you are using a Pokémon with an influencing ability (e.g. Synchronize). - Enter the amount of advances you wish to search through into the
Max Advancesfield. - Enter the Offset inside the
Offsetfield, pick the lowest number in the above table. - In older versions of PokeFinder the
Offsetis referred to asDelay. Both terms have the same definition and can be used interchangably. - In the
Settingssection in the middle, specify the Pokémon and encounter details. - Configure your search filters, such as filtering for a shiny Pokémon with 0 IVs in attack.
Having a Pokemon with the ability Syncronize ensures that all encountered/redeemed Pokémon have the same nature as your synchronizer. Ensure that your synchronizer is the first team member in your party or it will not work.
Figure 2 - Finding Your Seed
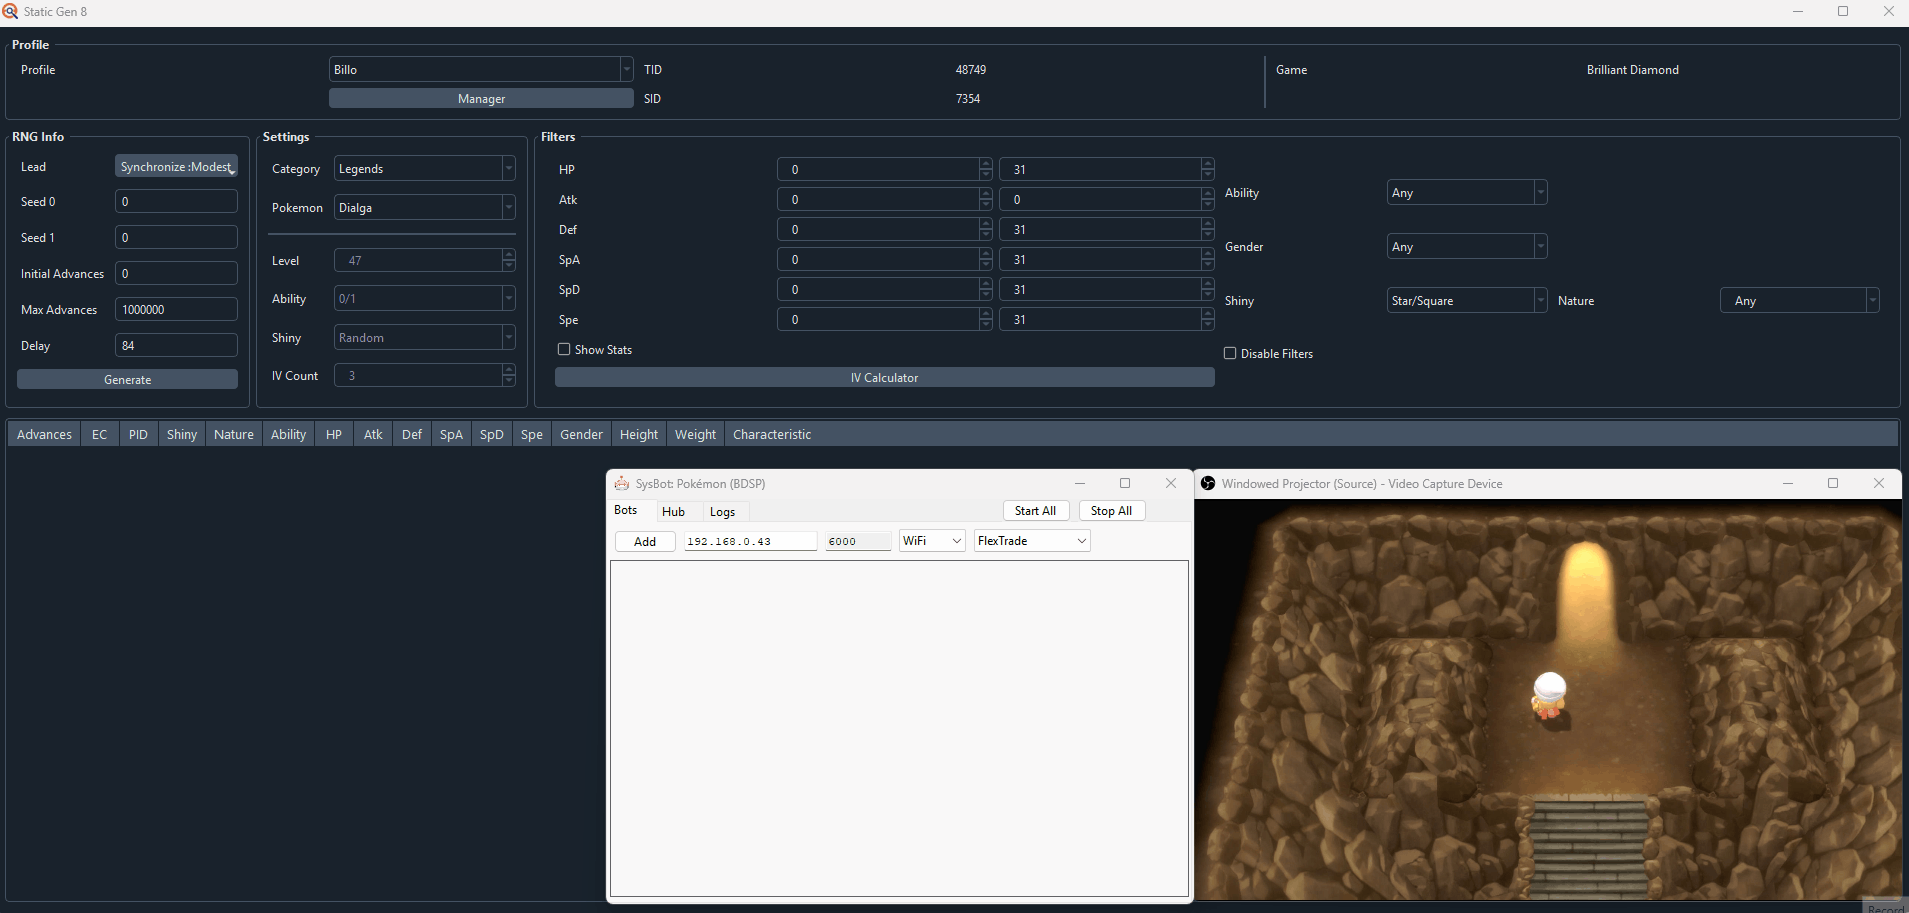
To easily obtain your current seed at any given point you can use the EncBotCopySeedBS routine in Moarencounterbots. If you have already followed the setup instructions found on the main page the bot should be configured to output the seed in the way PokeFinder expects. If you did not do this yet or your settings have changed for whatever reason, follow these instructions:
Settings Toggles
- Open SysBot.exe and navigate to the
Hubtab. - Open the
EncounterRNGBSdropdown menu to display the relevant settings. - Under
DisplaySeedMode, selectBit64PokeFinder. - Set the value in
MonitorRefreshRateto0.
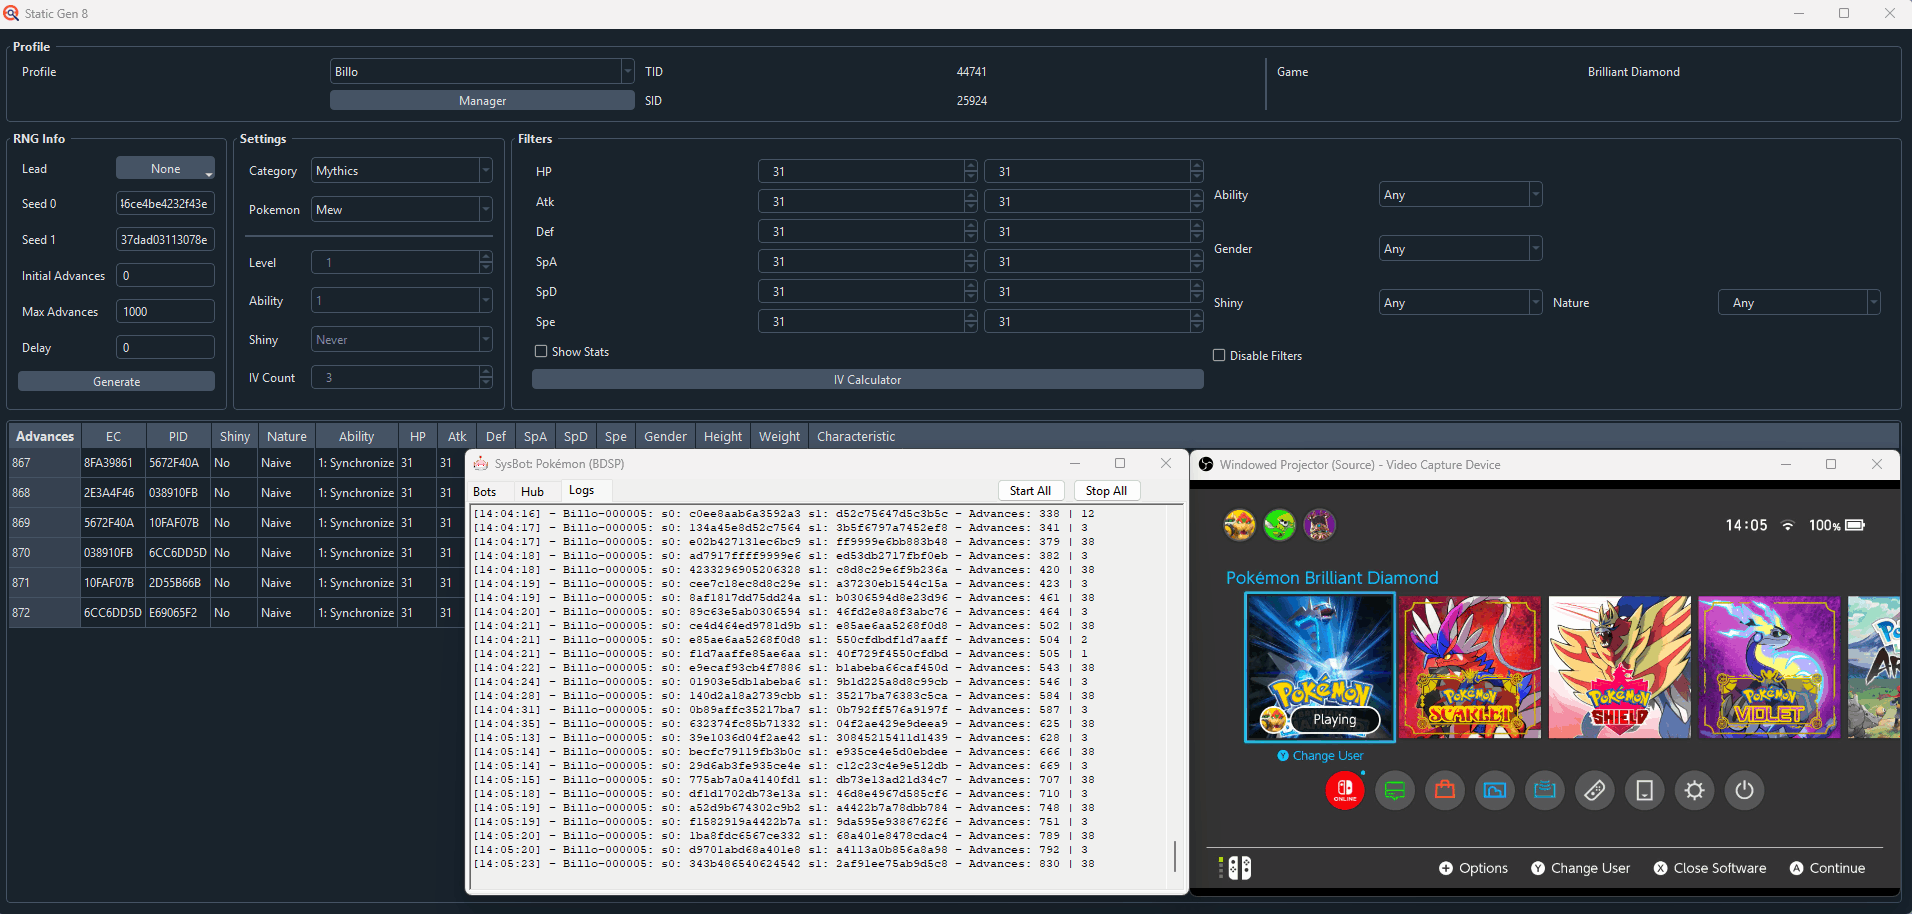
Grabbing Seed Information
- Navigate back to the
Botstab, enter your IP address, then addEncBotCopySeedBS. - Stand in the overworld in-game, press the
Homebutton, then clickStart All. - Navigate to the
Logstab. Your seed should be visible here (split into 2 sections referred to as "Seed 0" and "Seed 1"). - By default your seed will be copied to clipboard, but pasting directly into PokeFinder will not work.
- Copy the top half of the seed into the
Seed 0field of PokeFinder. - Copy the bottom half of the seed into the
Seed 1field of PokeFinder. - Click the
Generatebutton to search for targets that match your parameters.
If you do not find any results consider increasing your search range, applying less strict search filters, or restarting the game to generate a new seed. Repeat this process until a desirable seed has been found.
Extra Game Setup (SHAYMIN ONLY)
Figure 3 - Extra Game Setup (Shaymin)

Shaymin has highly inconsistent RNG due to overworld noise, making it difficult to reliably hit the desired frame. To improve consistency, we use an alternative method: instead of standing outside the encounter zone and mashing the A button on the target frame, we resurface from the Grand Underground and immediately interact with Shaymin. This approach provides more consistency between attempts.
Game Setup
- Obtain the Explorer Kit from Eterna City if you do not have it yet, go through the initial tutorial.
- Add the Explorer Kit to your registered items list, remove anything else that is currently registered.
- Head to Flower Paradise and stand directly next to Shaymin.
- Use the Explorer Kit, then click
Play Aloneand enter the Grand Underground. - Save the game while underground and reboot (by closing the game software and re-opening).
- This step is important as it will stop unwanted advances that occur while in the Home Menu.
- You should now be positioned correctly for the RNG manipulation, we now need to calibrate our Offset.
Offset Calibration:
- Open the game and stand in the Grand Underground overworld, then press the
Ybutton and selectGo up. - You should now be on the "Would you like to return to the surface where you entered? Yes/No" screen. hover over the
Yesoption and press theHomebutton. - Open
SysBot.exeand addEncBotCopySeedBSto the list of active bots, then click theStart Allbutton. - Navigate to the
Logstab and paste your seeds into PokeFinder, set yourMax Advancesto around 2000 andOffsetto 0. - Resume the game and press the
Abutton to resurface from the Grand Underground, then hold up on your control stick while resurfacing to face Shaymin. - Mash the
A,ZLandZRbuttons to interact with Shaymin and initiate the encounter as quickly as possible. - Once you are in battle, open PokeViewer.NET and connect to it as normal, then click the
Viewbutton to inspect the Shaymin you are in battle with. - Enter the IVs into the PokeFinder search filters to find the Shaymin you are in battle with. The number inside the
Advancescolumn will be your Offset for this attempt. - If you see multiple potential results you will need to match the PID/EC shown on PokeViewer to the search result table to find the exact frame you hit.
- Note down your Offset into a Notepad document, Google Sheet or similar. Repeat this process multiple times to get an rough idea of the Offset you are hitting.
- You may need to record upwards of 10 attempts before seeing any level of consistency.
The Process
The instructions for hitting a target frame depend on your target Pokémon. Pokémon located in "noisy" areas are considered advanced and likely unsuitable for beginners. If this is your first time attempting this type of RNG manipulation, we recommended you start with anything in the "quiet" category of the above table to familiarize yourself with the general process.
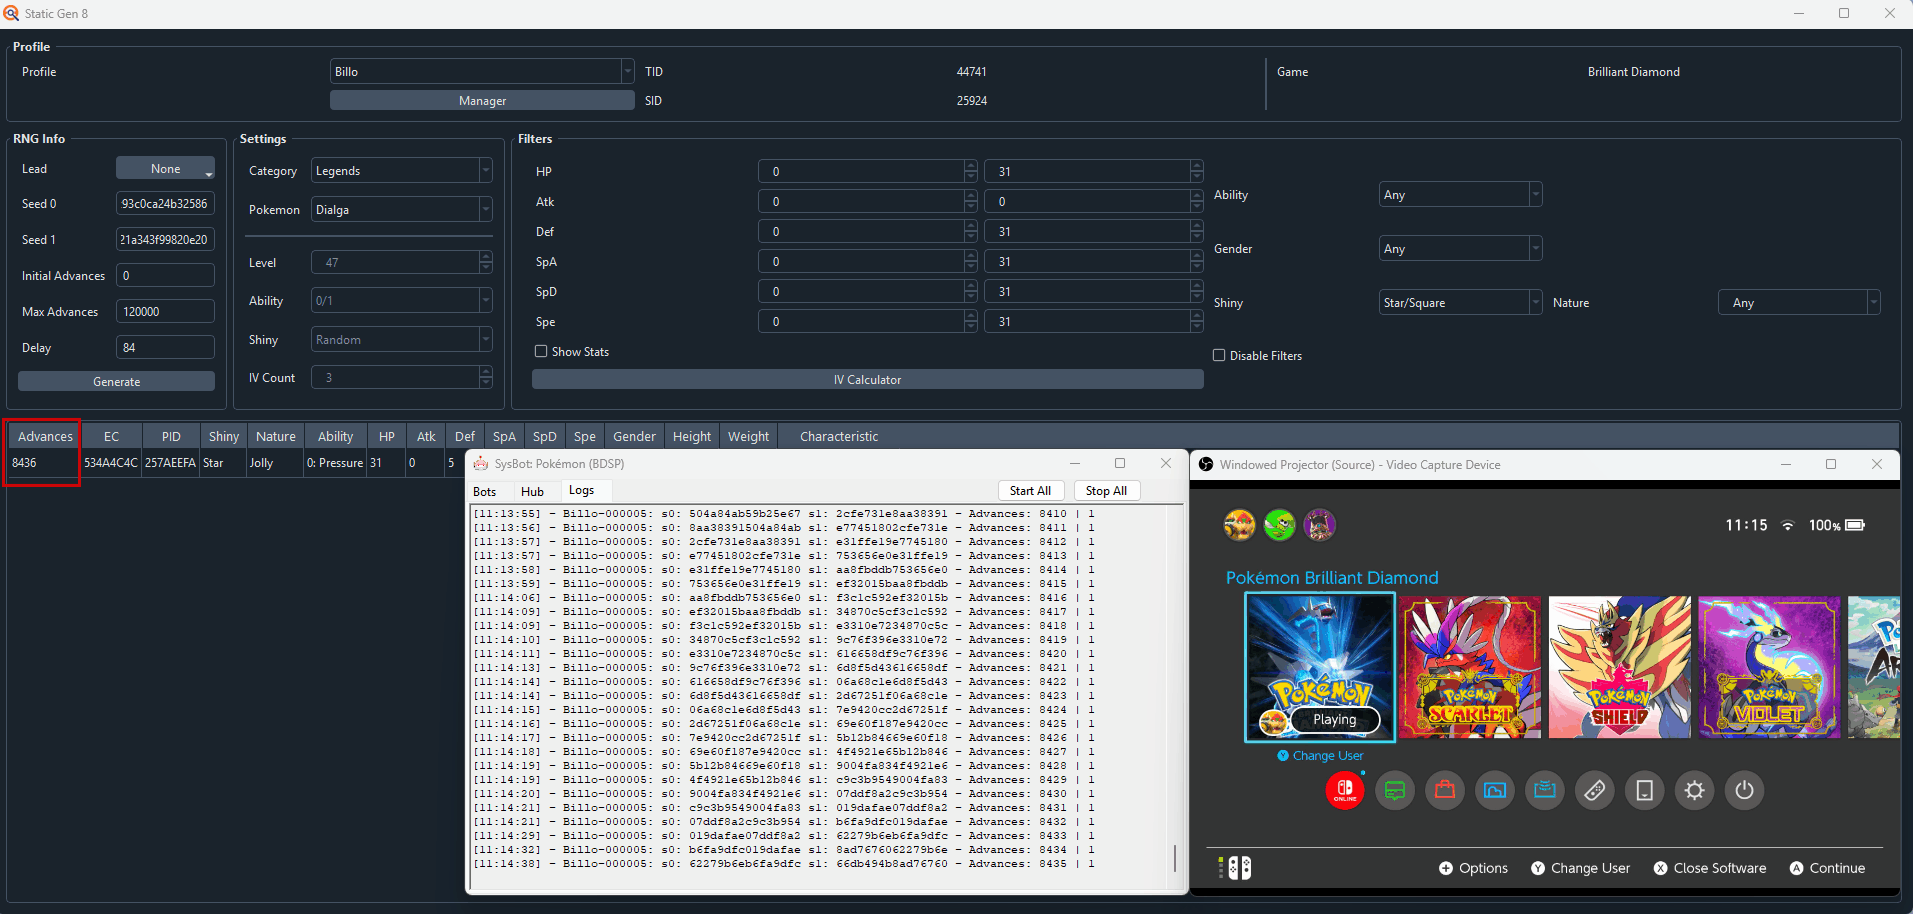
Figure 3 - Target Found
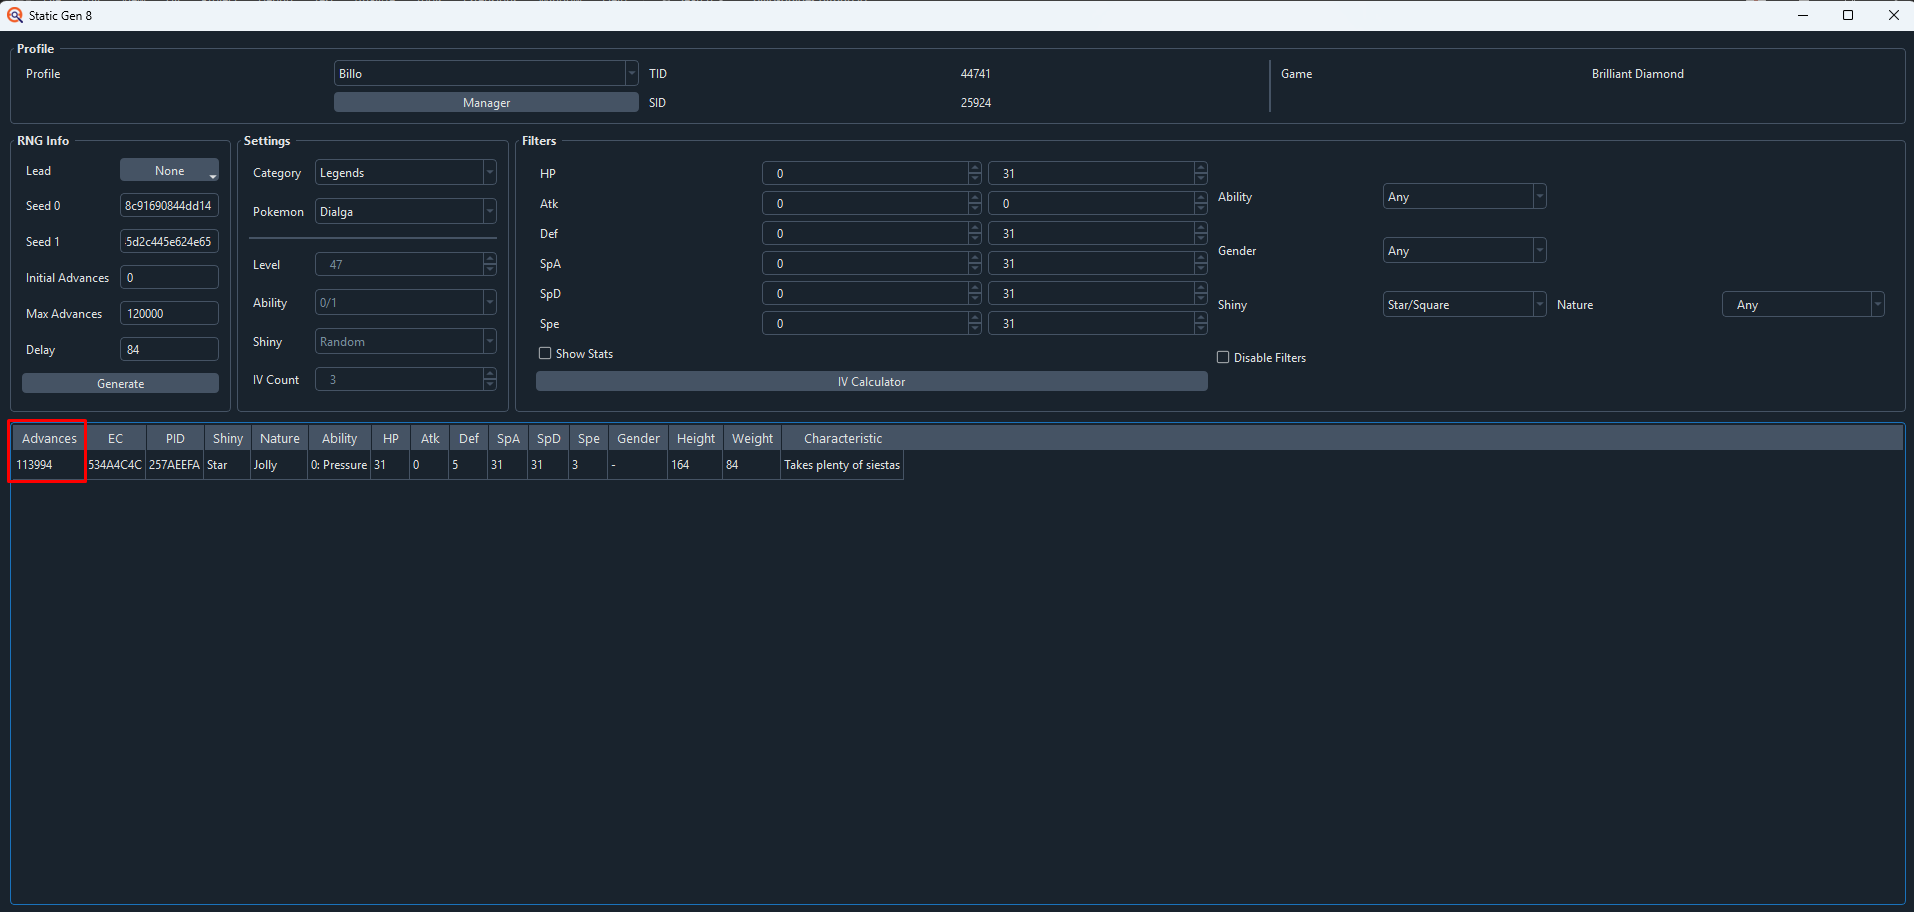
In Figure 3 we can see a result has been produced in 113,994 advances. Since the Offset (84) has already been considered by PokeFinder, we will aim to press the A button to generate the Pokémon on advance 113,994. If you are seeking a non shiny target you may notice multiple frames in a row that produce the same end result, this is known as a "frame cluster". It is recommended to target clusters for non-shiny targets as this grants more opportunities to hit the correct frame.
To advance the RNG state we will be using the Moarencounterbots EncBotDexFlipBS routine to automate this process. EncBotDexFlipBS flips back and fourth between Pokédex entries to advance the current seed until a given point. This quickest known method to advance the RNG state in this game.
EncBotDexFlipBS Setup
- Navigate to the
Hubtab and open theEncounterRNGBSdropdown menu. - Set your
MaxTotalAdvancesrelative to the amount needed to reach your target frame. - It is recommended to subtract 10,000 from the total number of required advances to give yourself time to position your character properly after the seed advancing has been completed.
- Head back to the
Botstab and remove any currently active bots. - Add the
EncBotRNGMonitorBSandEncBotDexFlipBSbots instead. - Open the Pokedex in-game in either Sinnoh or National mode.
- Enter a section of the Pokédex that has at least 10 registered Pokémon in a row to increase effectiveness of the DexFlip routine. It is recommended to place cursor somewhere in the middle of the Pokédex if you can.
- Disconnect any controllers, then click the
Start Allbutton on Moarencounterbots. - If everything was done correctly you should now see that the bot has started to flip between Pokédex entries very quickly.
- Navigate to the
Logstab and wait for the DexFlip routine to complete. - Click
Stop Allonce DexFlip has finished to completely stop any active bots.
If the bot does not begin flicking through Pokedex entries after clicking Start All to initiate the DexFlip routine, stop the bot and confirm that all controllers have been fully disconnected and click Start All again. This routine relies on taking control of button inputs and will not work if any other controllers are connected to the device. Controllers can be resynced after the routine has completed.
Figure 4 - DexFlip Complete
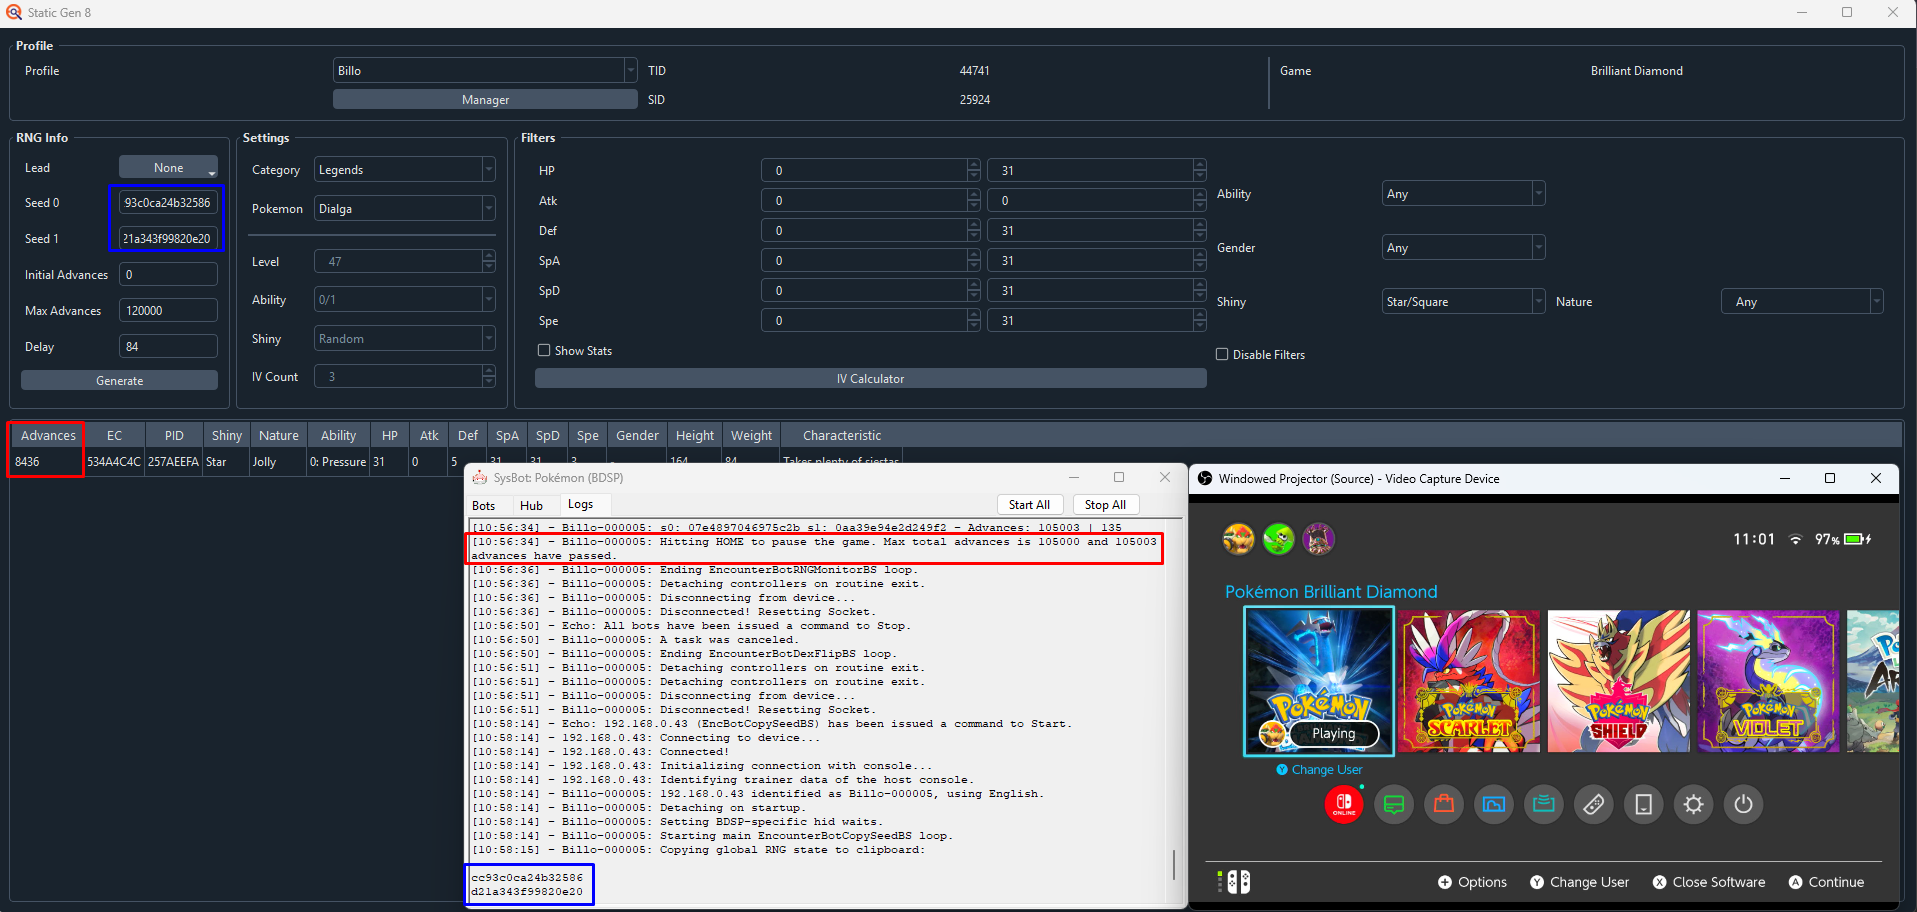
At this point you should be around 10,000 advances away from your target. To confirm exactly how far away you are from your target you will need to remove all currently active bots, then add and start EncBotCopySeedBS.
Step-by-Step
- Head to the location of your desired Pokémon in-game if you have not already done so. Stand close enough so that you can interact with the Pokémon.
- For Dialga, Palkia and Arceus the player will be forced into the cutscene if you walk too close, stand a few steps back to avoid this.
- Press the
Homebutton, then runEncBotCopySeedBSand enter your new seed into PokeFinder. Search for your target again to get your new target frame. - Remove
EncBotCopySeedBSand add and startEncBotRNGMonitorBSinstead to begin monitoring your RNG state. - Confirm that you have started a fresh instance of
EncBotRNGMonitorBS. Seed monitoring should begin from advance 0, NOT wherever you left off! - Resume the game and observe how quickly the RNG state is advancing. Your next action will depend on the speed of the natural RNG advances.
- If the RNG state is advancing slowly, manually scroll your Pokédex slowly until you 1000 advances (or less) away from your target, then interact with your desired Pokémon and reach the screen of the final button input.
- If the RNG state is advancing quickly, interact with your desired Pokémon and reach the screen of the final button input.
- See the above table if you are unsure which screen you should be on, final button input screen images can be found by clicking the hyperlinks.
- Monitor the RNG state until you reach your target frame, this should match the exact frame shown on PokeFinder's search result table.
- A technique called "Home button mashing" is used to help ensure that we land directly onto our target frame. Quickly pressing the Home button twice will resume, then pause the game. We can use this technique to inch closer to our target frame and land directly onto it in most cases.
- In the unlikely event that we cannot land directly onto our target frame this will need to be treated as a failure and you will need to restart the process again by finding a new seed and target frame.
- Shaymin, Drifloon and Spiritomb are the most notable examples of when it may be difficult to hit a target frame due to the RNG state advancing too quickly. These encounters may take multiple attempts before seeing success.
- You should now be on the Home menu and the SysBot
Logstab should indicate that you have reached your target frame. Unpause the game while mashing theAbutton to initiate the encounter. - In BDSP,
ZLandZRalso register asAbutton inputs. You can mash all three of these buttons when attempting to initiate the encounter for the best chances of hitting your target frame.
Figure 5 - Target Frame Hit
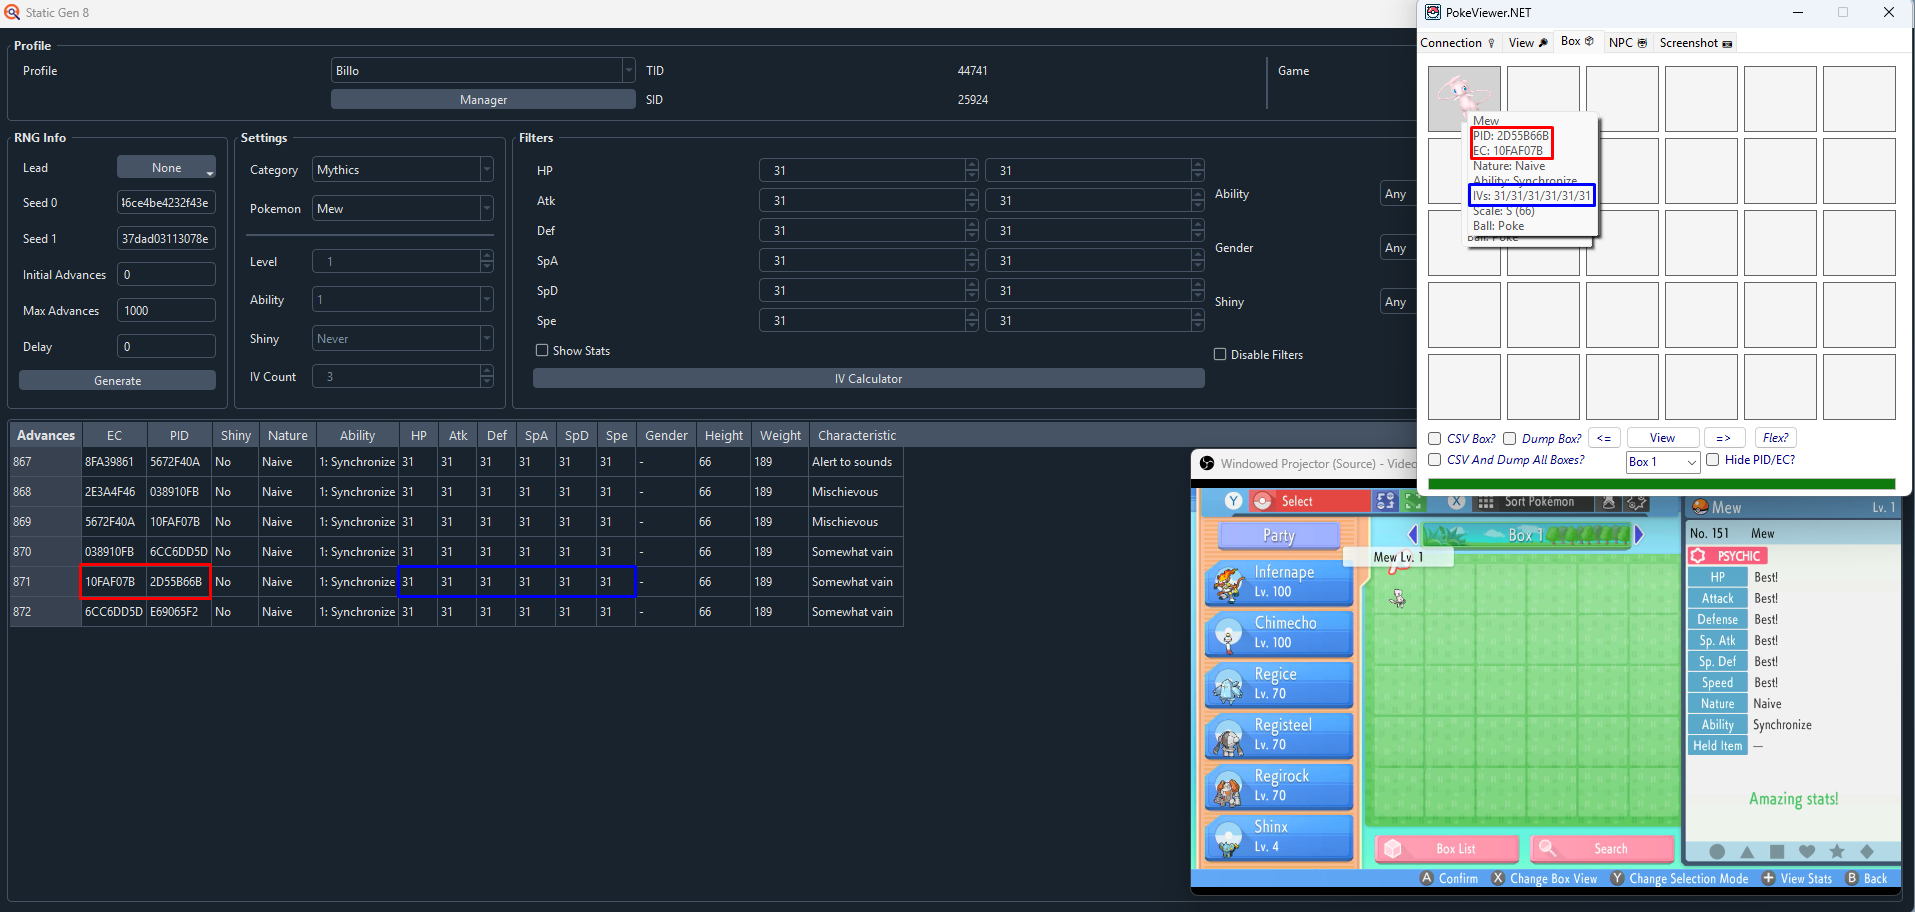
We have resumed the game on our target frame pressed the A button quickly to initiate the encounter. Now it is time to confirm that we have hit the correct target frame by connecting to PokeViewer.NET and clicking the View button.
Figure 6 - Result Found
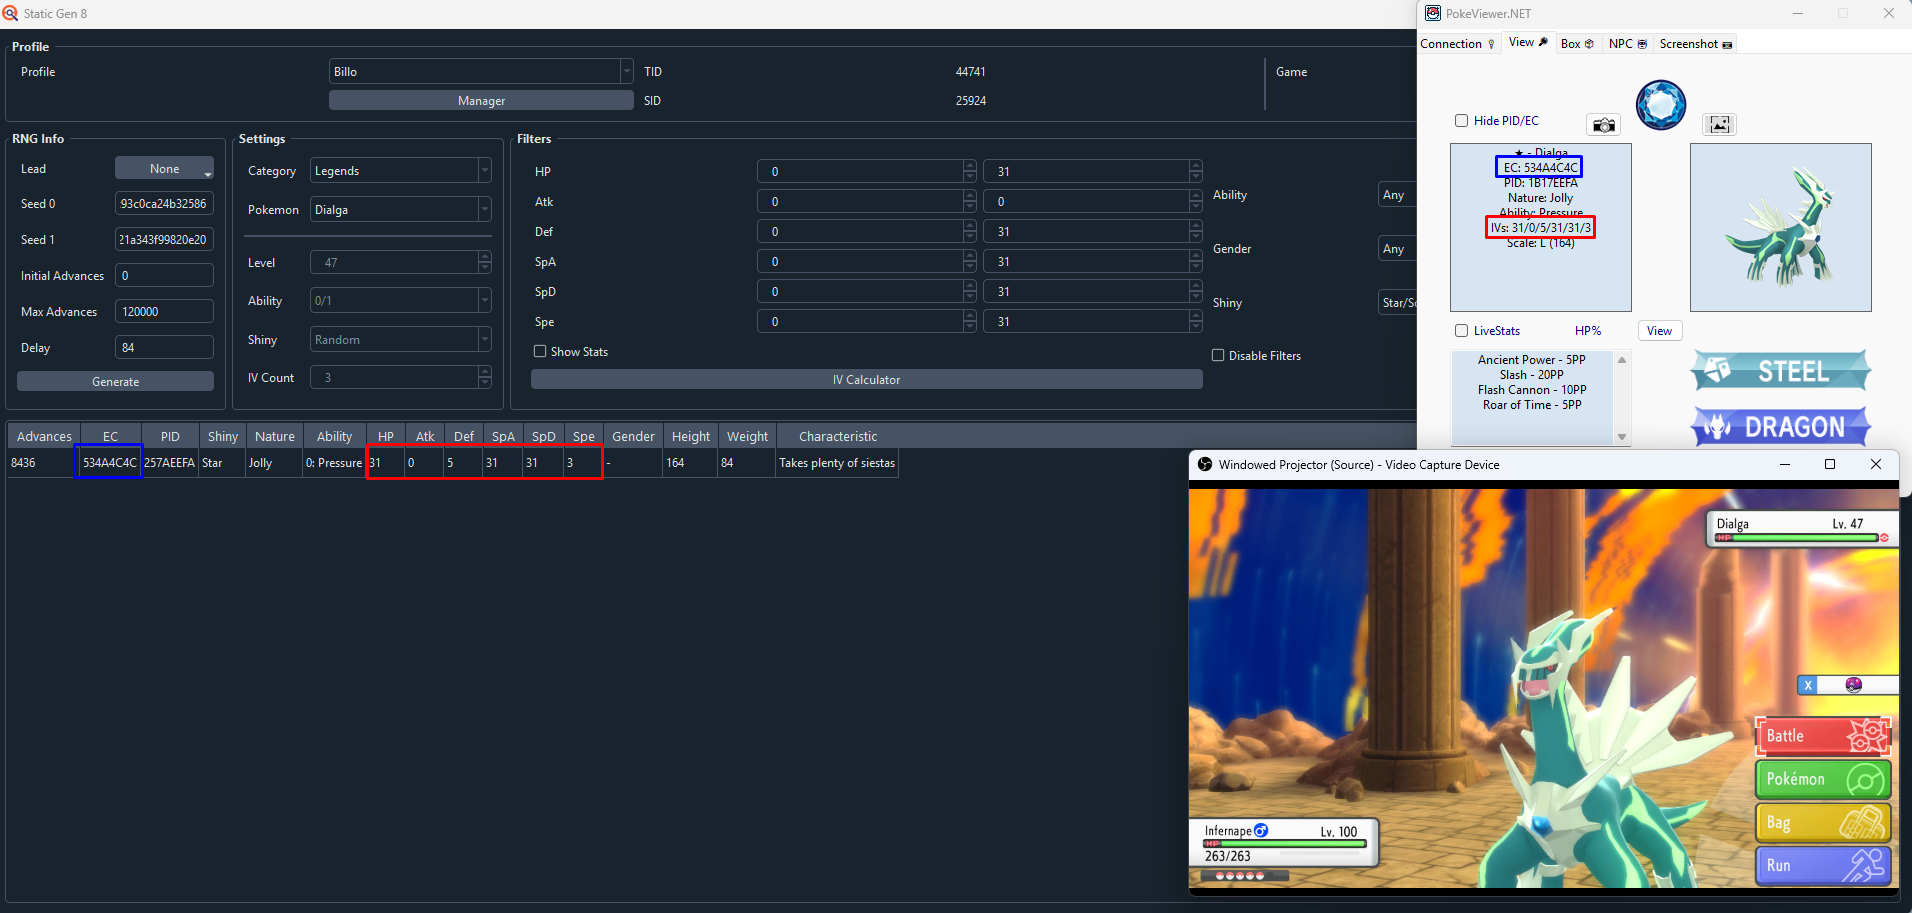
We can see that the internal details of the Pokémon match the PokeFinder search results, mission accomplished!
Missed your target frame? Visit encounter troubleshooting! Send me back to the main page!Figure 3 - Target Found
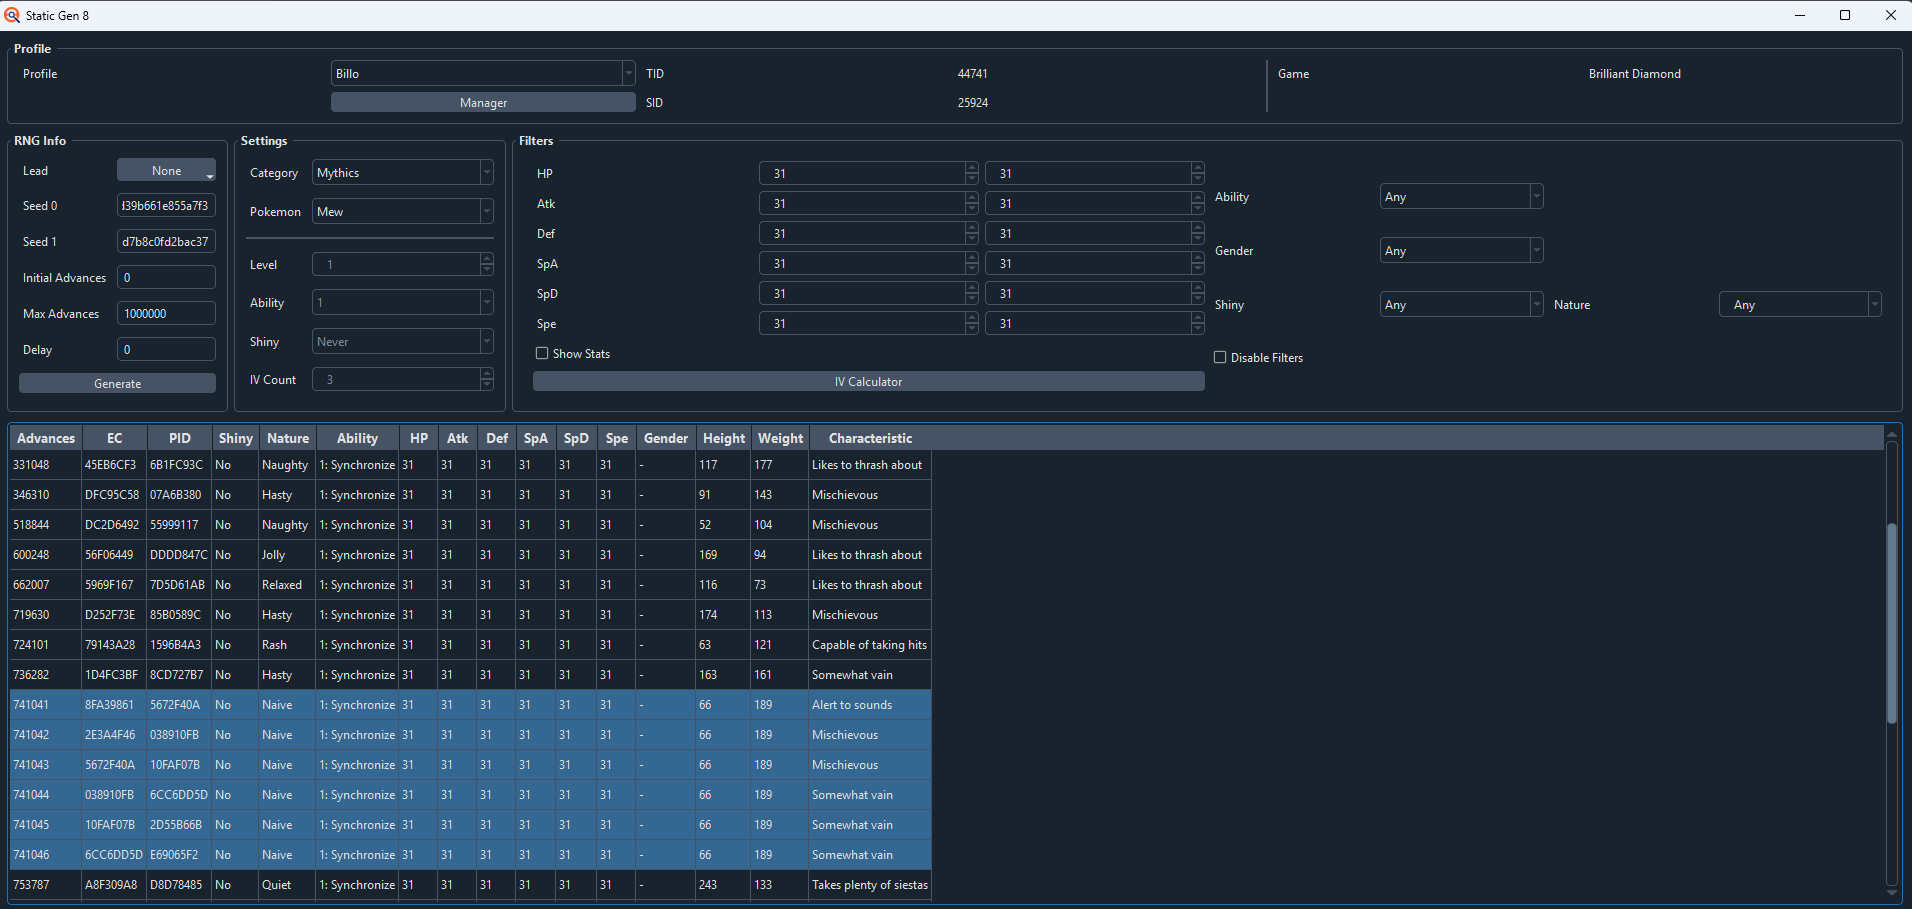
In Figure 3 we can see a result has been between advances 741,041-741,046. Since the Offset for this encounter is 0 we will aim to press the A button to generate the Pokémon on any of advance between 741,041-741,046. If you are seeking a non shiny target you may notice multiple frames in a row that produce the same end result, this is known as a "frame cluster". It is recommended to target clusters for non-shiny targets as this grants more opportunities to hit the correct frame.
To advance the RNG state we will be using the Moarencounterbots EncBotDexFlipBS routine to automate this process. EncBotDexFlipBS flips back and fourth between Pokédex entries to advance the current seed until a given point. This quickest known method to advance the RNG state in this game.
EncBotDexFlipBS Setup
- Navigate to the
Hubtab and open theEncounterRNGBSdropdown menu. - Set your
MaxTotalAdvancesrelative to the amount needed to reach your target frame. - It is recommended to subtract 10,000 from the total number of required advances to give yourself time to position your character properly after the seed advancing has been completed.
- Head back to the
Botstab and remove any currently active bots. - Add the
EncBotRNGMonitorBSandEncBotDexFlipBSbots instead. - Open the PokeDex in-game in either Sinnoh or National mode.
- Enter a section of the Pokédex that has at least 10 registered Pokémon in a row to increase effectiveness of the DexFlip routine. It is recommended to place cursor somewhere in the middle of the Pokédex if you can.
- Disconnect any controllers, then click the
Start Allbutton on Moarencounterbots. - If everything was done correctly you should now see that the bot has started to flip between Pokédex entries very quickly.
- Navigate to the
Logstab and wait for the DexFlip routine to complete. - Click
Stop Allonce DexFlip has finished to completely stop any active bots.
If the bot does not begin flicking through Pokedex entries after clicking Start All to initiate the DexFlip routine, stop the bot and confirm that all controllers have been fully disconnected and click Start All again. This routine relies on taking control of button inputs and will not work if any other controllers are connected to the device. Controllers can be resynced after the routine has completed.
Figure 4 - DexFlip Complete
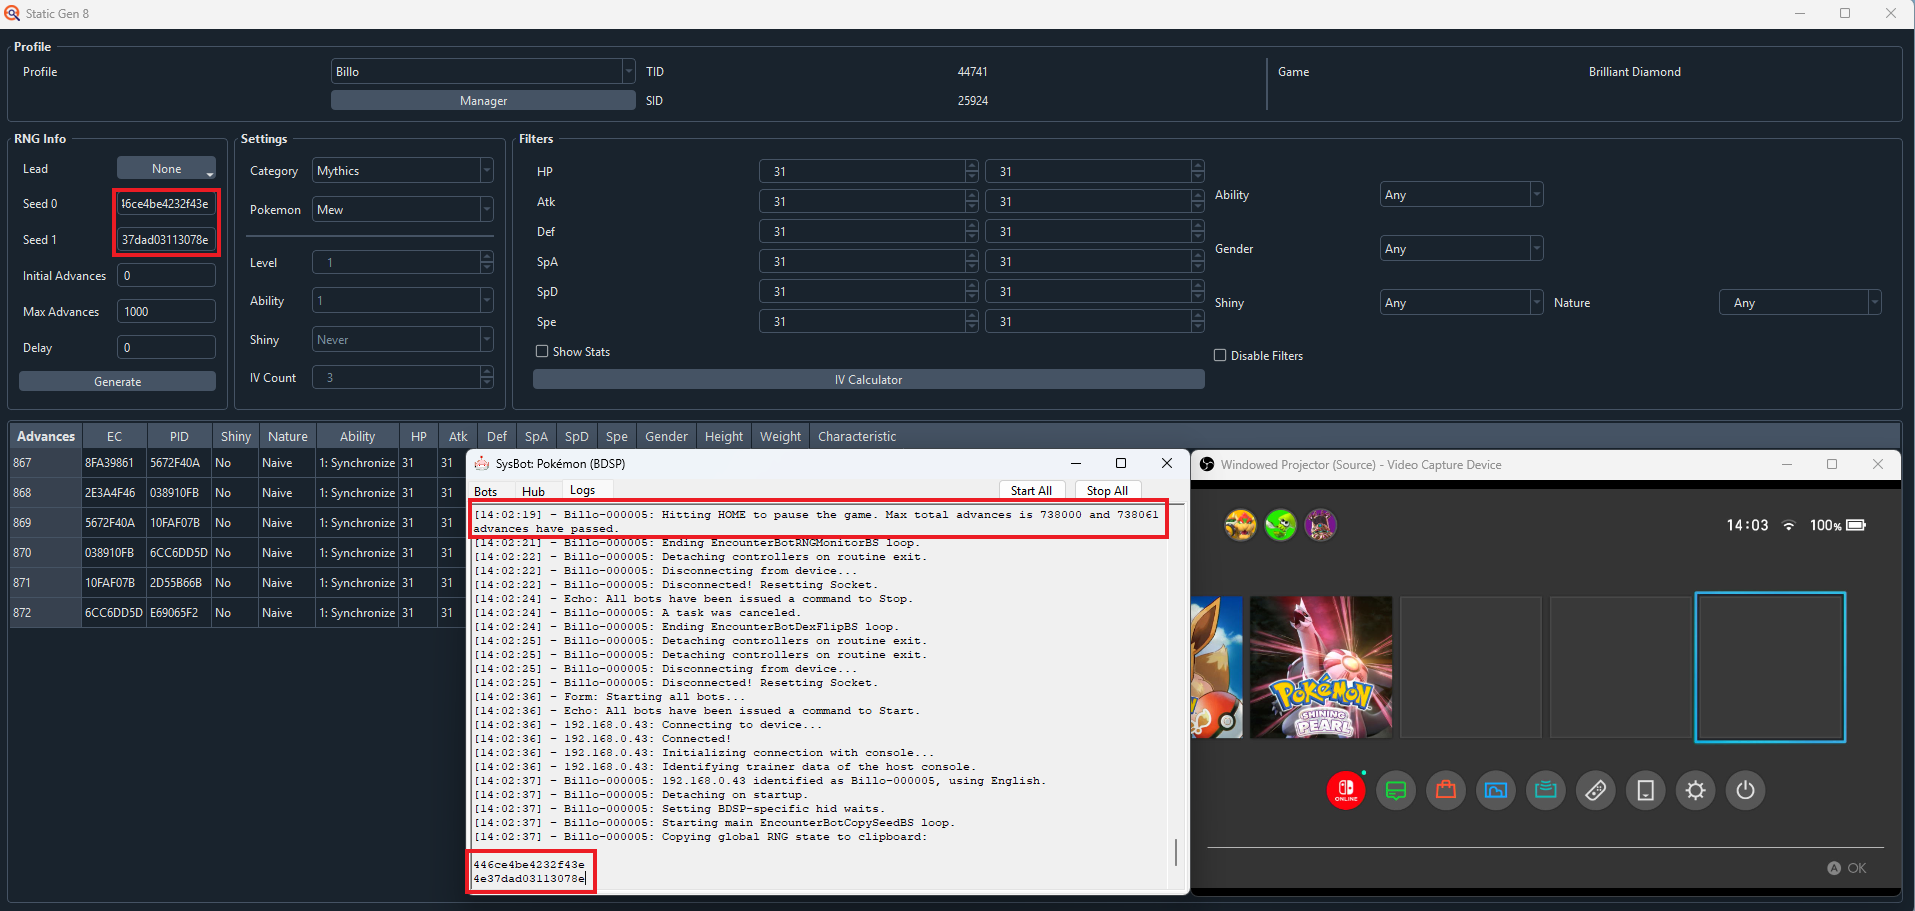
At this point you should be around 10,000 advances away from your target. To confirm exactly how far away you are from your target you will need to remove all currently active bots, then add and start EncBotCopySeedBS.
Step-by-Step
- Head to the location of your gift NPC in-game if you have not already done so. Stand close enough so that you can interact with the NPC.
- Press the
Homebutton, then runEncBotCopySeedBSand enter your new seed into PokeFinder. Search for your target again to get your new target frame. - Remove
EncBotCopySeedBSand add and startEncBotRNGMonitorBSinstead to begin monitoring your RNG state. - Confirm that you have started a fresh instance of
EncBotRNGMonitorBS. Seed monitoring should begin from advance 0, NOT wherever you left off! - Resume the game and observe how quickly the RNG state is advancing. Your next action will depend on the speed of the natural RNG advances.
- If the RNG state is advancing slowly, manually scroll your Pokédex slowly until you 1000 advances (or less) away from your target, then interact with the NPC and reach the screen of the final button input.
- If the RNG state is advancing quickly, interact with the NPC and reach the screen of the final button input.
- See the above table if you are unsure which screen you should be on, final button input screen images can be found by clicking the hyperlinks.
- Monitor the RNG state until you reach your target frame, this should match the exact frame shown on PokeFinder's search result table.
- A technique called "Home button mashing" is used to help ensure that we land directly onto our target frame. Quickly pressing the Home button twice will resume, then pause the game. We can use this technique to inch closer to our target frame and land directly onto it in most cases.
- In the unlikely event that we cannot land directly onto our target frame this will need to be treated as a failure and you will need to restart the process again by finding a new seed and target frame.
- Mew, Jirachi and Happiny are the most notable examples of when it may be difficult to hit a target frame due to the RNG state advancing too quickly. These gifts may take multiple attempts before seeing success.
- You should now be on the Home menu and the SysBot
Logstab should indicate that you have reached your target frame. Unpause the game while mashing theAbutton to redeem the gift. - In BDSP,
ZLandZRalso register asAbutton inputs. You can mash all three of these buttons when attempting to redeem your Pokemon for the best chances of hitting your target frame.
Figure 5 - Target Frame Hit
We have resumed the game on our target frame pressed the A button quickly to redeem the gift. Now it is time to confirm that we have hit the correct target frame by connecting to PokeViewer.NET and using the BoxView button to view the details of the redeemed Pokémon.
Figure 6 - Result Found
We can see that the internal details of the Pokémon match the PokeFinder search results, mission accomplished!
Missed your target frame? Visit gift troubleshooting! Send me back to the main page!Figure 3 - Target Found
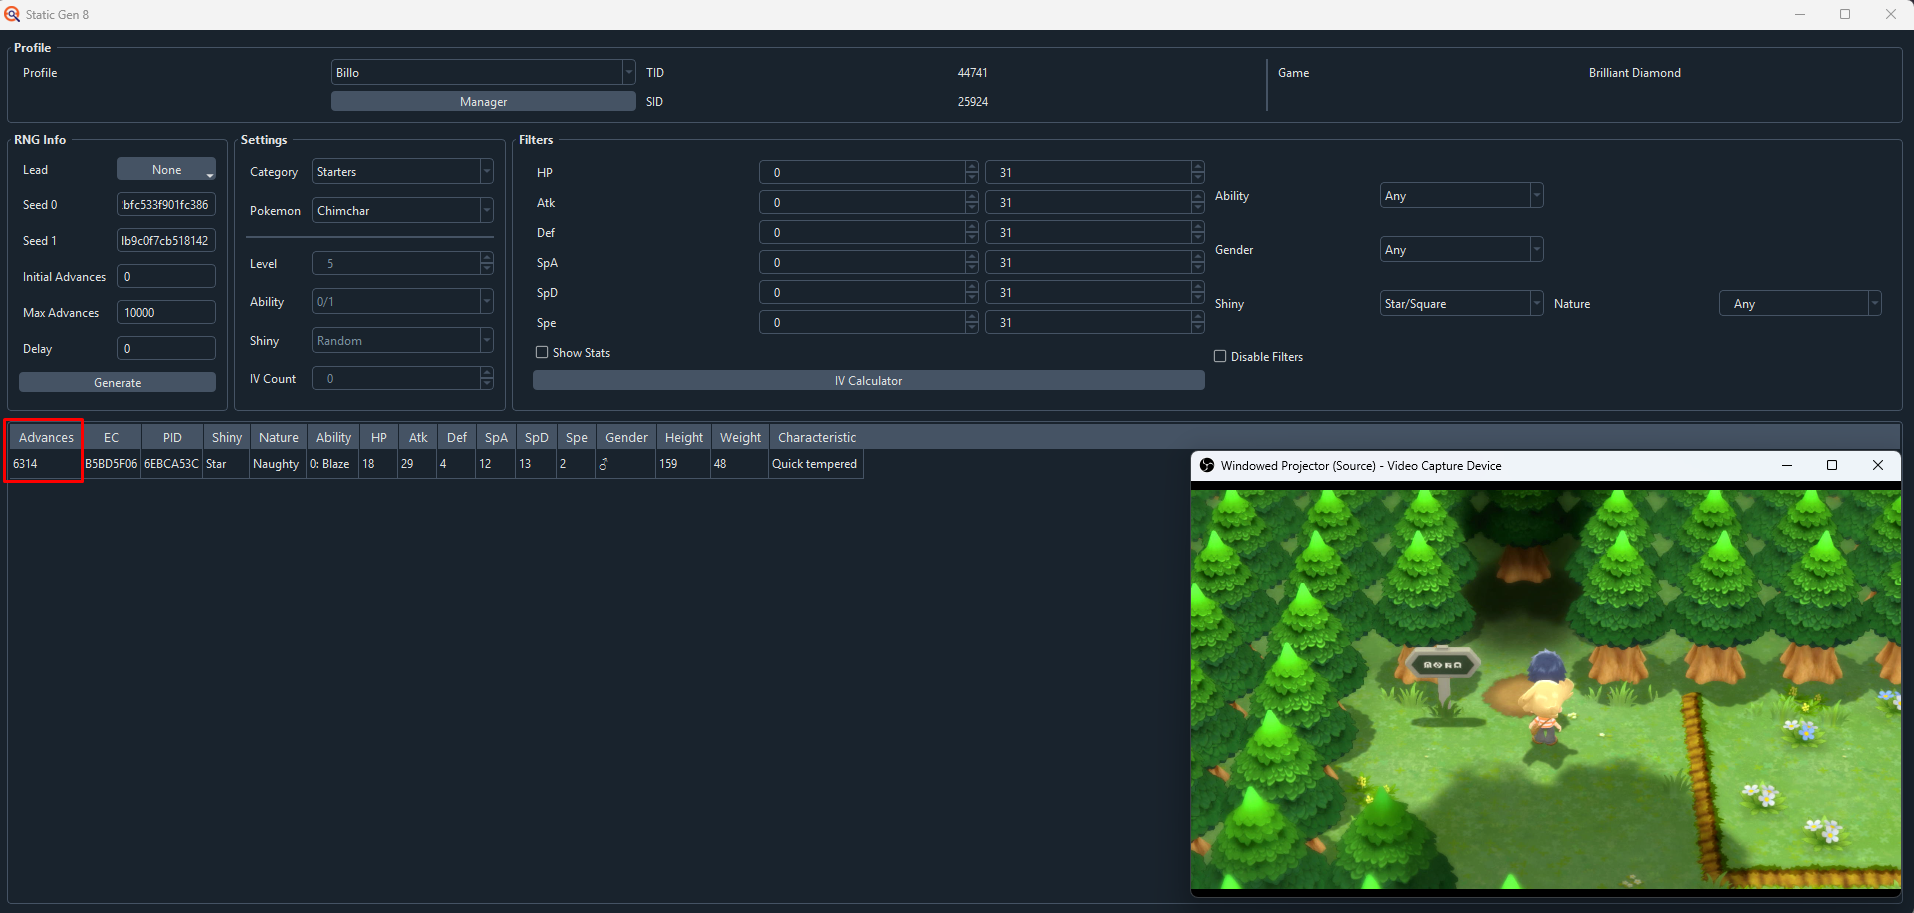
In Figure 3 we can see a result has been produced in 6,314 advances. Since the Offset (64) has already been considered by PokeFinder, we will aim to press the A button to generate the Pokémon on advance 6,314. If you are seeking a non shiny target you may notice multiple frames in a row that produce the same end result, this is known as a "frame cluster". It is recommended to target clusters for non-shiny targets as this grants more opportunities to hit the correct frame.
Typically, the main method to advance the RNG state is scrolling the Pokédex, however, since we do not have access to the Pokédex due to low game progress we will need to advance the RNG state by standing in the overworld before entering Verity Lakefront as this area has a lot of noise and will advance the RNG state at a quick pace.
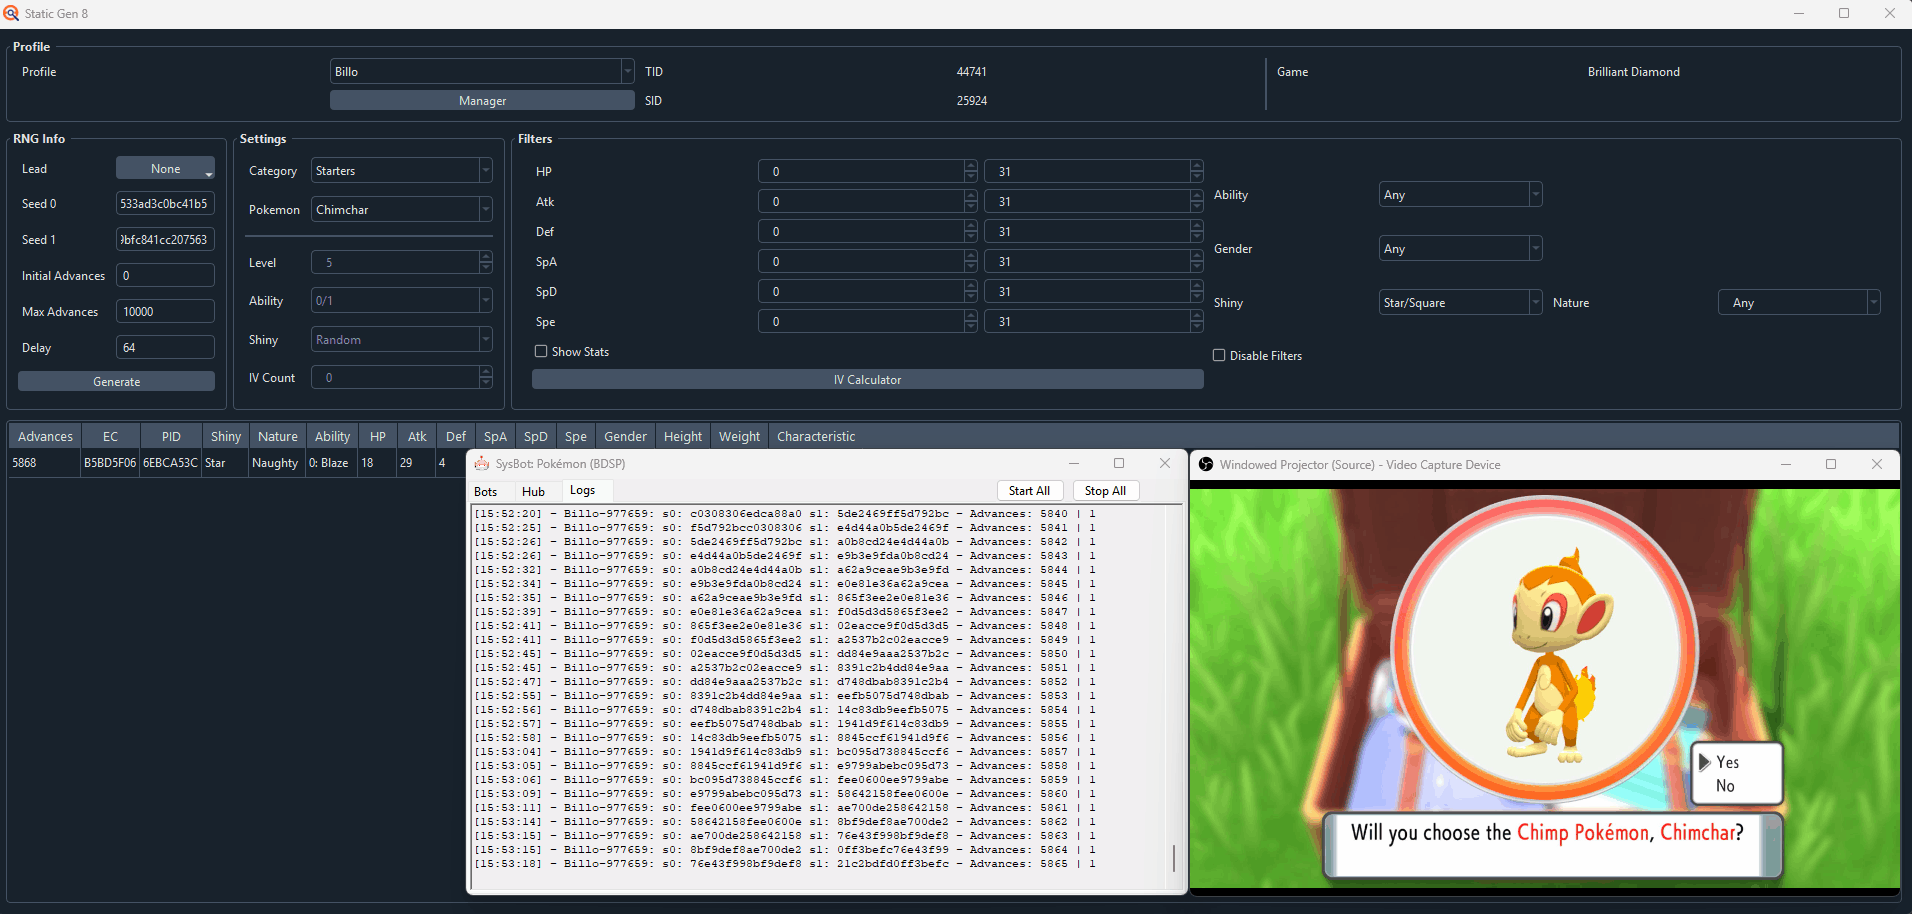
Step-by-Step
- Once you have found a target frame stand next to the enterance of Lake Verity and pause RNG advances by pressing the
Homebutton. - Add
EncBotCopySeedBSand start the bot. Paste your seeds into PokeFinder and search for your target again. - Remove
EncBotCopySeedBSand addEncBotRNGMonitorBSinstead, then resume the game. - Monitor the RNG state until you are around 500-1000 advances away from your target then enter Lake Verity.
- Mash through the cutscene until you reach the screen where you select your starter, press the
Abutton on the Poke Ball that contains your desired starter. - The RNG state will advance very slowly once the briefcase has been opened.
- Wait on this screen until you reach your target frame, then press the
Abutton. Your starter will be generated at this point.
Figure 4 - Target Frame Hit
We have resumed the game on our target frame pressed the A button quickly to redeem our starter. Now it is time to confirm that we have hit the correct target frame by checking if our starter is shiny (if you did not target a shiny you will need to view the summary of your starter after the battle to confirm a match).
Figure 5 - Result Found
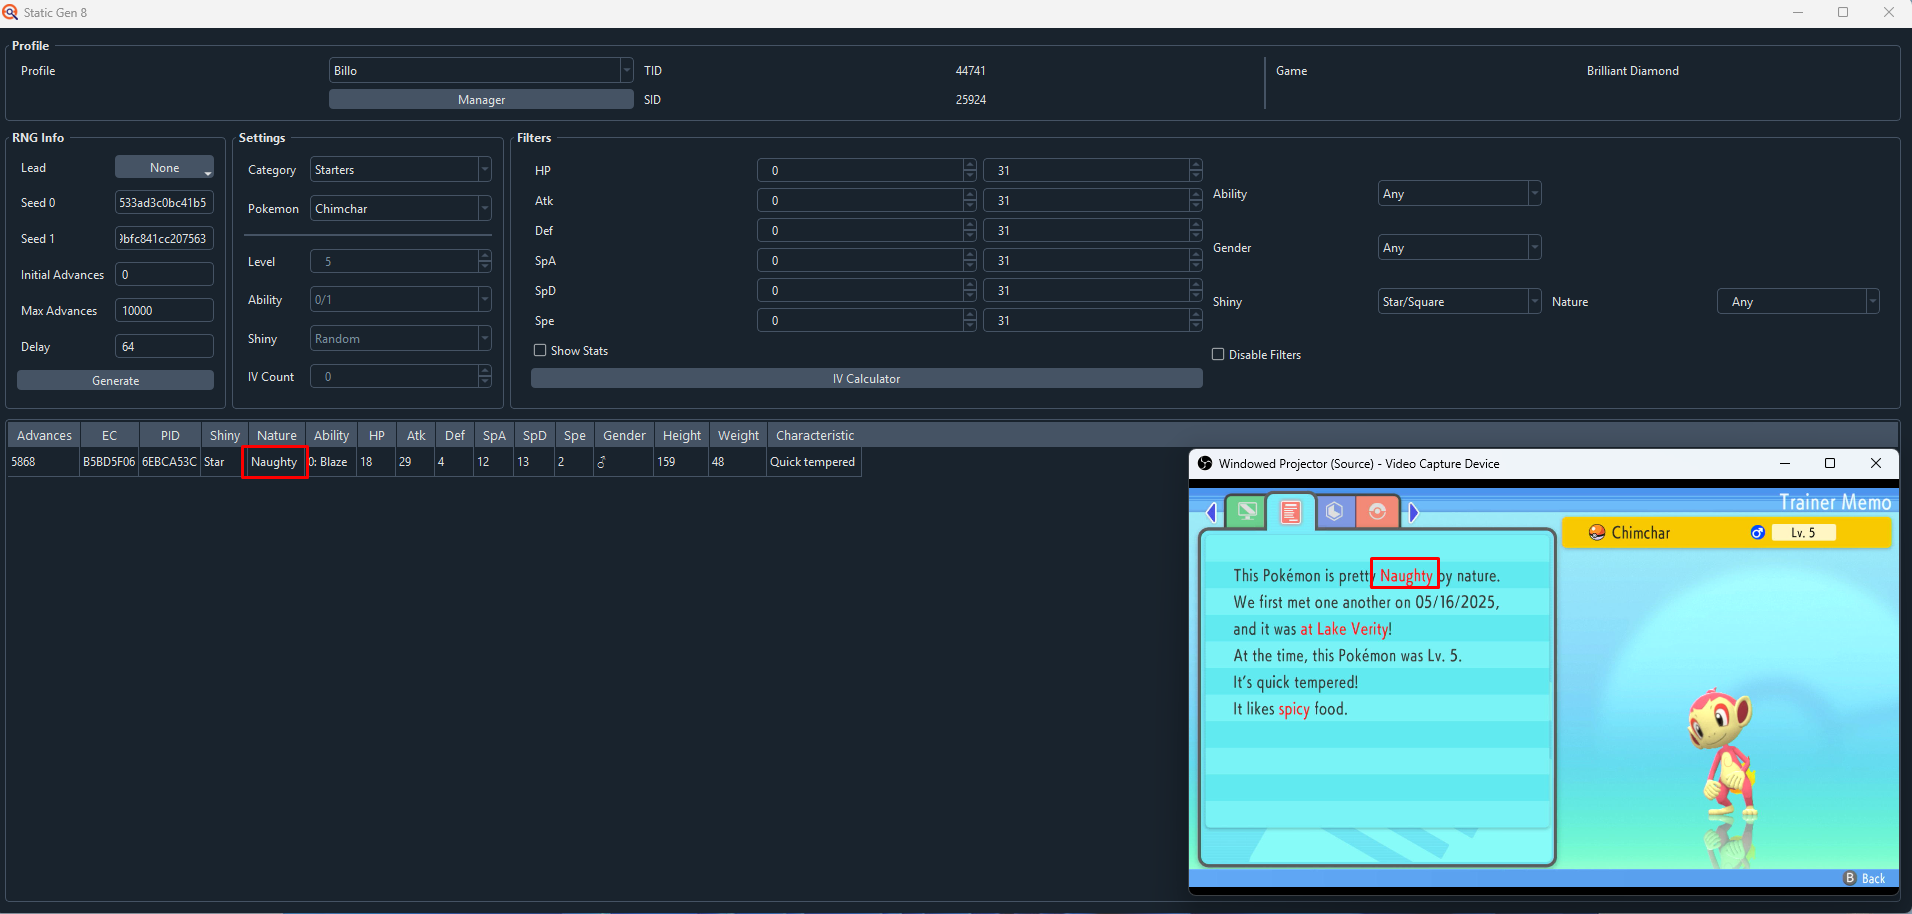
We can see our starter is shiny and that it match the PokeFinder search results, mission accomplished!
Missed your target frame? Visit gift troubleshooting! Send me back to the main page!