Main RNG (CFW)
This page provides instructions and examples of how you can perform Legends: Arceus Main RNG manipulation for Legendary & Mythical Pokémon using ParLiAment. From here it is assumed that you have followed all of the instructions found on the main page and have confirmed that Pokémon falls into the Main RNG category.
Unsure if your Pokémon is in the Main RNG category? Head back to the main page!Before doing anything else, make sure your game is properly set up to ensure that the RNG process is as smooth as possible. It is assumed that you have progressed the story enough to spawn your target Pokémon. If you have not yet done so you should go back and do this now.
In-game Requirements
- If your target is Dialga/Palkia (Base form), Giratina, or Regigigas, bring the following:
- Plenty of healing items to keep your Pokémon in good health.
- Plenty of Poké Balls to capture your target Pokémon.
- A Pokémon capable of inflicting status conditions onto your target Pokémon.
- If your target is Dialga/Palkia (Origin form) or Arceus, bring the following:
- Good game sense and strategy to handle the difficult boss battle.
- A full team of 6 Pokémon in your party.
- A clear slot in Pasture/Box 1 slot 1.
Game Settings / Misc
- In the
Communicationstab of the pause menu, setInternet ConnectiontoOffandAutomatically Connect?toNo. - In the
Helptab of the pause menu, open theSettingsand navigate toAutosave, ensure that it is set toDisabled.
Figure 1 - ParLiAment Usage
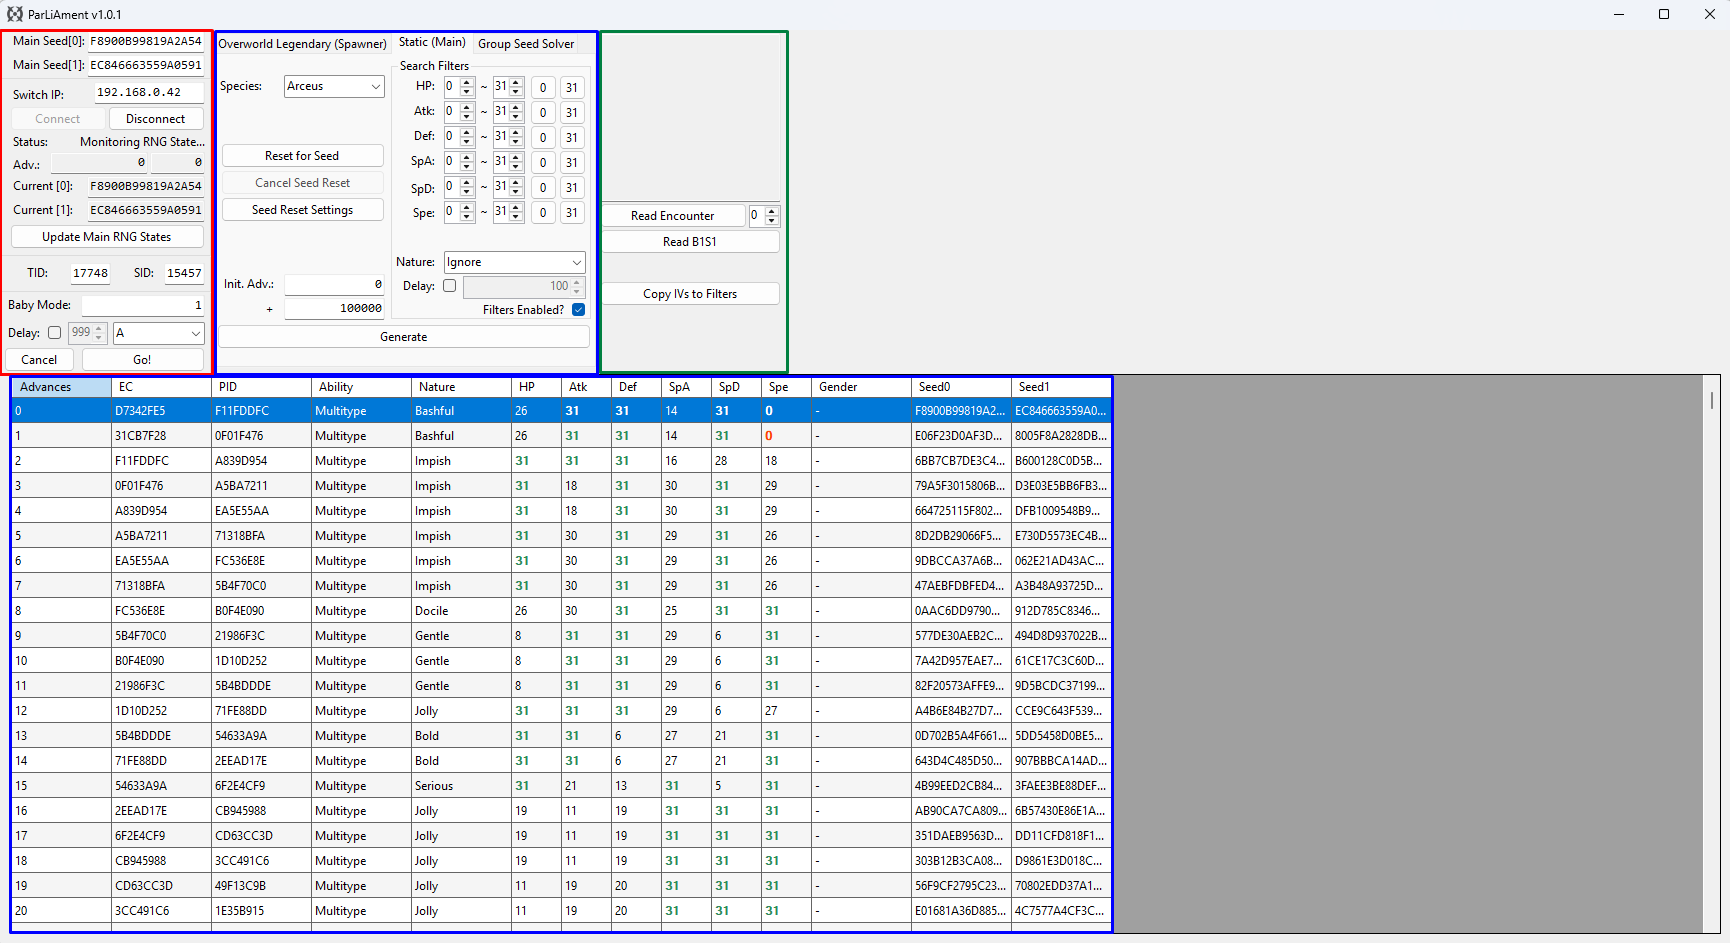
ParLiAment is capable of reading your Main RNG seed in real time and provides an RNG calculator that allowing you to predict and manipulate the details of upcoming Pokémon on your seed. It also provides seed reset features to automate the process of finding a desirable seed based on your search parameters.
Throughout this guide we will only be using the Static (Main) tab as all of our targets use Main RNG. Ensure that you have this tab open and have selected the appropriate target Pokémon in the dropdown menu.
Program Feature Overview
- Red Column - Provides program connectivty features, seed monitoring, TID/SID reading, and final button input automation.
Baby Modeallows for a hands-free approach for performing the final button input before a Pokémon is generated. This is useful for players with accessibility (or skill) issues.- Blue Column - Enter the details of your target Pokémon, set desired search filters, reset for desirable seeds, and view the predicted results in the table.
- Clicking the
Reset for Seedbutton will automate the process of finding a seed that matches your search filters, controllers must be completely disconnected (or Joy Cons must be docked to the console) before clicking. - Green Column - Read the details of an encounter OR the Pokémon occupying the first slot of Pasture 1. Useful for ensuring we hit the correct target.
- Each encounter has a delay between when the final button input is pressed and when the Pokémon is actually generated, details about how to calculate and adjust for this delay will be covered later.
Figure 2 - ParLiAment Seed Resetting
Finding a desirable seed may take a while depending on your search range and desired target. The seed reset feature in ParLiAment automates this process entirely, taking a way a significant portion of manual effort. To automate seed resetting, do the following:
- Type the IP address of your console into the
Switch IP:field, then clickConnect. You should now see that your current seed has been updated. - Select
Static (Main)tab, then enter the details of your target Pokémon and enter your search range, do not tweak the value inInit. Adv:yet. - Enter your search filters, in the above example we are searching for a seed that has 6 perfect (31) IVs within 50,000 advances as 6 IV seeds can be difficult to come by.
- Disconnect any controllers (or dock your Joy Cons), then click the
Reset for Seedbutton to start the seed resetting process.
If everything is done correctly you should now see that your console has started to cycle closing and reopening the game, it will then stop and press the Home (⌂) button once a seed that matches your search conditions has been found. If your seed search is taking a very long time you could consider increasing your search range or applying less strict IV/Nature filters.
If you experience timing issues during the seed reset routine, you can adjust the timing settings by clicking the Seed Reset Settings button. All timing values are in milliseconds. For example, to add an extra second when starting the game, enter 1000 into Extra Time to Load Game.
Worked Example
The instructions for hitting a target seed will vary depending on your target Pokémon and how/when that Pokémon is generated. Each individual encounter type has its own nuances and has been given a relevant section that can be accessed by selecting your chosen encounter.
Figure 1 - Boss Battle Mechanics
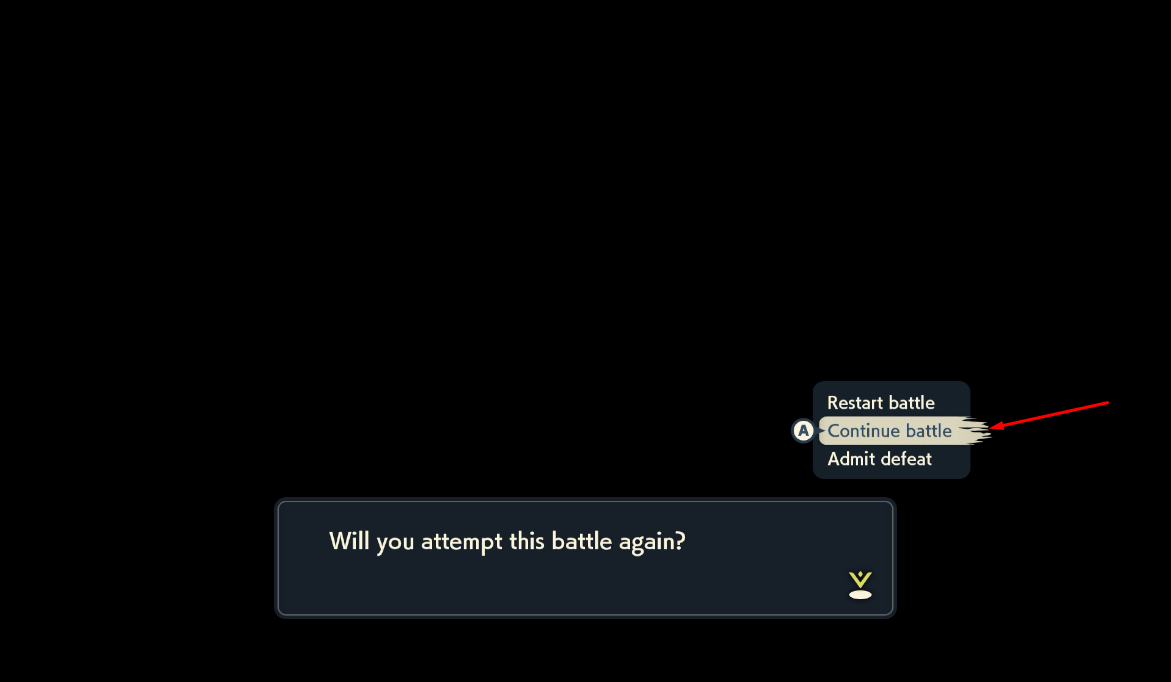
The Arceus boss battle is difficult to beat in one attempt and you may find yourself losing to it multiple times. The Continue battle option allows you to keep your previous progress, making it easier to eventually defeat Arceus. Use this to your advantage if you are struggling.
You could also take this time to connect your console to ParLiAment and monitor how many advances it takes you to defeat the boss on average. Knowing this information will be useful later when it comes to hitting a desired target Pokémon.
In my example, around 5,500-6,000 advances were needed to defeat Arceus, and I lost to the battle multiple times before finally succeeding.
Figure 2 - Delay Calibration
The term delay refers to the time between the final button input and when the Pokémon is generated. Because the number of advances during this period can vary, it's important to do a few practice attempts to find a delay that is consistent for you.
The image above illustrates the process of delay calibration for the Arceus boss battle. This method will not work when targeting the Origin Form Dialga/Palkia boss battle, as Arceus is generated shortly after the battle ends once the final text box is dismissed.
Step-by-step
- Complete the boss battle and get through the cutscene until you reach the final text box. Press the
Home (⌂)button at this point. - Connect to ParLiAment if you have not already done so, or click
Update Main RNG Statesif you were already connected. - Updating the states is important because this will reset your advances to 0, simplifying the delay calibration process.
- Press the
Home (⌂)button to resume the game, then quickly press theAbutton to dismiss the text box and generate Arceus. - Once the screen fades to black, click the
Read B1S1button on ParLiAment and then clickCopy IVs to Filters. - If nothing shows up or you read a Pokémon that is not Arceus, clear Pasture/Box 1 Slot 1, save the game, then try again from step 1.
- Enter a search range of ~100, then click the
Generatebutton. It should produce one or more results that match the Arceus you were in battle with. - If you see multiple results, simply match the PID/EC with the Arceus in the
Read Encounterbox. - Take note of the advance the Arceus was generated on, this will be your delay for this attempt. It is recommended to repeat this process a few times to determine a rough average delay (5-10 attempts is ideal).
| Arceus Delay Table | |
|---|---|
| Attempt | Delay |
| Attempt 1 | 33 |
| Attempt 2 | 36 |
| Attempt 3 | 40 |
| Attempt 4 | 40 |
| Attempt 5 | 34 |
Figure 3 - Seed Resetting / Target Found
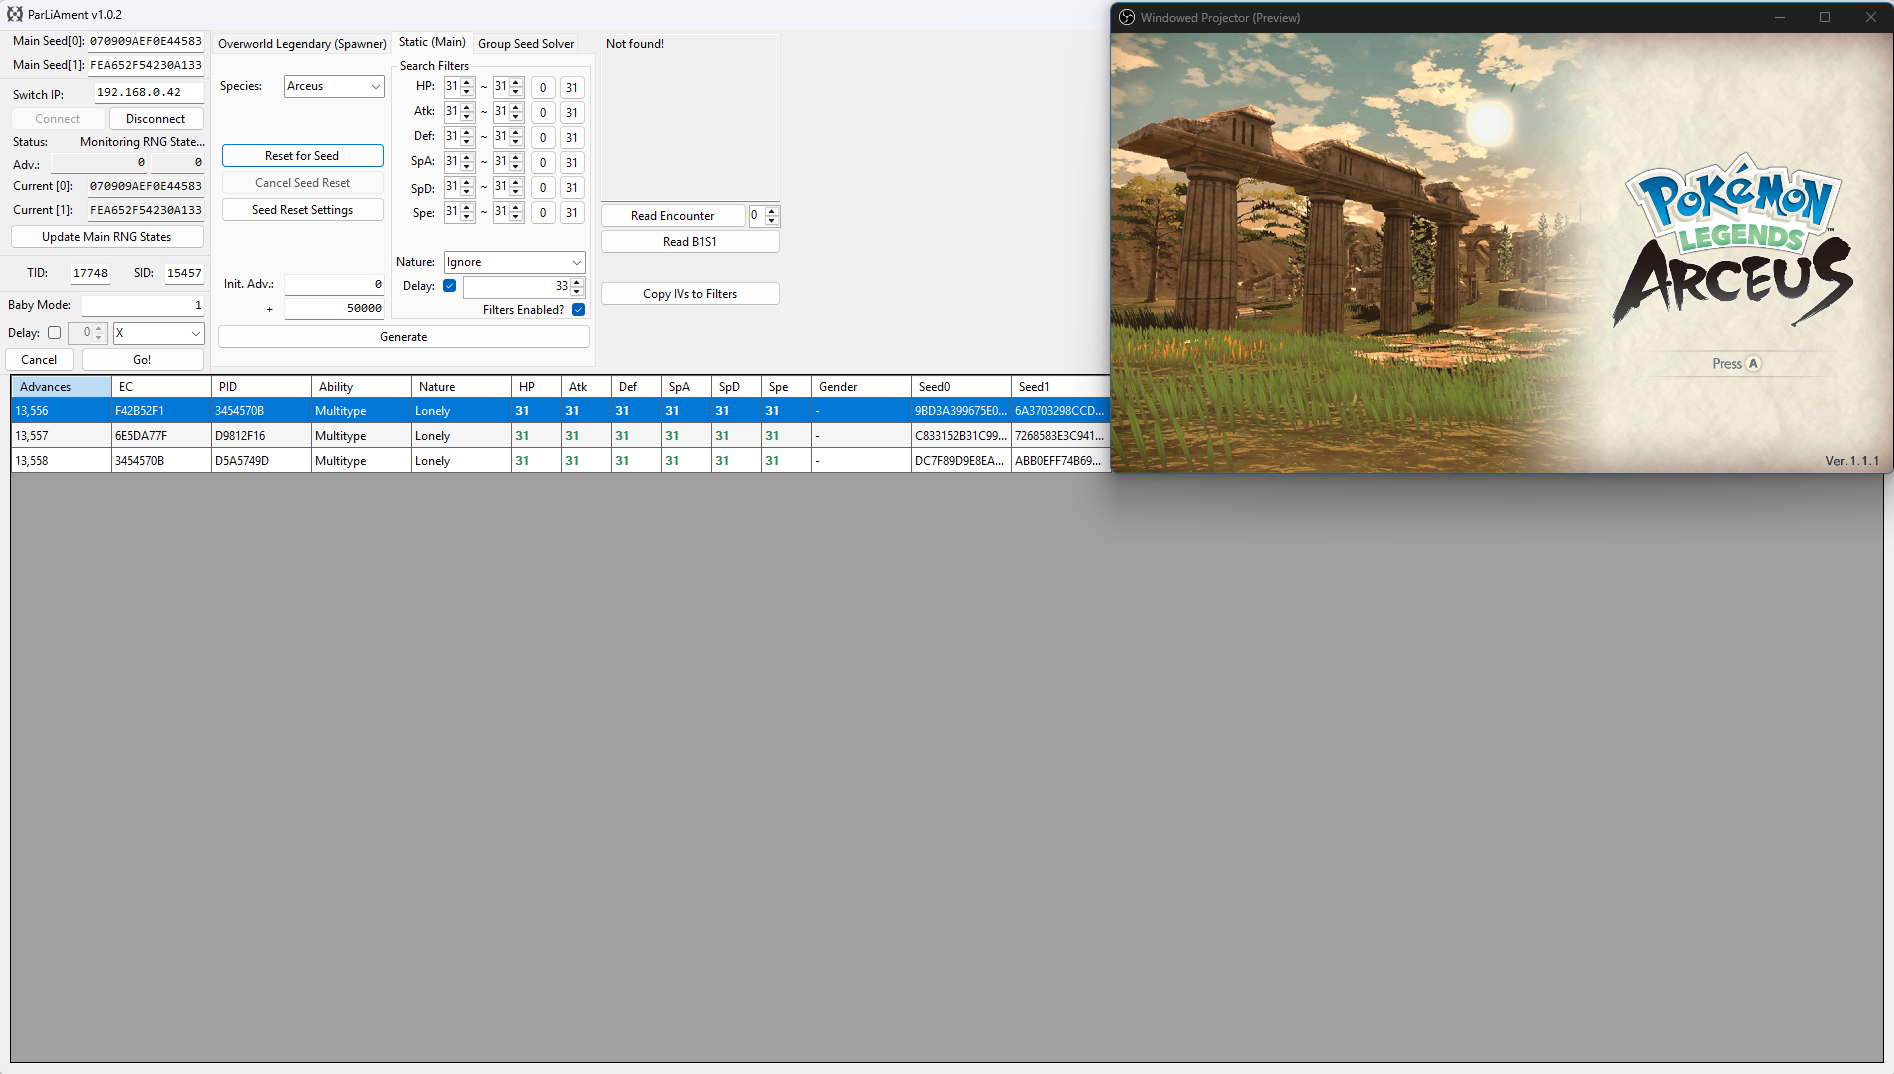
After calibrating your delay, enter your desired search filters into ParLiAment. In this case we will be searching for a 6 IV Arceus so all six of the IV filters have been set to 31. We have also set our search range to 50,000 as we are searching for quite a rare target.
Once you have set your search filters, check the Delay checkbox and enter the most common value from your delay calibration attempts, in the context of this example we hit a delay of 33-40, so we will enter 33 into the Delay field. You can now move onto resetting for a desirable target seed.
In the example above, we can see a 6 IV Arceus appearing at 13,556-13,558 advances in cluster of 3. A cluster is a group of advances that all produce the same outcome. In this case, there are 3 advances that result in a 6IV Arceus. Larger clusters increase the likelihood of hitting the correct target frame.
Figure 4 - Advancing The RNG State
The RNG state advances naturally, and the speed of the advances will depend on what you are doing in-game. If you wish to increase the speed of advances you can perform the following actions:
- Stand next to a body of water, this will advance the RNG state by roughly 2,500-3,000 per minute and can be done while idle.
- Fly around on Braviary spawning wild Pokémon, this will advance the RNG state by roughly 5,500-6,000 per minute, but requires some manual effort.
- Stand in areas densely populated with wild Pokémon, this will advance the RNG state by roughly 3,000-3,500 per minute, but be cautious of attacks.
- Combine any of the above methods to further increase the number of advances per minute.
Leave yourself plenty of time to navigate back to Arceus and defeat the boss battle after finishing with advancing the RNG state to avoid overshooting your target. As mentioned above, it takes me roughly 6,000 advances to defeat the boss battle, we also need to add number of advances it takes to head back up to Spear Pillar from our current location, so for example:
- It takes ~6,000 advances to defeat the boss.
- It takes ~2,500 advances to reposition at Spear Pillar.
This means we should leave roughly 8,500 advances spare before we start heading back to Spear Pillar to defeat the boss (6,000 + 2,500 = 8,500)
Figure 5 - Character Repositioning
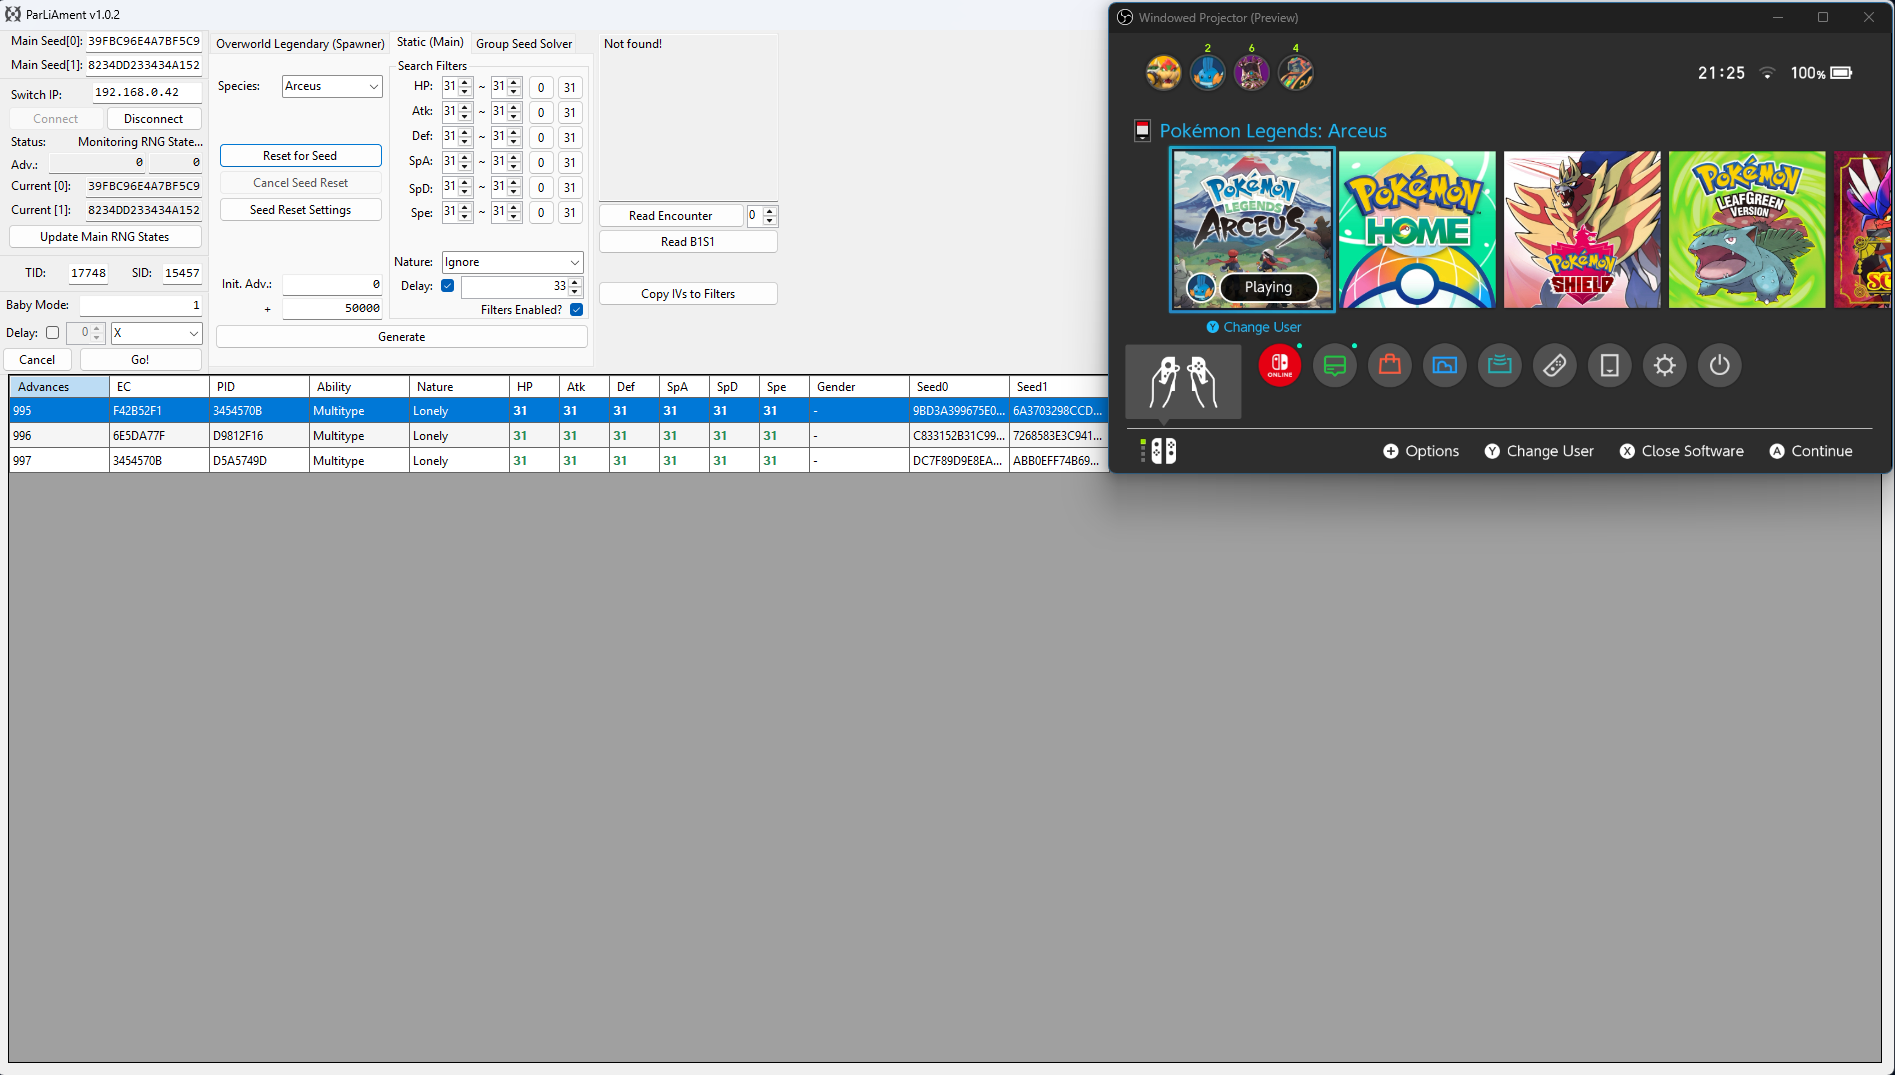
We have now navigated back to Spear Pillar and defeated Arceus. After updating the current seed using the Update Main RNG States button and searching for the target again, we can now see our new target frame is on advance 995-997. Delay is already being considered by the search result table, so we will aim to dismiss the text box and skip the cutscene on advance 995.
Simply wait on the cutscene text box until you reach your target frame. If you want to advance the RNG state gradually you can press the Home (⌂) button on your controller to pause the RNG state, then press it again to resume the game when you are ready. Do this until you have reached your target frame.
Once you reach your target frame, quickly dismiss the text box to generate Arceus. Press the A button after skipping the cutscene, then click the Read B1S1 button once the screen fades to black to confirm that you hit the correct Arceus.
Baby Mode
You can optionally use baby mode to attempt to automate the process of hitting your target frame, this can be done as follows:
- Ensure that you are on the screen of the final button input, then press the
Home (⌂)button and update your current seed. - Uncheck the
Delaycheckbox in the search filters section, then search for your target again. - Confirm the target frame, then enter that value into the
Baby Mode:field on the left-hand side of the ParLiAment window. - Click the
Delaycheckbox found Baby Mode section and enter your delay here instead, then set the button input toAin the dropdown menu. - Re-enter the game, disconnect all controllers (or dock the Joy Cons), then click the
Go!button. ParLiAment will then automatically press theAbutton once it reaches the target frame.
Figure 6 - Result Found
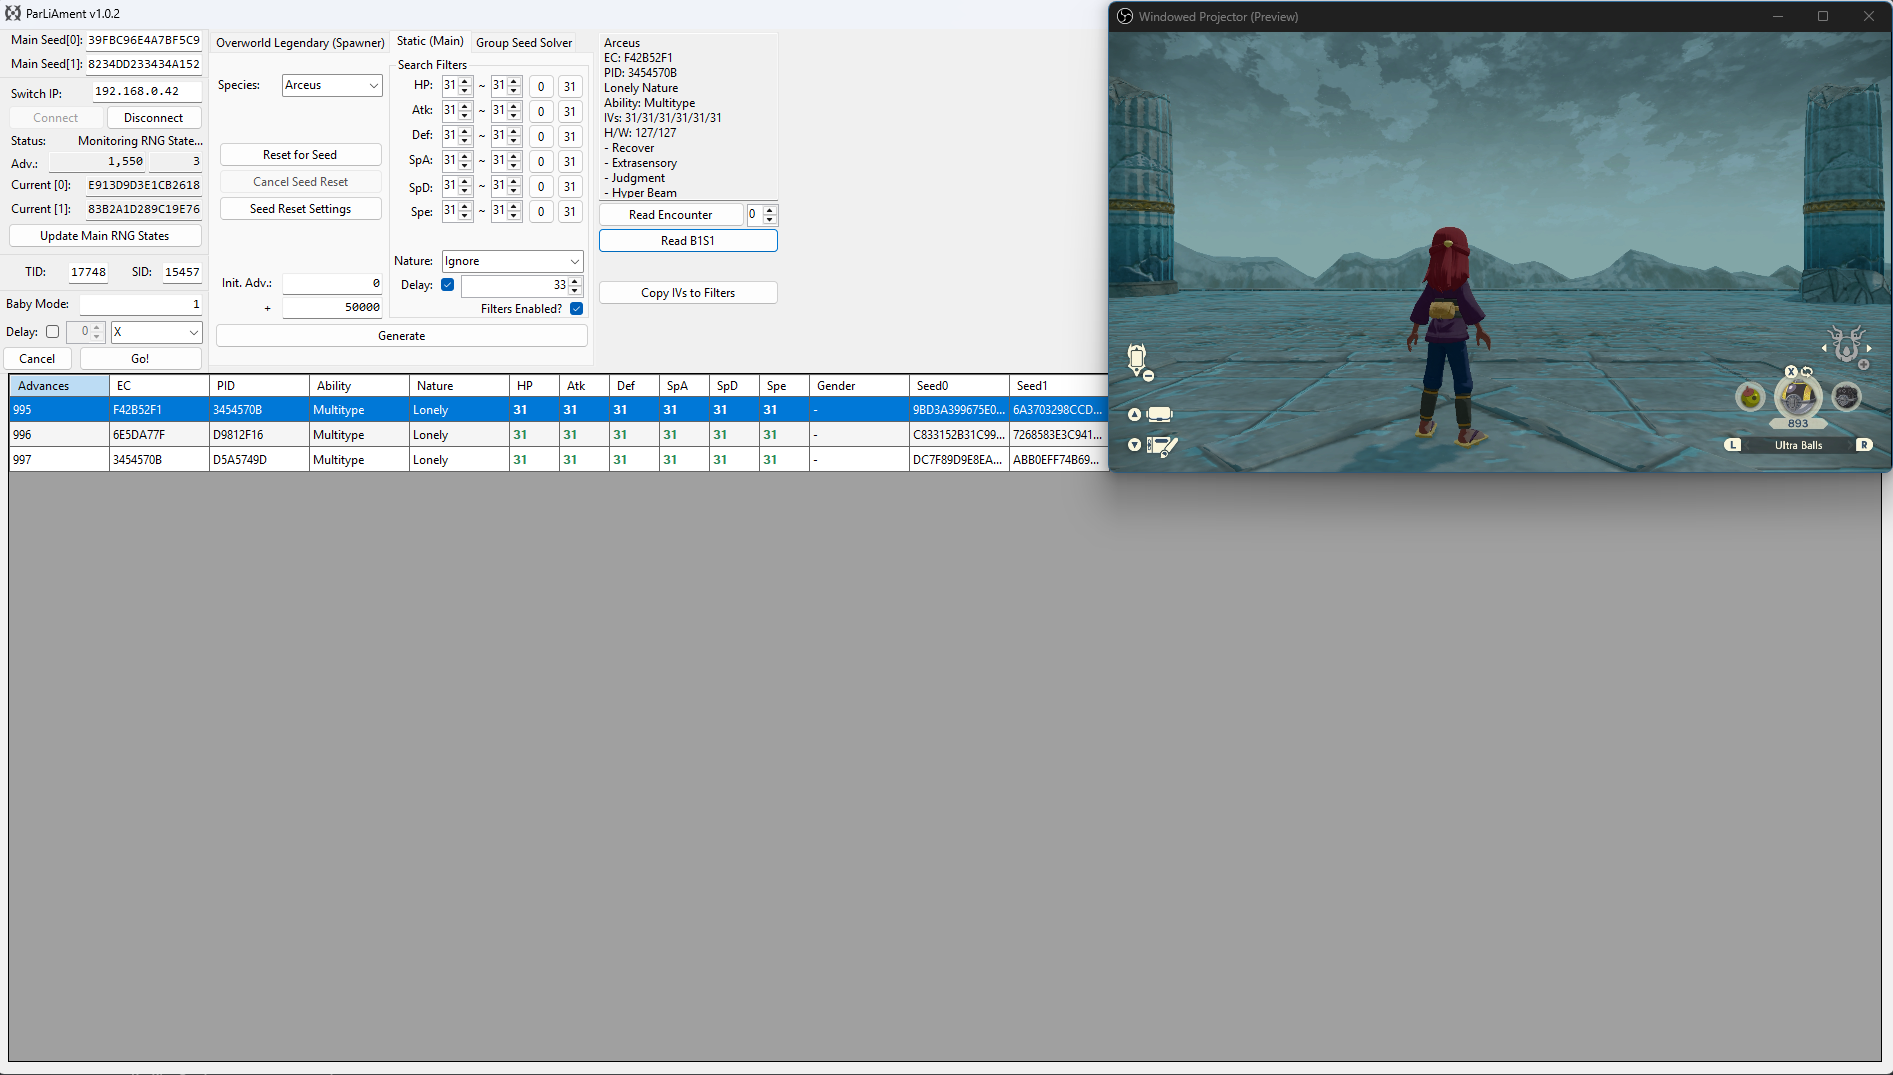
After dismissing the text box on our target advance and reading the details of Box 1 Slot 1, we can see that the details of the Arceus match our desired conditions!
Figure 1 - Boss Battle Mechanics
The Origin legends (Dialga or Palkia) are generated in one of two ways, either:
- After clearing the initial cutscene, where the boss generates on full HP.
- After each failed attempt (character being blacked out from damage), where the boss can generate on lower HP.
Generating the boss by skipping the initial cutscene, then defeating it in one attempt without blacking out is possible, but difficult. Instead, this method covers the process of damaging the boss down to its final health bar, then intentionally take damage and have the player black out as this is more beginner friendly.
The boss is respawned after the blackout, on the screen pictured above. When we respawn the boss using the Keep previous progress option it will respawn with only a single bar of health, making the remainder of the fight easier to execute.
It's a good idea to do a test run and figure out how many advances it takes you to get the boss down to a single HP bar, this information will be useful later when it comes to hitting a target frame in practice. In my example, around 5,500-6,000 advances were needed to get the boss down to a single health bar.
Figure 2 - Delay Calibration
The term delay refers to the time between the final button input and when the Pokémon is generated. Because the number of advances during this period can vary, it's important to do a few practice attempts to find a delay that is consistent for you.
The image above illustrates the process of delay calibration for the Dialga/Palkia boss battle. This method will not work when targeting the Arceus boss battle, as Arceus is generated after the boss battle ends.
Step-by-step
- Get the boss down to a single bar of health, then intentionally lose the battle. Select
Continue battleand wait on this screen. - Press the
Home (⌂)button and connect to ParLiAment if you have not already done so, or clickUpdate Main RNG Statesif you were already connected. - Updating the states is important because this will reset your advances to 0, simplifying the delay calibration process.
- Press the
Home (⌂)button to resume the game, then quickly press theAbutton to dismiss the text box and regenerate Dialga/Palkia. - Once the boss regerates you must then defeat it without dying, it should only have one bar of health so this should not be too difficult.
- After the credits roll begins, click the
Read B1S1button on ParLiAment and then clickCopy IVs to Filters - If nothing shows up or you read a Pokémon that is not Dialga/Palkia, clear Pasture/Box 1 Slot 1, save the game, then try again from step 1.
- Enter a search range of ~50, then click the
Generatebutton. It should produce one or more results that match the Dialga/Palkia you were in battle with. - If you see multiple results, simply match the PID/EC with the Dialga/Palkia in the
Read Encounterbox. - Take note of the advance the Dialga/Palkia was generated on, this will be your delay for this attempt. It is recommended to repeat this process a few times to determine a rough average delay (5-10 attempts is ideal).
| Origin Form Dialga/Palkia Delay Table (Intentional Death Method) | |
|---|---|
| Attempt | Delay |
| Attempt 1 | 4 |
| Attempt 2 | 3 |
| Attempt 3 | 3 |
| Attempt 4 | 2 |
| Attempt 5 | 3 |
Figure 3 - Seed Resetting / Target Found
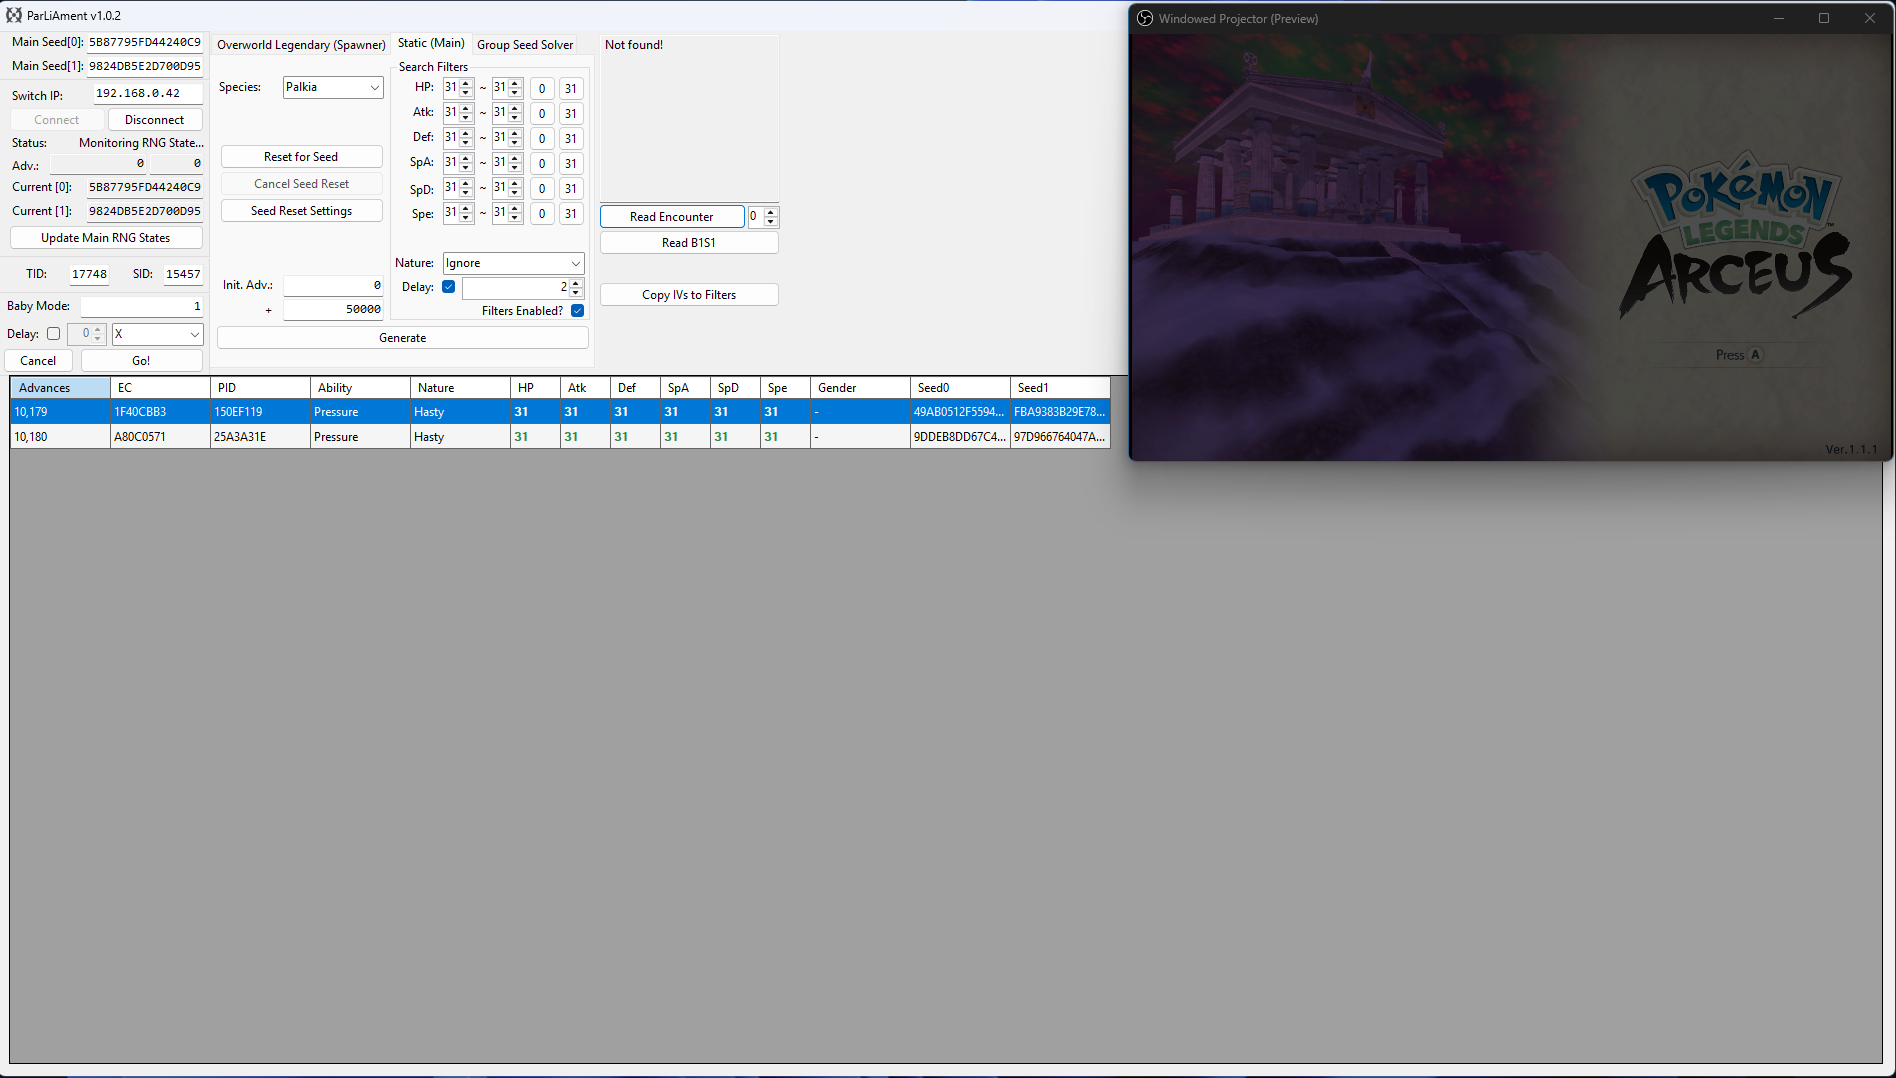
After calibrating your delay, enter your desired search filters into ParLiAment. In this case we will be searching for a 6 IV Palkia so all six of the IV filters have been set to 31. We have also set our search range to 50,000 as we are searching for quite a rare target.
Once you have set your search filters, check the Delay checkbox and enter the most common value from your delay calibration attempts, in the context of this example we hit a delay of 2-4, so we will enter 2 into the Delay field. You can now move onto resetting for a desirable target seed.
In the example above, we can see a 6 IV Palkia appearing at 10,179-10,180 advances in cluster of 2. A cluster is a group of advances that all produce the same outcome. In this case, there are 2 advances that result in a 6IV Palkia. Larger clusters increase the likelihood of hitting the correct target frame.
Figure 4 - Advancing The RNG State
The RNG state advances naturally, and the speed of the advances will depend on what you are doing in-game. If you wish to increase the speed of advances you can perform the following actions:
- Stand next to a body of water, this will advance the RNG state by roughly 2,500-3,000 per minute and can be done while idle.
- Fly around on Braviary spawning wild Pokémon, this will advance the RNG state by roughly 5,500-6,000 per minute, but requires some manual effort.
- Stand in areas densely populated with wild Pokémon, this will advance the RNG state by roughly 3,000-3,500 per minute, but be cautious of attacks.
- Combine any of the above methods to further increase the number of advances per minute.
Leave yourself plenty of time to navigate back to Spear Pillar and whittle down the HP bar to avoid overshooting your target. As mentioned above, it takes me roughly 3,000 advances to defeat the boss battle, we also need to add number of advances it takes to head back up to Spear Pillar from our current location, so for example:
- It takes ~3,000 advances to get the boss down to the final health bar.
- It takes ~2,500 advances to reposition at Spear Pillar.
This means we should leave roughly 5,500 advances spare before we start heading back to Spear Pillar to defeat the boss (3,000 + 2,500 = 5,500)
Figure 5 - Character Repositioning
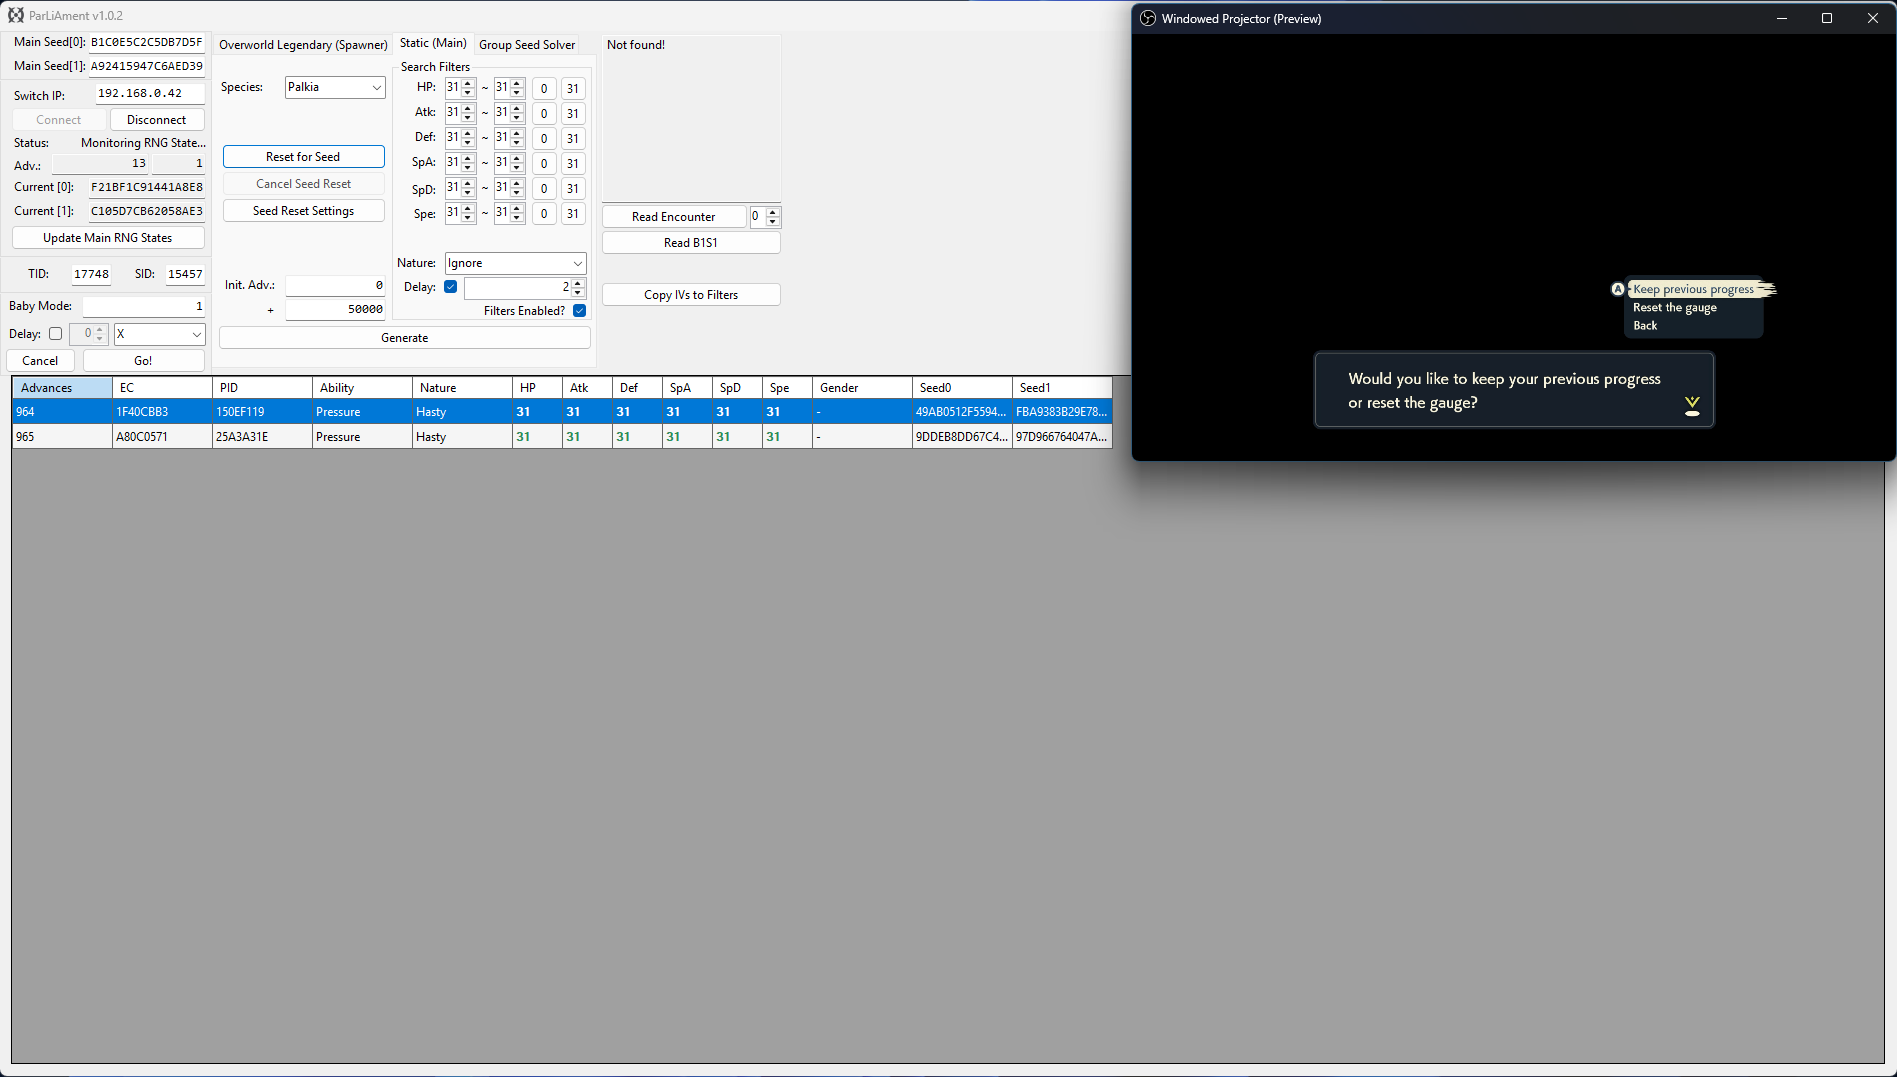
We have now navigated back to Spear Pillar and got Palkia down to a single HP bar, after doing this we intentionally took damage causing the player to black out. Now we need to update the current seed using the Update Main RNG States button and search for the target again. After doing so we can see our new target frame is on advance 964-965. Delay is already being considered by the search result table, so we will aim to dismiss the text box and skip the cutscene on advance 964.
Simply wait on the cutscene text box until you reach your target frame. If you want to advance the RNG state gradually you can press the Home (⌂) button on your controller to pause the RNG state, then press it again to resume the game when you are ready. Do this until you have reached your target frame.
Once you reach your target frame, quickly dismiss the text box to generate Dialga/Palkia and defeat the boss without blacking out. Get through the cutscene until you see the screen fade to black and the credits roll begins, then click the Read B1S1 button to confirm that you hit the correct Dialga/Palkia.
Baby Mode
You can optionally use baby mode to attempt to automate the process of hitting your target frame, this can be done as follows:
- Ensure that you are on the screen of the final button input, then press the
Home (⌂)button and update your current seed. - Uncheck the
Delaycheckbox in the search filters section, then search for your target again. - Confirm the target frame, then enter that value into the
Baby Mode:field on the left-hand side of the ParLiAment window. - Click the
Delaycheckbox found Baby Mode section and enter your delay here instead, then set the button input toAin the dropdown menu. - Re-enter the game, disconnect all controllers (or dock the Joy Cons), then click the
Go!button. ParLiAment will then automatically press theAbutton once it reaches the target frame.
Figure 6 - Result Found
After dismissing the text box on our target advance and reading the details of Box 1 Slot 1, we can see that the details of the Palkia match our desired conditions!
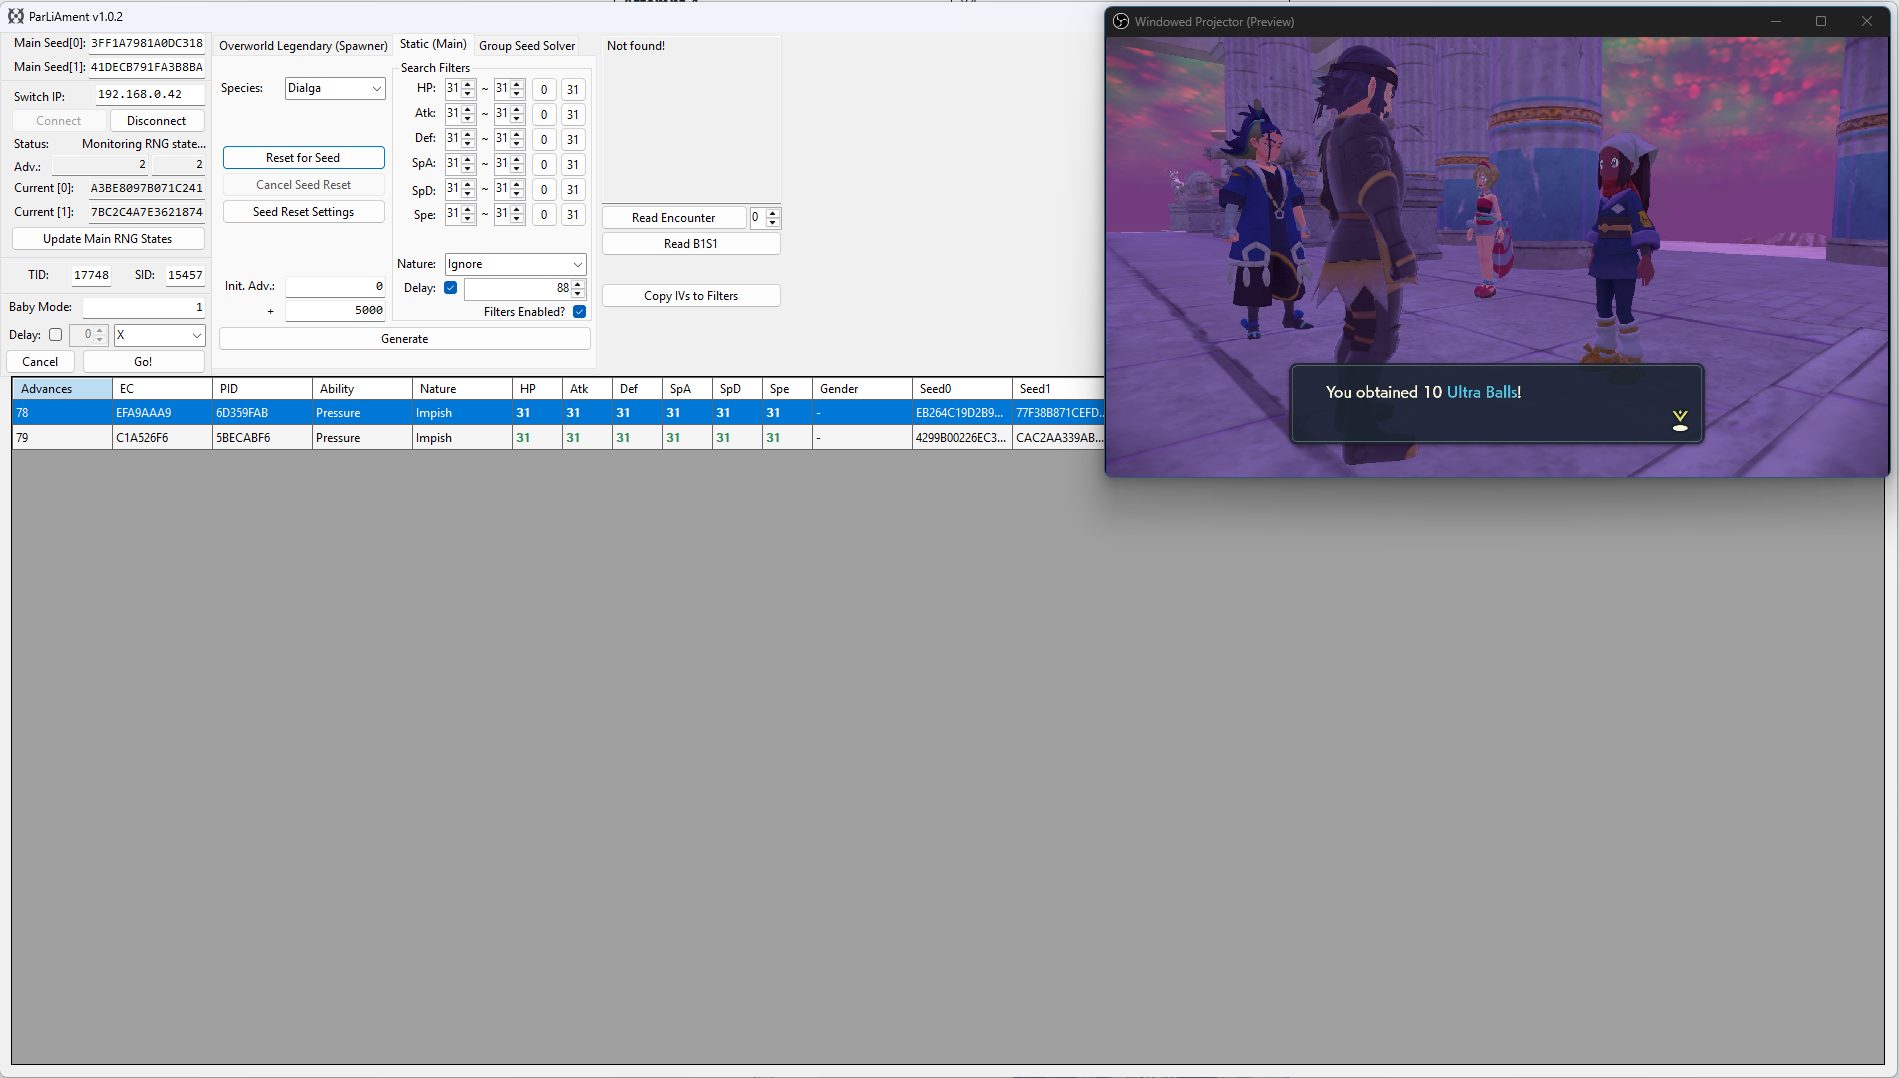
Figure 1 - Delay Calibration
The term delay refers to the time between the final button input and when the Pokémon is generated. Because the number of advances during this period can vary, it's important to do a few practice attempts to find a delay that is consistent for you. The image above illustrates the process of delay calibration for base form Dialga/Palkia.
Pressing the A button on "You obtained 10 Ultra Balls" screen will dismiss the text box and a cutscene will begin. Once the cutscene has loaded you can press the + followed by the X button to skip the cutscene. You should aim to skip the cutscene as quickly as possible.
Step-by-step
- Save your game while standing close to Dialga/Palkia then initiate the first cutscene. Press the
Home (⌂)button once you reach the final text box. - Connect to ParLiAment if you have not already done so, or click
Update Main RNG Statesif you were already connected. - Updating the states is important because this will reset your advances to 0, simplifying the delay calibration process.
- Press the
Home (⌂)button to resume the game, then quickly press theAbutton to dismiss the text box and trigger a cutscene. - Once the screen fades to black and Spear Pillar cutscene starts to play, press the
+button followed by theXbutton as quickly as possible to skip it. - A black screen will appear before the battle starts and you will need to press the
Abutton to begin the battle. - This part is not time sensitive, Dialga/Palkia is generated after clearing the cutscene, so it is already generated by the time we reach the black screen.
- Once the battle has started, click the
Read Encounterbutton on ParLiAment and then clickCopy IVs to Filters. - Enter a search range of ~200, then click the
Generatebutton. It should produce one or more results that match the Dialga/Palkia you are in battle with. - If you see multiple results, simply match the PID/EC with the Dialga/Palkia in the
Read Encounterbox. - Take note of the advance the Dialga/Palkia was generated on, this will be your delay for this attempt. It is recommended to repeat this process a few times to determine a rough average delay (5-10 attempts is ideal).
| Base Form Dialga/Palkia Delay Table | |
|---|---|
| Attempt | Delay |
| Attempt 1 | 88 |
| Attempt 2 | 96 |
| Attempt 3 | 88 |
| Attempt 4 | 84 |
| Attempt 5 | 91 |
| Attempt 6 | 95 |
| Attempt 7 | 88 |
| Attempt 8 | 92 |
| Attempt 9 | 84 |
| Attempt 10 | 90 |
Figure 2 - Seed Resetting / Target Found
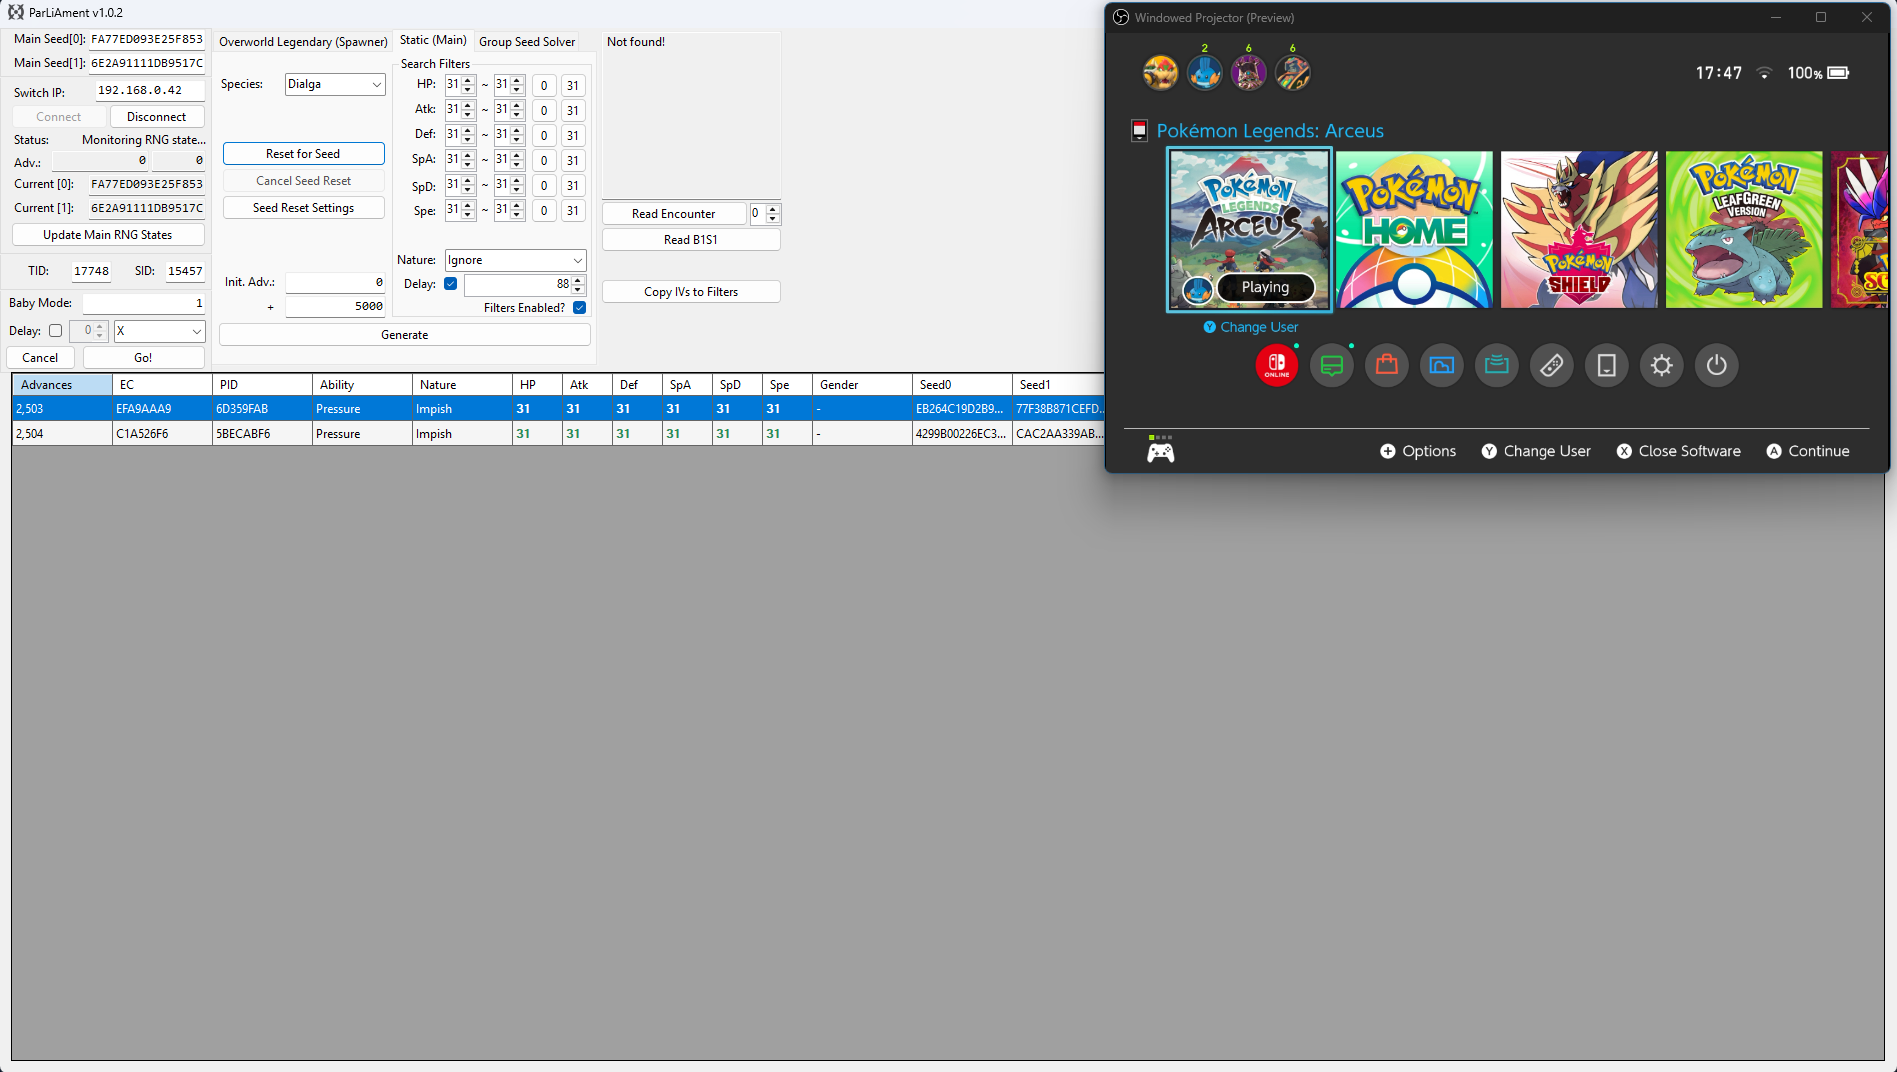
After calibrating your delay, enter your desired search filters into ParLiAment. In this case we will be searching for a 6 IV Dialga so all six of the IV filters have been set to 31. We have also set our search range to 50,000 as we are searching for quite a rare target.
Once you have set your search filters, check the Delay checkbox and enter the most common value from your delay calibration attempts, in our case we most commonly hit a delay of 88, so we will enter 88 into the Delay field. You can now move onto resetting for a desirable target seed.
In the example above, we can see a 6 IV Dialga appearing at 2,503-2,504 advances in cluster of 2. A cluster is a group of advances that all produce the same outcome. In this case, there are 2 advances that result in a 6IV Dialga. Larger clusters increase the likelihood of hitting the correct target frame.
Figure 3 - Advancing The RNG State
The RNG state advances naturally, and the speed of the advances will depend on what you are doing in-game. If you wish to increase the speed of advances you can perform the following actions:
- Stand next to a body of water, this will advance the RNG state by roughly 2,500-3,000 per minute and can be done while idle.
- Fly around on Braviary spawning wild Pokémon, this will advance the RNG state by roughly 5,500-6,000 per minute, but requires some manual effort.
- Stand in areas densely populated with wild Pokémon, this will advance the RNG state by roughly 3,000-3,500 per minute, but be cautious of attacks.
- Combine any of the above methods to further increase the number of advances per minute.
Leave yourself plenty of time to navigate back to Dialga/Palkia after advancing the RNG state to avoid overshooting your target. If you overshoot your target frame by accident you will need to restart the process of finding a desirable seed and advance the RNG state again.
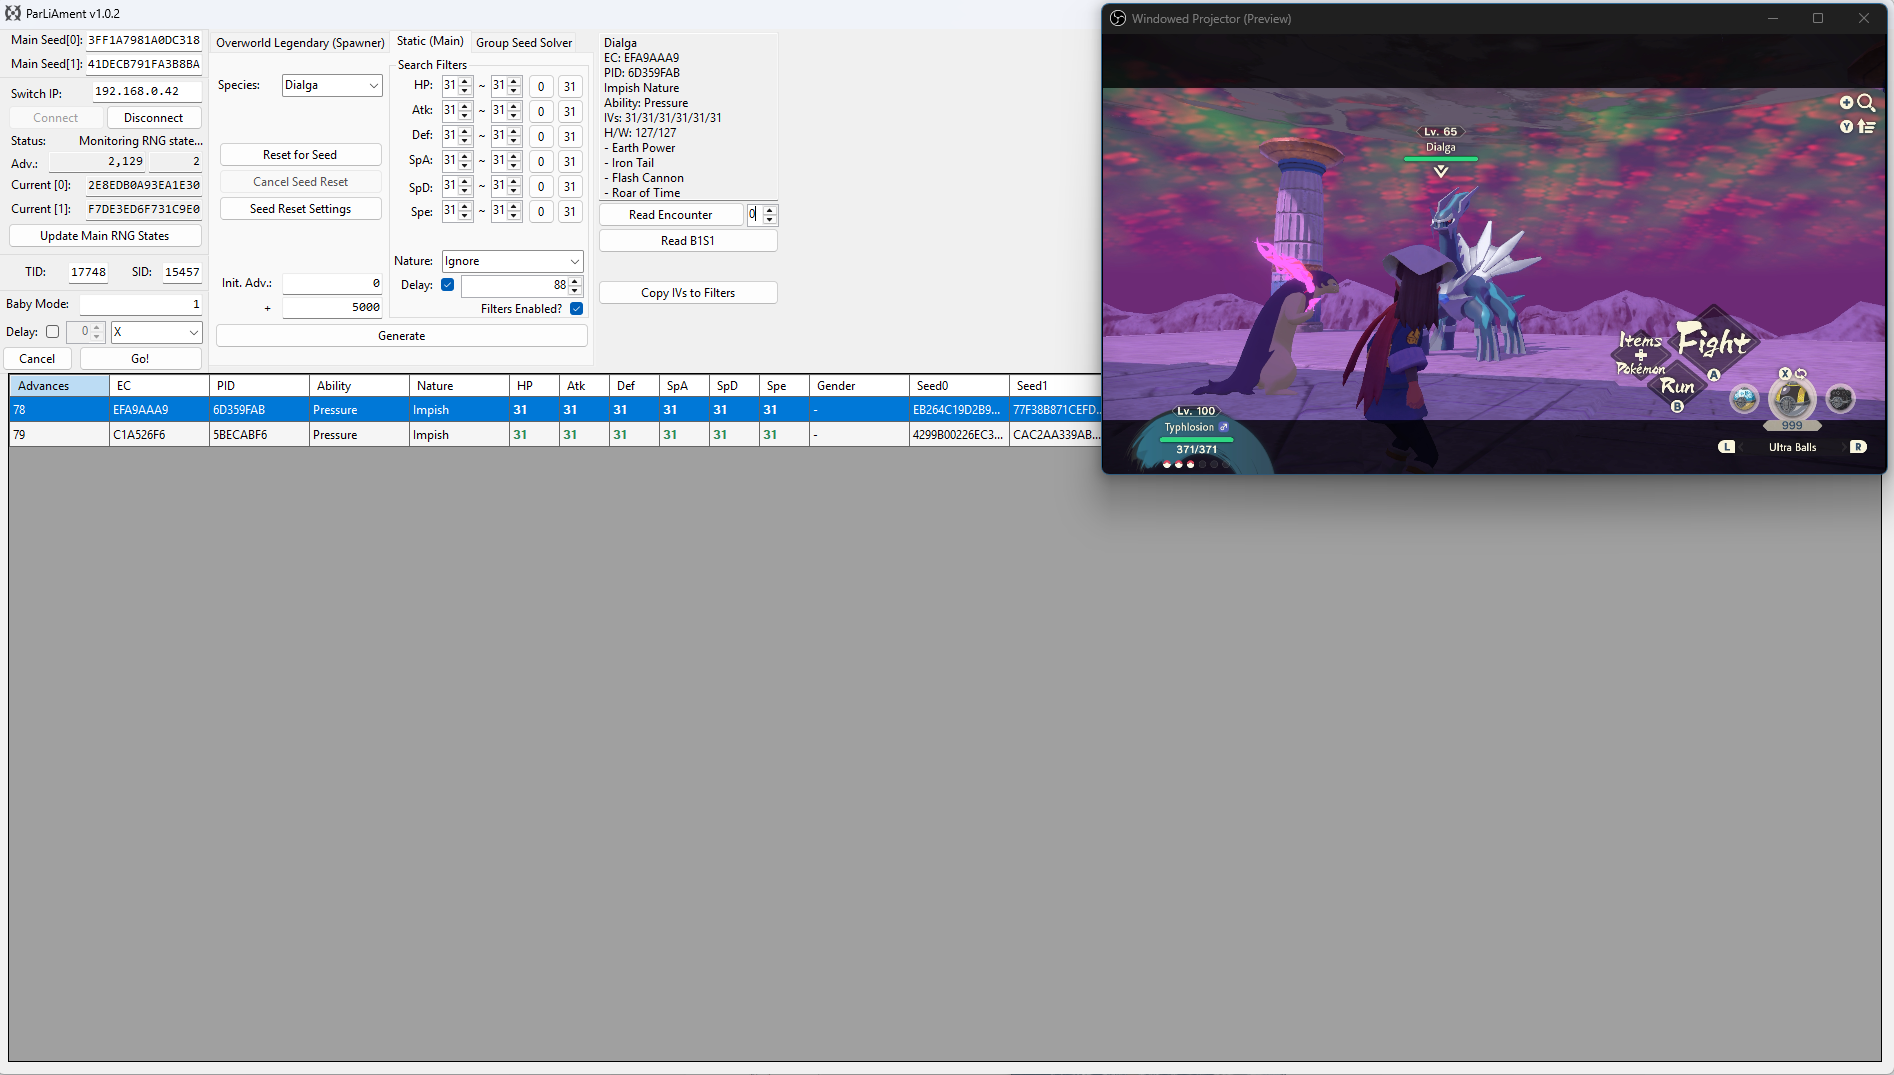
Figure 4 - Character Repositioning
We have now navigated back to Dialga/Palkia and after updating the current seed using the Update Main RNG States button and searching for the target again, we can now see our new target frame is on advance 78-79. Delay is already being considered by the search result table, so we will aim to dismiss the text box and skip the cutscene on advance 78.
Simply wait on the cutscene text box until you reach your target frame. If you want to advance the RNG state gradually you can press the Home (⌂) button on your controller to pause the RNG state, then press it again to resume the game when you are ready. Do this until you have reached your target frame.
Once you reach your target frame, quickly dismiss the text box and skip the cutscene button to generate Dialga or Palkia. Press the A button after skipping the cutscene, then click the Read Encounter button to confirm that you are in battle with the correct Pokémon before capturing.
Figure 5 - Result Found
After dismissing the text box on our target advance and reading the details of the encounter, we can see that the details of the Dialga match our desired conditions!
Figure 1 - Delay Calibration
The term delay refers to the time between the final button input and when the Pokémon is generated. Because the number of advances during this period can vary, it's important to do a few practice attempts to find a delay that is consistent for you.
The above image illustrates the process of delay calibration for Regigigas. This method will not work if you are targeting any other Pokémon in the list.
Step-by-step
- Save outside Regigigas then walk towards it to begin the cutscene, then press the
Home (⌂)button once you reach this screen. - Connect to ParLiAment if you have not already done so, or click
Update Main RNG Statesif you were already connected. - Updating the states is important because this will reset your advances to 0, simplifying the delay calibration process.
- Hover over the Legends: Arceus game icon in the home menu, then mash the
Abutton to dismiss the text box and generate Regigigas. - Once the battle has started, click the
Read Encounterbutton on ParLiAment and then clickCopy IVs to Filters. - Enter a search range of ~100, then click the
Generatebutton. It should produce one or more results that match the Regigigas you are in battle with. - If you see multiple results, simply match the PID/EC with the Regigigas in the
Read Encounterbox. - Take note of the advance the Regigigas was generated on, this will be your delay for this attempt. It is recommended to repeat this process a few times to determine a rough average delay (5-10 attempts is ideal).
| Regigigas Delay Table | |
|---|---|
| Attempt | Delay |
| Attempt 1 | 8 |
| Attempt 2 | 6 |
| Attempt 3 | 13 |
| Attempt 4 | 8 |
| Attempt 5 | 11 |
| Attempt 6 | 8 |
| Attempt 7 | 13 |
| Attempt 8 | 7 |
| Attempt 9 | 8 |
| Attempt 10 | 10 |
Figure 2 - Seed Resetting / Target Found
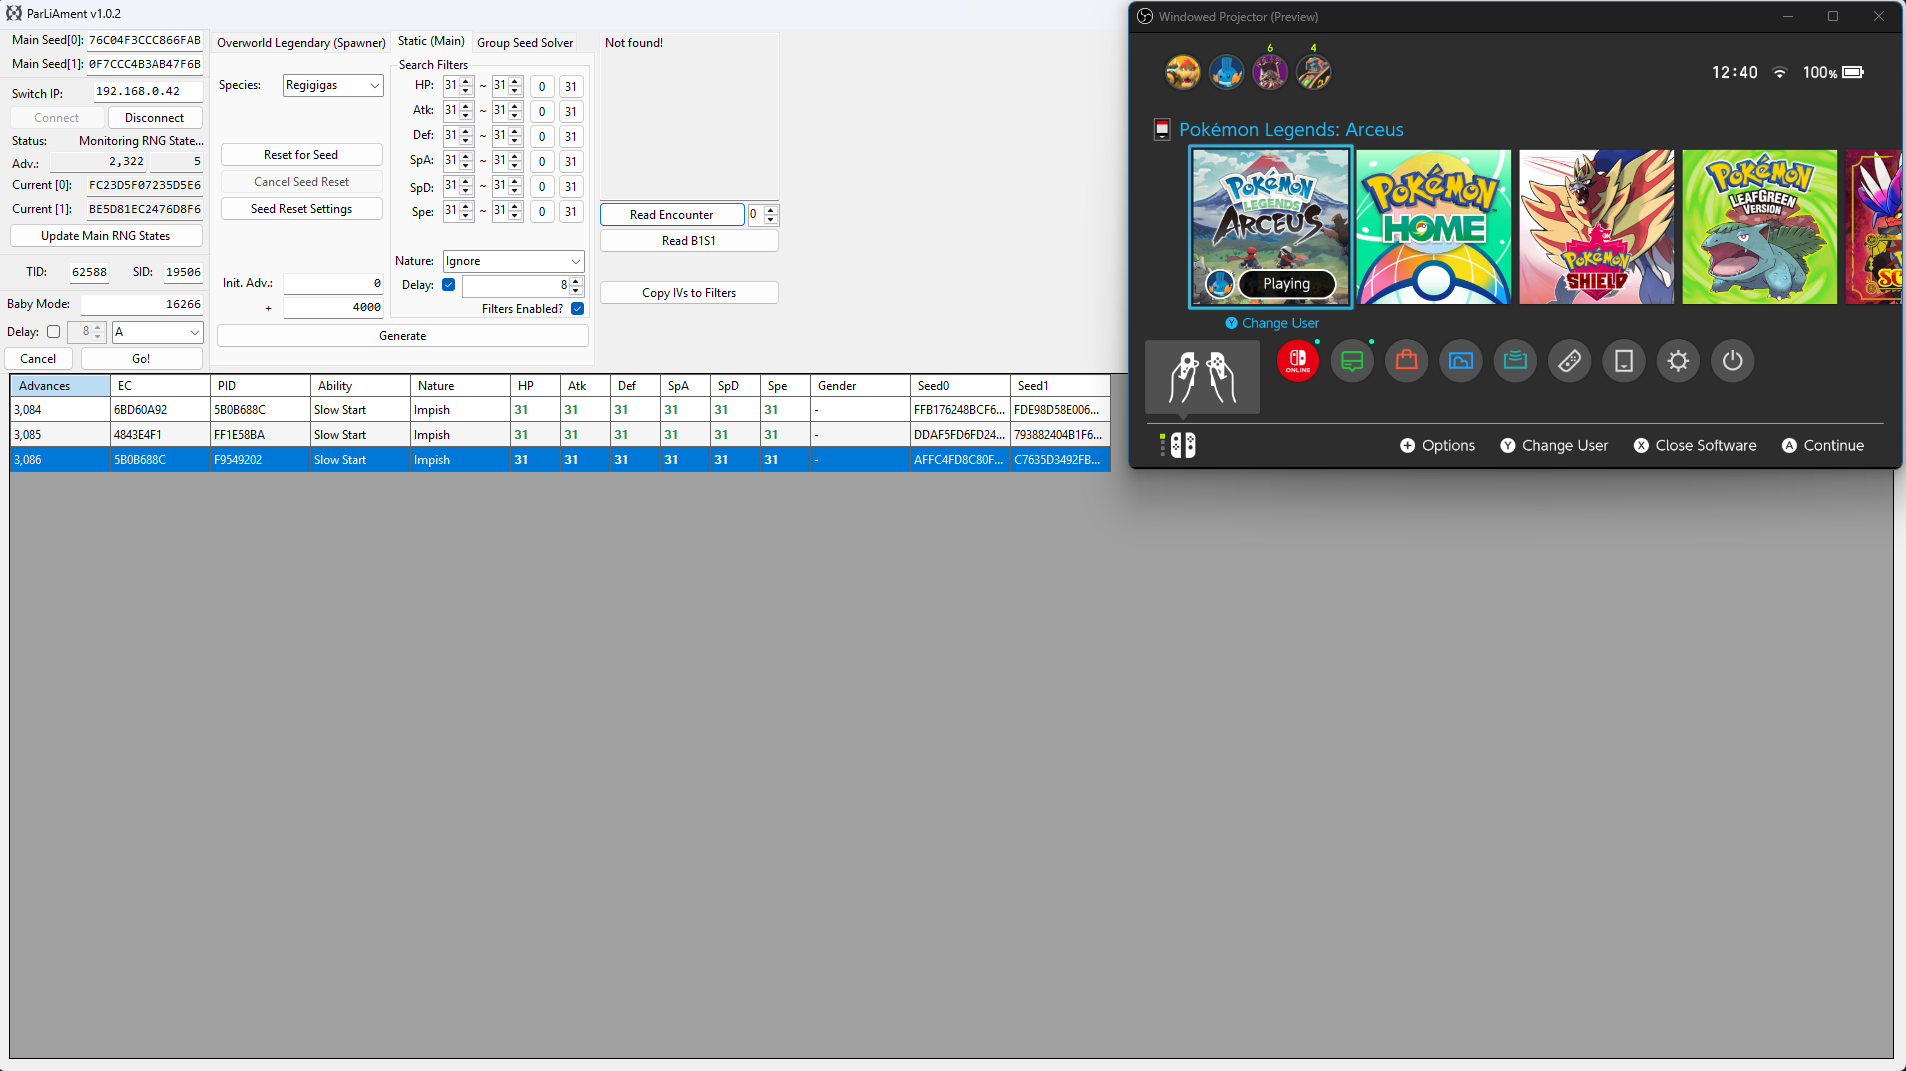
After calibrating your delay, enter your desired search filters into ParLiAment. In this case we will be searching for a 6 IV Regigigas so all six of the IV filters have been set to 31. We have also set our search range to 50,000 as we are searching for quite a rare target.
Once you have set your search filters, check the Delay checkbox and enter the most common value from your delay calibration attempts, in our case we most commonly hit a delay of 8, so we will enter 8 into the Delay field. You can now move onto resetting for a desirable target seed.
In the example above, we can see a 6 IV Regigigas appearing at 3,084-3,086 advances in cluster of 3. A cluster is a group of advances that all produce the same outcome. In this case, there are 3 advances that result in a 6IV Regigigas. Larger clusters increase the likelihood of hitting the correct target frame.
Figure 3 - Advancing The RNG State
The RNG state advances naturally, and the speed of the advances will depend on what you are doing in-game. If you wish to increase the speed of advances you can perform the following actions:
- Stand next to a body of water, this will advance the RNG state by roughly 2,500-3,000 per minute and can be done while idle.
- Fly around on Braviary spawning wild Pokémon, this will advance the RNG state by roughly 5,500-6,000 per minute, but requires some manual effort.
- Stand in areas densely populated with wild Pokémon, this will advance the RNG state by roughly 3,000-3,500 per minute, but be cautious of attacks.
- Combine any of the above methods to further increase the number of advances per minute.
Leave yourself plenty of time to navigate back to Regigigas after advancing the RNG state to avoid overshooting your target. If you overshoot your target frame by accident you will need to restart the process of finding a desirable seed and advance the RNG state again.
Figure 4 - Character Repositioning
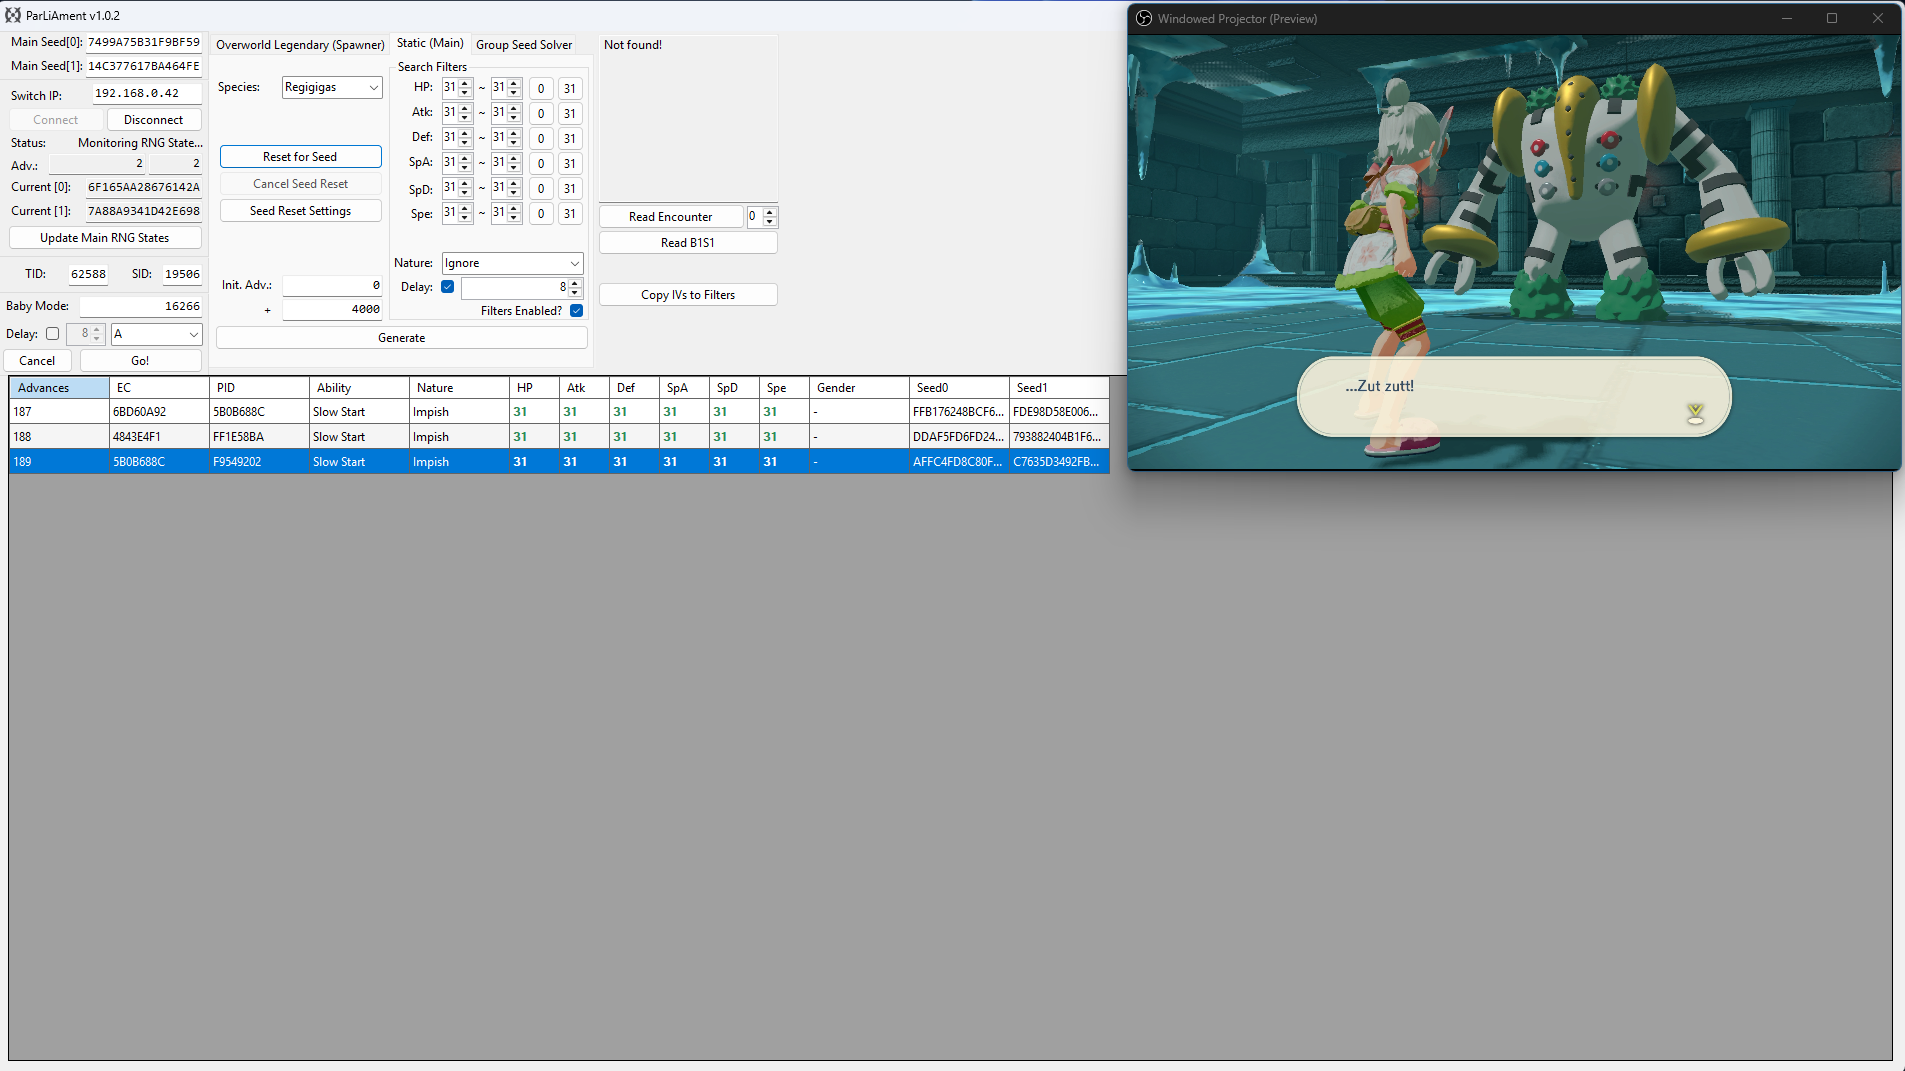
We have now navigated back to Regigigas and after updating the current seed using the Update Main RNG States button and searching for the target again, we can now see our new target frame is on advance 187-189. Delay is already being considered by the search result table, so we will aim to dismiss the final text box on around advance 187.
Simply wait on the cutscene text box until you reach your target frame. If you want to advance the RNG state gradually you can press the Home (⌂) button on your controller to pause the RNG state, then press it again to resume the game when you are ready. Do this until you have reached your target frame.
Once you reach your target frame, quickly mash the A button to initiate the encounter and generate Regigigas. Click the Read Encounter button to confirm that you are in battle with the correct Pokémon before capturing.
Baby Mode
You can optionally use baby mode to attempt to automate the process of hitting your target frame, this can be done as follows:
- Ensure that you are on the screen of the final button input, then press the
Home (⌂)button and update your current seed. - Uncheck the
Delaycheckbox in the search filters section, then search for your target again. - Confirm the target frame, then enter that value into the
Baby Mode:field on the left-hand side of the ParLiAment window. - Click the
Delaycheckbox found Baby Mode section and enter your delay here instead, then set the button input toAin the dropdown menu. - Re-enter the game, disconnect all controllers (or dock the Joy Cons), then click the
Go!button. ParLiAment will then automatically press theAbutton once it reaches the target frame.
Figure 5 - Result Found
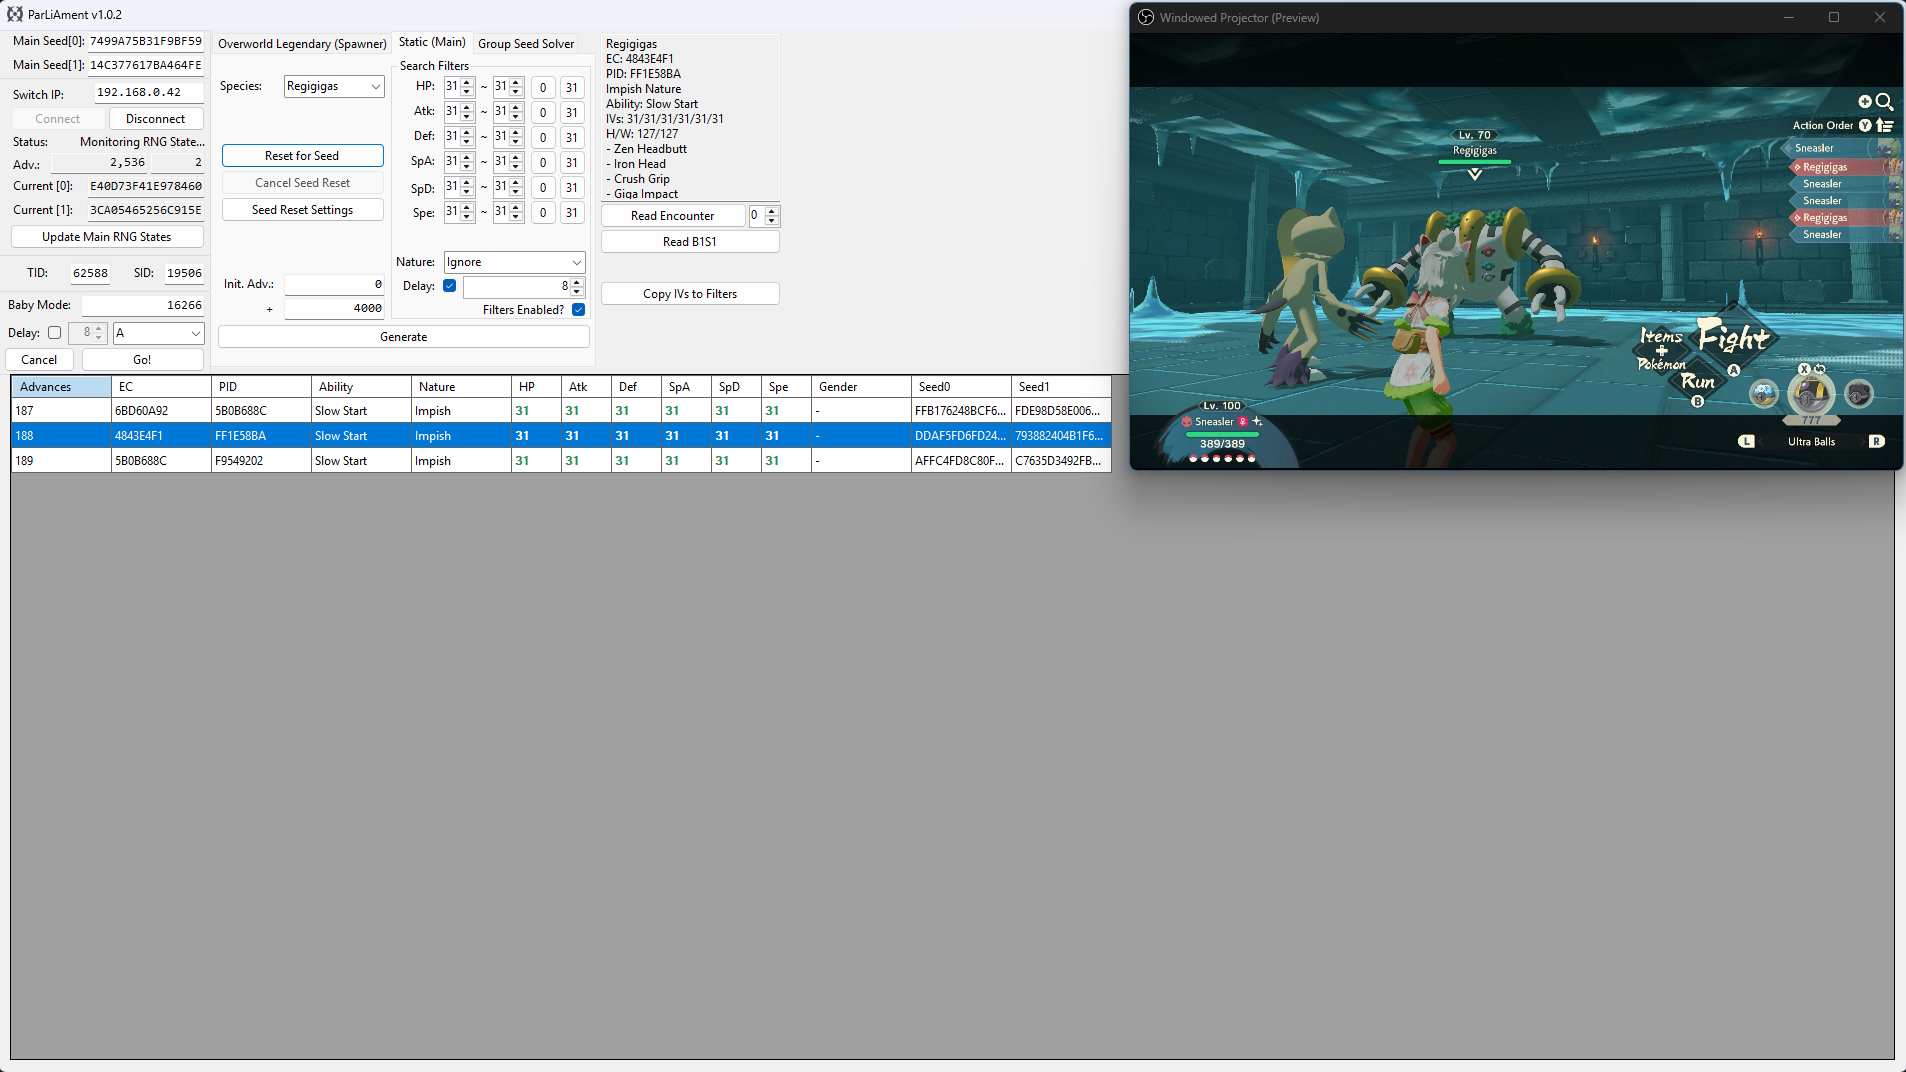
After dismissing the text box on our target advance and reading the details of the encounter, we can see that the details of the Regigigas match our desired conditions!
Figure 1 - Delay Calibration
The term delay refers to the time between the final button input and when the Pokémon is generated. Because the number of advances during this period can vary, it's important to do a few practice attempts to find a delay that is consistent for you. The image above illustrates the process of delay calibration for Giratina.
Pressing the Y button causes the player to enter the loading zone that triggers the cutscene. for the purposes of this example this approach will be referred to as “tumbling”. The tumble method does not require extremely precise positioning, which provides greater consistency between attempts compared to simply walking into the cutscene trigger.
Step-by-step
- Save your game while standing close to Giratina, avoid walking too close as you will trigger the cutscene. Press the
Home (⌂)button once you reach this screen. - Connect to ParLiAment if you have not already done so, or click
Update Main RNG Statesif you were already connected. - Updating the states is important because this will reset your advances to 0, simplifying the delay calibration process.
- Press the
Home (⌂)button to resume the game, then quickly press theYbutton to cause your character to tumble into the cutscene trigger for the encounter. - Once the battle has started, click the
Read Encounterbutton on ParLiAment and then clickCopy IVs to Filters. - Enter a search range of ~200, then click the
Generatebutton. It should produce one or more results that match the Giratina you are in battle with. - If you see multiple results, simply match the PID/EC with the Giratina in the
Read Encounterbox. - Take note of the advance the Giratina was generated on, this will be your delay for this attempt. It is recommended to repeat this process a few times to determine a rough average delay (5-10 attempts is ideal).
| Giratina Delay Table | |
|---|---|
| Attempt | Delay |
| Attempt 1 | 56 |
| Attempt 2 | 55 |
| Attempt 3 | 57 |
| Attempt 4 | 56 |
| Attempt 5 | 48 |
| Attempt 6 | 52 |
| Attempt 7 | 46 |
| Attempt 8 | 48 |
| Attempt 9 | 62 |
| Attempt 10 | 49 |
Figure 2 - Seed Resetting / Target Found

After calibrating your delay, enter your desired search filters into ParLiAment. In this case we will be searching for a 6 IV Giratina so all six of the IV filters have been set to 31. We have also set our search range to 50,000 as we are searching for quite a rare target.
Once you have set your search filters, check the Delay checkbox and enter the most common value from your delay calibration attempts, in our case we most commonly hit a delay of 56, so we will enter 56 into the Delay field. You can now move onto resetting for a desirable target seed.
In the example above, we can see a 6 IV Giratina appearing at 4,193-4,195 advances in cluster of 3. A cluster is a group of advances that all produce the same outcome. In this case, there are 3 advances that result in a 6IV Giratina. Larger clusters increase the likelihood of hitting the correct target frame.
Figure 3 - Advancing The RNG State
The RNG state advances naturally, and the speed of the advances will depend on what you are doing in-game. If you wish to increase the speed of advances you can perform the following actions:
- Stand next to a body of water, this will advance the RNG state by roughly 2,500-3,000 per minute and can be done while idle.
- Fly around on Braviary spawning wild Pokémon, this will advance the RNG state by roughly 5,500-6,000 per minute, but requires some manual effort.
- Stand in areas densely populated with wild Pokémon, this will advance the RNG state by roughly 3,000-3,500 per minute, but be cautious of attacks.
- Combine any of the above methods to further increase the number of advances per minute.
Leave yourself plenty of time to navigate back to Giratina after advancing the RNG state to avoid overshooting your target. If you overshoot your target frame by accident you will need to restart the process of finding a desirable seed and advance the RNG state again.
Figure 4 - Character Repositioning
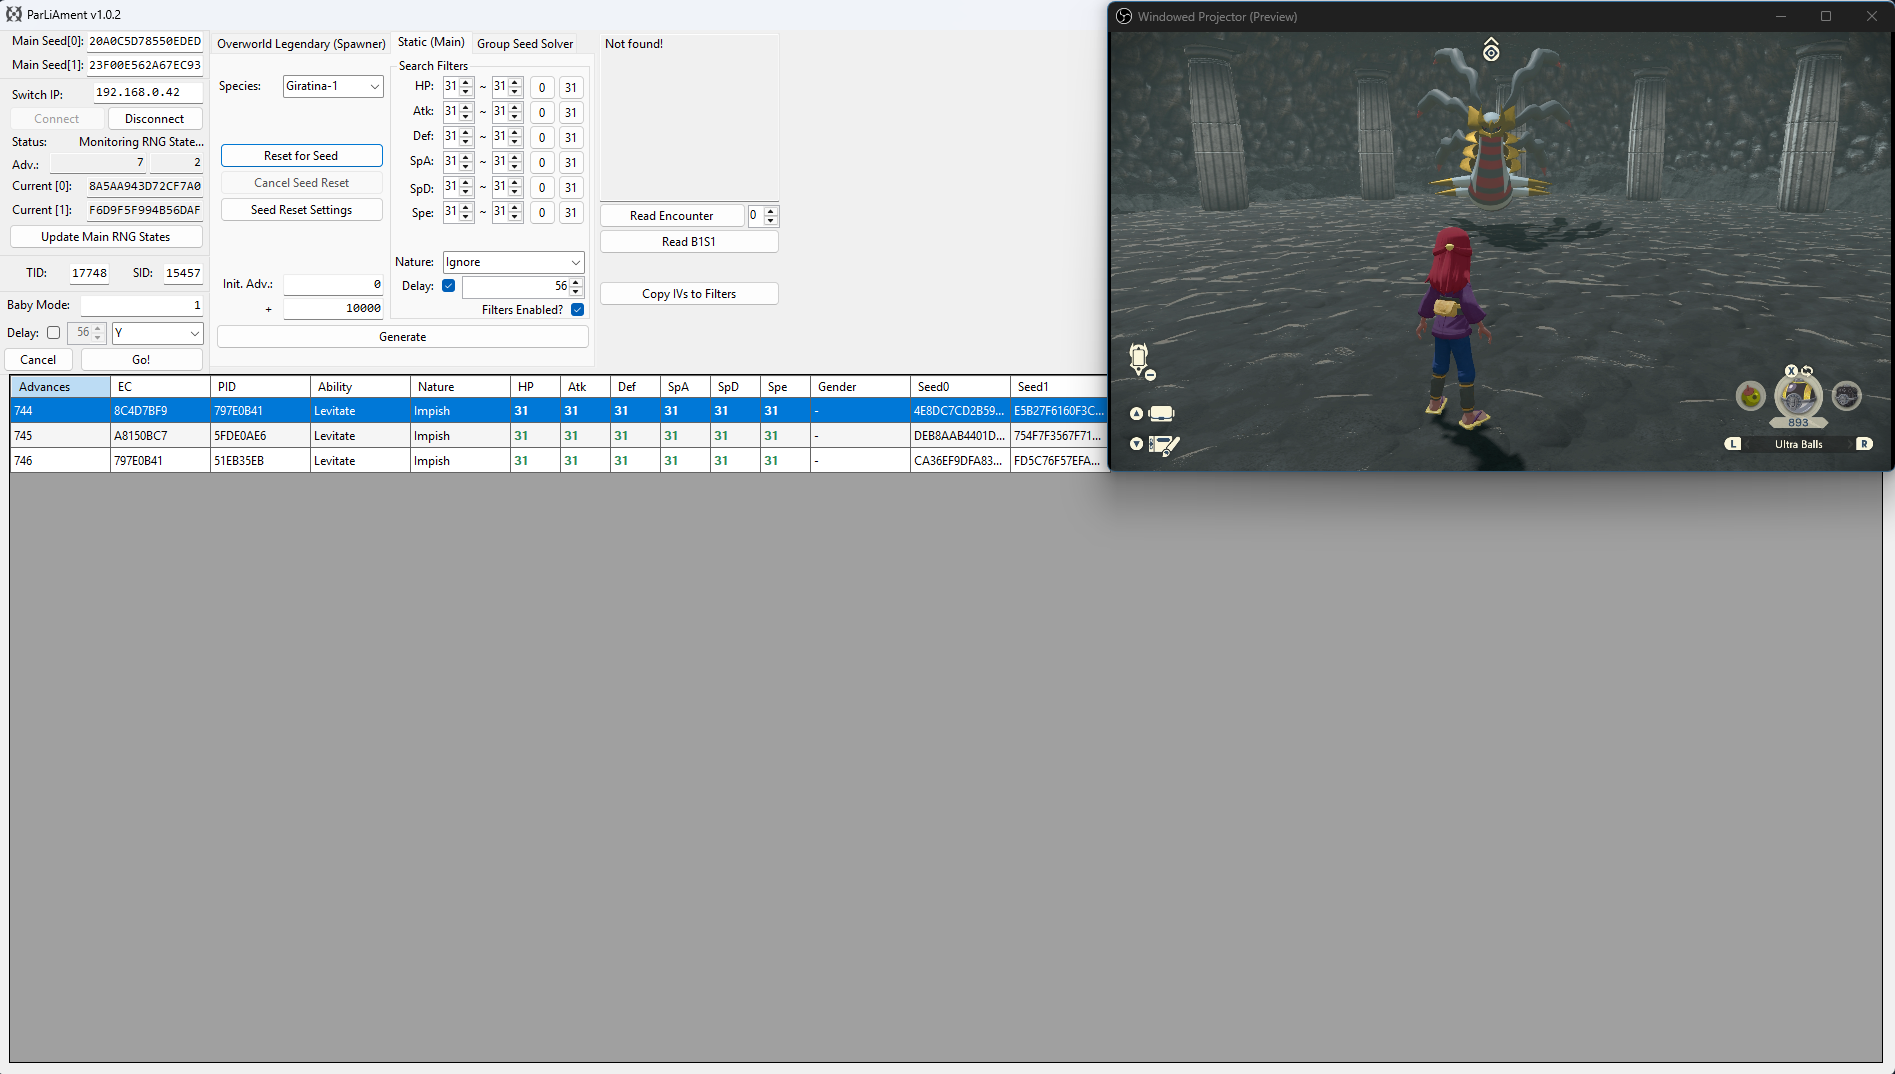
We have now navigated back to Giratina and after updating the current seed using the Update Main RNG States button and searching for the target again, we can now see our new target frame is on advance 744-746. Delay is already being considered by the search result table, so we will aim to tumble into the cutscene trigger on around advance 744.
Simply wait on the cutscene text box until you reach your target frame. If you want to advance the RNG state gradually you can press the Home (⌂) button on your controller to pause the RNG state, then press it again to resume the game when you are ready. Do this until you have reached your target frame.
Once you reach your target frame, quickly tumble using the Y button to initiate the encounter and generate Giratina. Click the Read Encounter button to confirm that you are in battle with the correct Pokémon before capturing.
Baby Mode
You can optionally use baby mode to attempt to automate the process of hitting your target frame, this can be done as follows:
- Ensure that you are on the screen of the final button input, then press the
Home (⌂)button and update your current seed. - Uncheck the
Delaycheckbox in the search filters section, then search for your target again. - Confirm the target frame, then enter that value into the
Baby Mode:field on the left-hand side of the ParLiAment window. - Click the
Delaycheckbox found Baby Mode section and enter your delay here instead, then set the button input toYin the dropdown menu. - Re-enter the game, disconnect all controllers (or dock the Joy Cons), then click the
Go!button. ParLiAment will then automatically press theYbutton once it reaches the target frame.
Figure 5 - Result Found
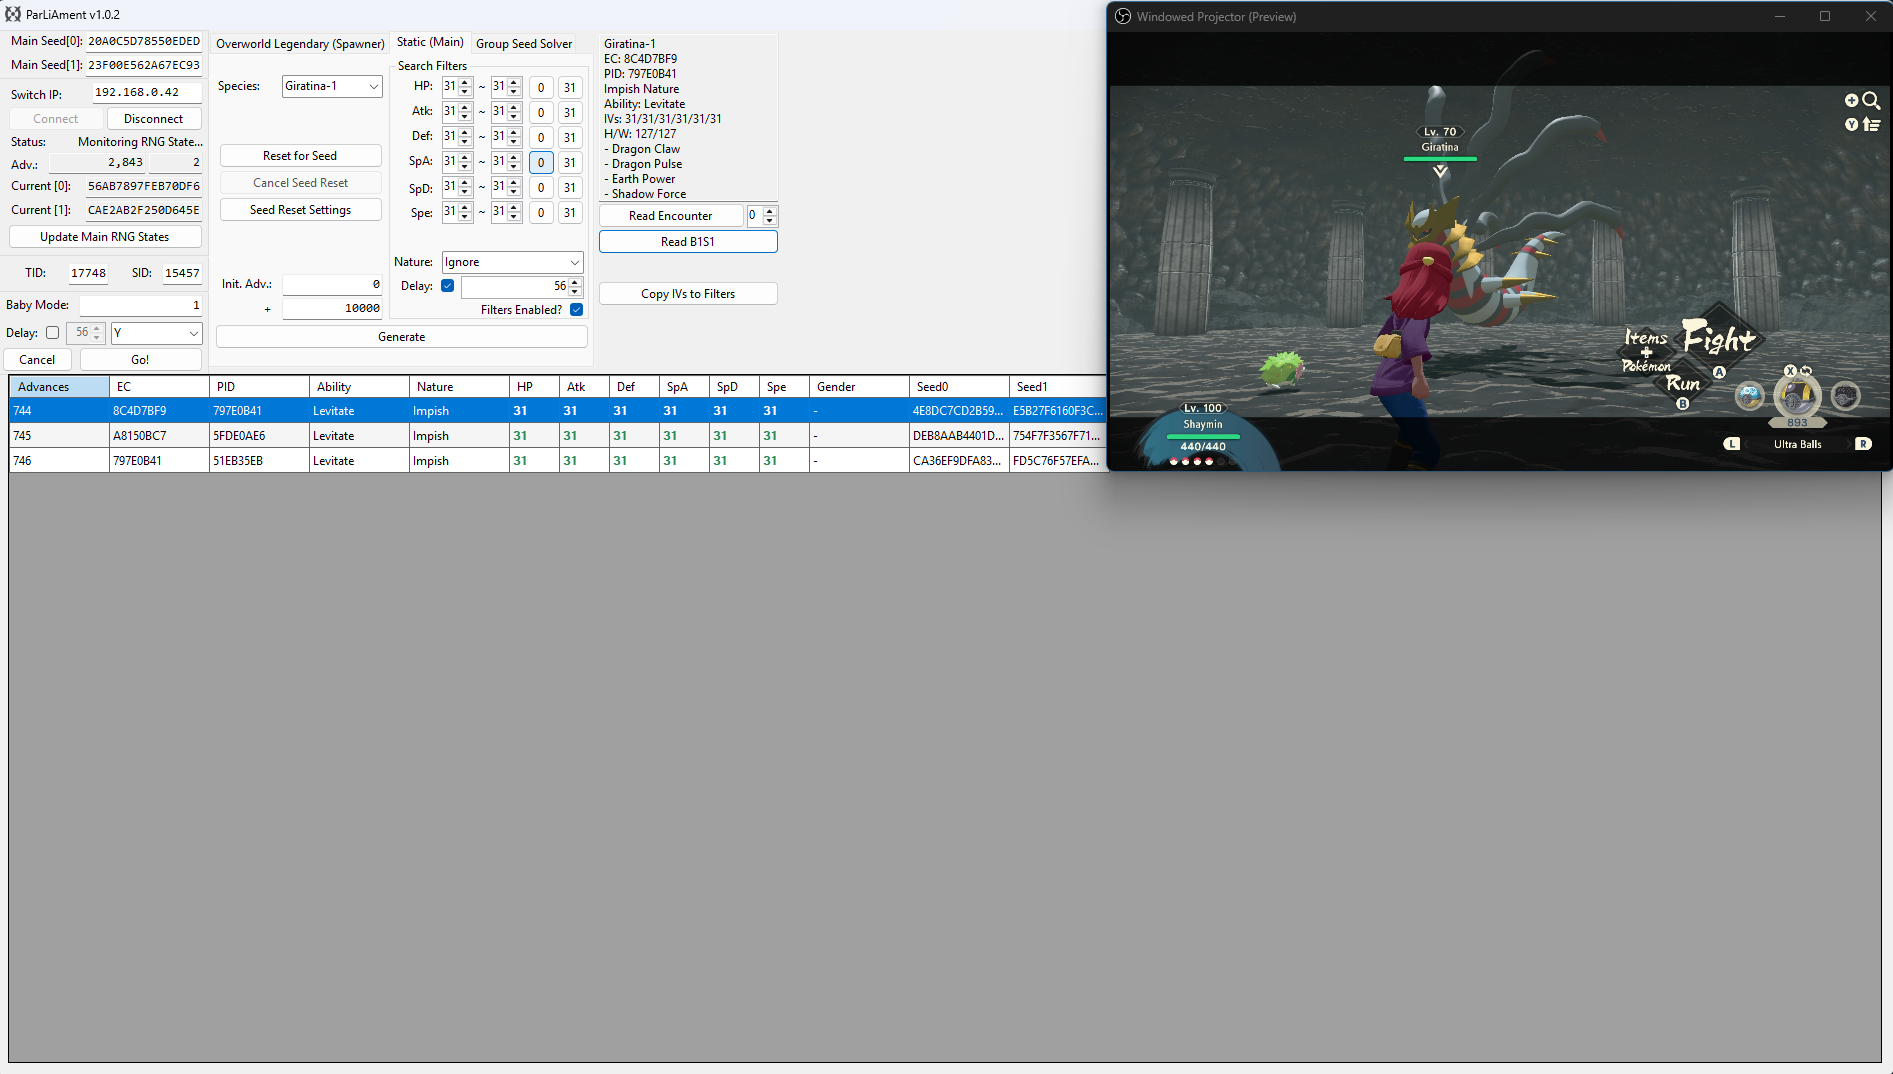
After dismissing the text box on our target advance and reading the details of the encounter, we can see that the details of the Giratina match our desired conditions!