Spawner RNG (CFW)
This page provides instructions and examples of how you can perform Spawner RNG manipulation for Legendary & Mythical Pokémon in Legends: Arceus. From here it is assumed that you have followed all of the instructions found on the main page and have confirmed that Pokémon falls into the Spawner RNG category.
Moarencounterbots is the main tool we will be using throughout this guide. It can be used to automate the process of finding a desirable spawner seed for your target Pokémon which cuts out a significant amount of manual effort. After we have found a desirable seed we will then be using ParLiAment to keep track of our current state.
Unsure if your Pokémon is in the Spawner category? Head back to the main page!Figure 1 - Initial Game Setup
Before doing anything else, make sure your game is properly set up and that you have the required resources to ensure the RNG process is as smooth as possible. It is assumed that you have progressed the story enough to spawn your target Pokémon. If you have not yet done so you should go back and do this now.
In-game Resources
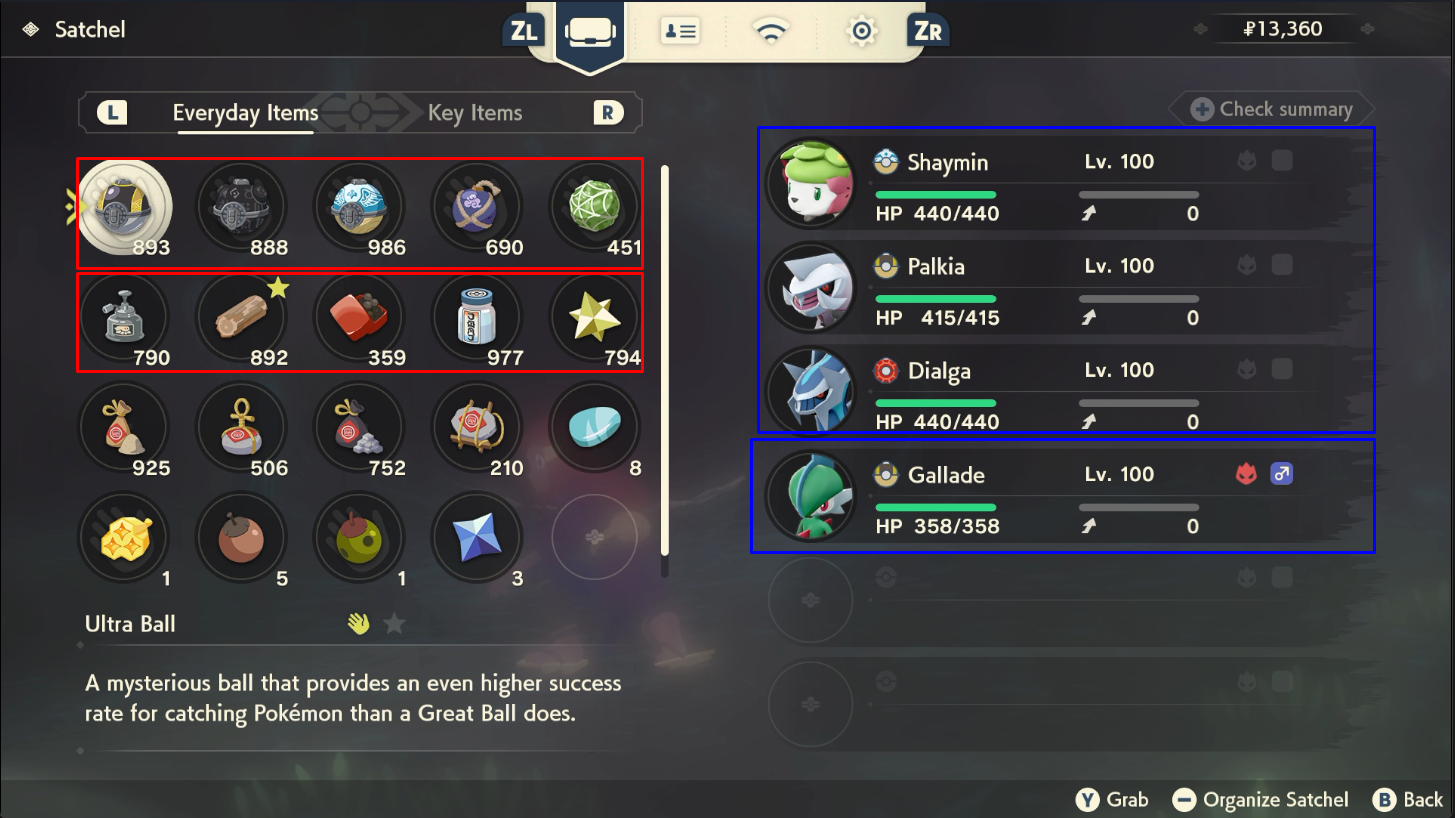
- Plenty of throwable items to remove the shield and stun the target Pokémon (e.g., Sticky Glob, Ball of Mud, etc.)
- Plenty of healing items to keep your Pokémon in good health (e.g., Full Restore, Revives, etc.)
- Plenty of Poké Balls to capture your target Pokémon (e.g., Gigaton Ball, Jet Ball, Ultra Ball, etc.)
- Plenty of stealth items, particularly helpful for weather genies and Darkrai (e.g., Stealth Spray, Smoke Ball, etc.)
Party Setup
- A strong Pokémon with a Super Effective move, ideally capable of knocking out your target Pokémon in 1-2 attacks.
- A fast Pokémon capable of inflicting status conditions (Paralysis or Sleep) onto your target Pokémon.
- At least one spare space on your party for your target Pokémon to go into.
Game Settings / Misc
- In the
Communicationstab of the pause menu, setInternet ConnectiontoOffandAutomatically Connect?toNo. - In the
Helptab of the pause menu, open theSettingsand navigate toAutosave, ensure that it is set toDisabled. - (Optional) Most of these encounters have an initial in-game cutscene the first time you interact with them, you can choose to clear this cutscene if you wish to do so.
Figure 2 - Moarencounterbots Configuration
As mentioned above, Moarencounterbots (SysBot.NET) is used to automate the process of finding a desirable seed that matches your search conditions, but you will need to manually configure the program settings to match your target Pokémon first.
Bot Settings
- Open SysBot.NET and click the
Hubtab, then open theEncounterLAdropdown menu to reveal the settings. - Set the
OWLegendaryto match your desired target, this will determine the routine the bot uses. - Set the
SearchDepthto an amount you are comfortable with, this is the amount of advances you wish to search through. - For Uxie, Mesprit, Azelf, Heatran & Cresselia, advancing the seed once takes around 30-60 seconds as they immediately respawn.
- For Phione, Manaphy, Shaymin, Darkrai, Tornadus, Thundurus, Landorus & Enamorus, advancing the seed once can take up to 5 minutes.
- It may take a long time to reach your target frame. It is recommended to have a
SearchDepthof 10-100 depending on the rarity of your target. - For Phione specifically, set
CheckAllPhioneLayerstoTrueif you have NOT caught any Phione, otherwise set this value toFalse(More Information).
Stop Conditions
After completing all of the initial bot configurations you will need to set your StopConditions. This essentially decides when the bot will stop searching for a target (result has been found). To set your Stop Conditions do the following:
- Open the
StopConditionsdropdown menu in theHubtab. - Set the
TargetNatureif you want to filter seeds for specific natures. - Set the
TargetMinIVs&TargetMaxIVsif you want to filter seeds for specific IV ranges. - IVs go in the order of HP/ATK/DEF/SPATK/SPDEF/SPEED and values of 0-31 can be set, enter x if you do not care about a specific IV value.
- IV and Nature filters can be combined. For example, we can search for a Timid target with IVs of 31/0/31/31/31/31.
- Set the same values in both
TargetMinIVsandTargetMaxIVsif you want to search for an exact IV value. - All Legendary and Mythical encounters are Shiny and Height locked, keep these settings disabled or you will never find a result.
- After setting your Stop Conditions, close and re-open the program to lock in your settings, this is a requirement.
Worked Example
The instructions will vary slightly depending on your target Pokémon and how that Pokémon is generated. Each of the available encounters can be split into three sub-categories: Cave, Overworld, and Unique Encounters.
Each of these sub-categories has its own section on this page with worked examples and instructions for hitting a target frame. Make sure to follow the instructions for your specific encounter type!
Figure 1 - In-game Setup (Cave)

The Legendary Pokémon found in caves are generated when the player enters the cave. This means that the required setup is for the player to be standing directly outside the cave that contains your target Pokémon.
Step-by-step
- Start in Jubilife, then speak to the guard to enter the map that corresponds to your target Pokémon. In this case we are targeting Heatran so we will select Cobalt Coastlands.
- Head to the cave that contains your target Pokémon, then stand directly outside of the cave entrance facing the cave. DO NOT ENTER THE CAVE YET.
- In the event that you have entered the cave by accident or did not enter from Jubilife, repeat the process again from Step 1.
- Save the game, then disconnect any controllers. This is the desired state for Moarencounterbots to operate properly (controllers must be disconnected to use the bot routines).
Figure 2 - Extra Bot Setup (Cave)

Once your settings are configured and your in-game setup is correct, you're ready to start the bot and begin searching for target seeds.
Step-by-Step
- Make sure your in-game setup and
Hubsettings are correct for your target Pokémon. - Go back to the
Botstab and selectEncBotOWLCheckRNGfrom the dropdown menu on the right. - Enter your console's IP address into the IP field, add the bot, then click
Start All. - If everything is set up correctly, the bot will begin searching for a target. Wait until it finds a result.
Figure 3 - Target Found (Cave)
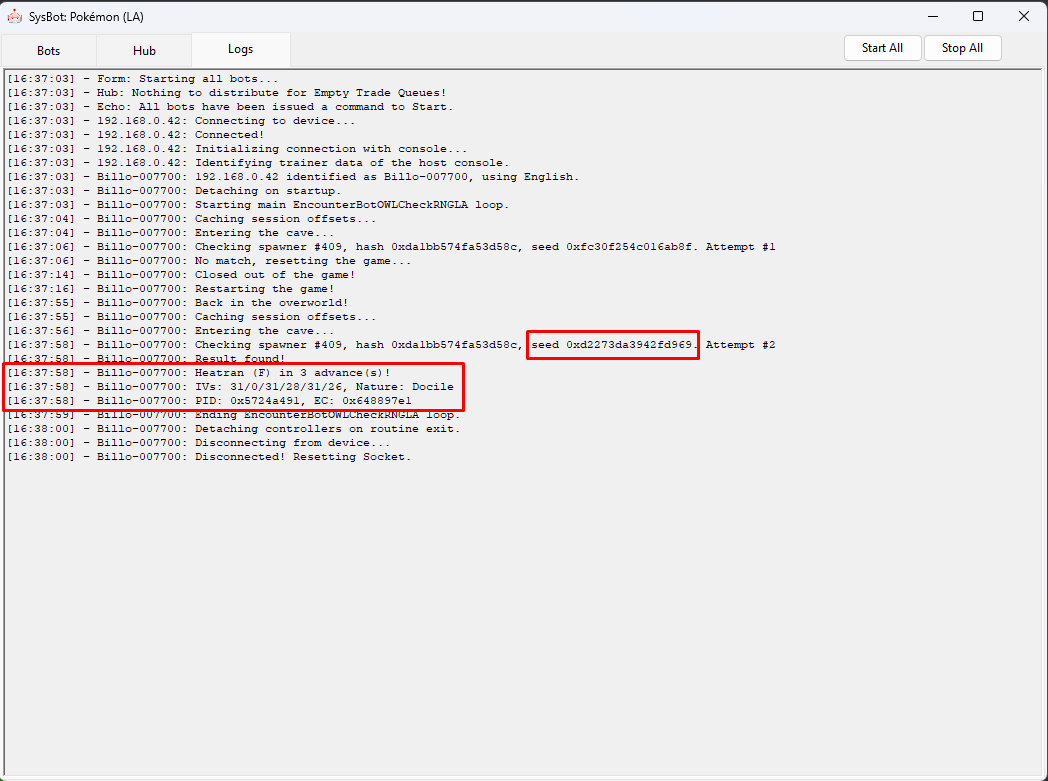
A Heatran that matches our StopConditions has been found, and will appear after advancing the spawner seed 3 times. For Uxie, Mesprit, Azelf & Heatran you can advance the spawner seed by repeating the following actions:
Advancing The Spawner Seed
- Engage your target Pokémon in battle and knock it out.
- You should now see that the Pokémon has immediately respawned.
Figure 4 - Tracking Spawner Seed (Cave)
ParLiAment can be used to track and verify the spawner seeds to ensure they match the desired conditions, we can read the details of the Pokémon we are in battle with, then compare it to the search results table to confirm the advance we are currently on.
Step-by-step
- Connect to the program by typing the IP address of your Switch into the
Switch IP:field, then clicking theConnectbutton. - Select the
Overworld Legendary (Spawner)tab if this is not already open, then select your target Pokémon in the dropdown list. - Paste your seed from moarencounterbots into the
Seedfield underneath the dropdown list. - Set your desired search range, then click
Search. You should now see your upcoming advances in the search results table. - To verify your current advance you can use the
Read Encounterbutton to read the details of the Pokémon you are in battle with. - You will need to advance the spawner seed at least once before you can find the Pokémon you are in battle with in the search results table.
- If you are in a multi-battle, you may need to change the value next to the read encounter button to read the desired Pokémon.
- Keep the value next to the
Read Encounterbutton set to0if you are in a single battle.
Figure 5 - Result Found (Cave)
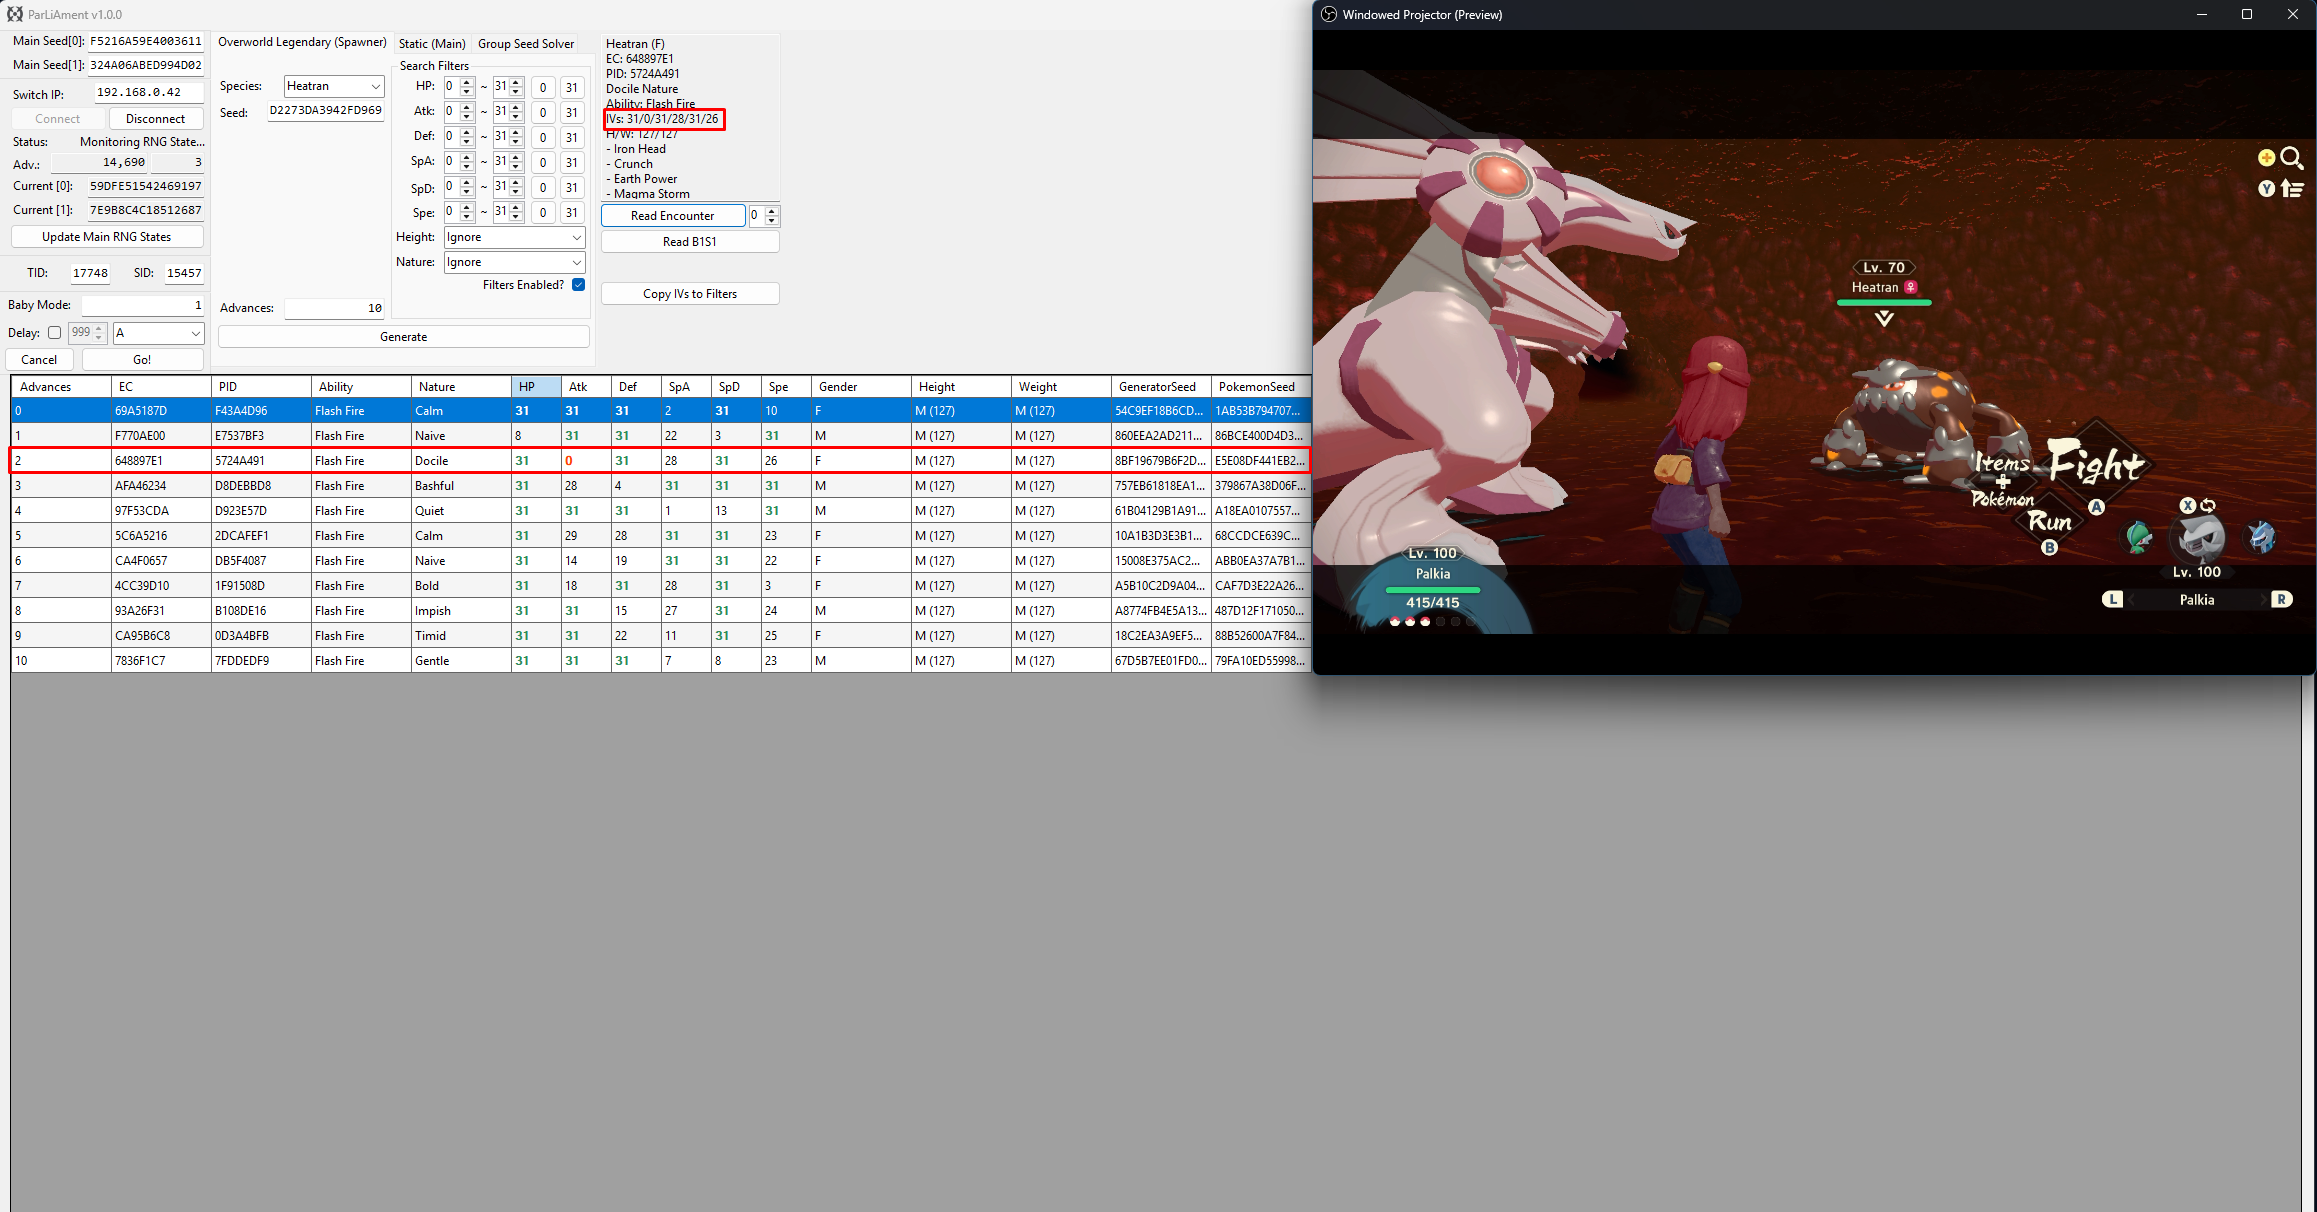
After advancing the spawner seed 3 times and reading the encounter details using ParLiAment, we can see that the details of the Heatran match our desired conditions!
Figure 1 - In-game Setup (Overworld)
The Legendary Pokémon found in caves are generated when the player enters the cave. This means that the required setup is for the player to be standing directly outside the cave that contains your target Pokémon.
Step-by-step
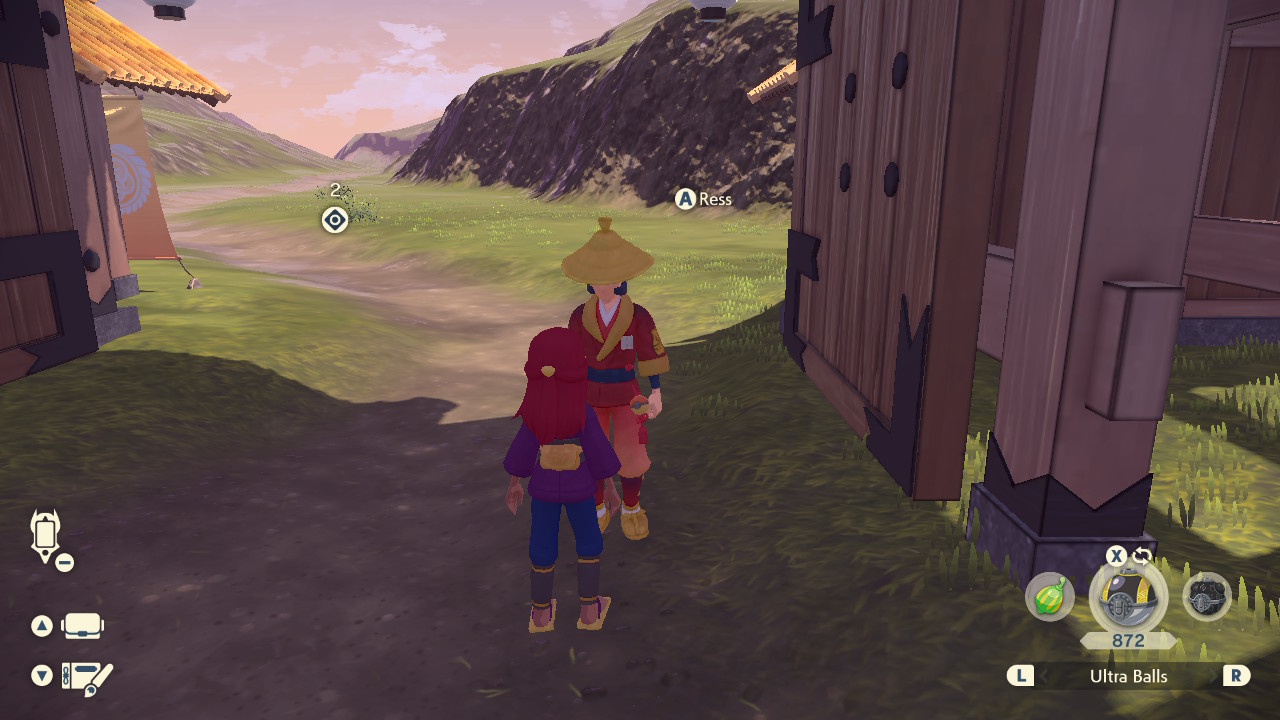
- Stand directly next to Guard Ress in Jubilife, close enough so that the
A Resstext box is visible (see above image). - Save the game, then disconnect any controllers. This is the desired state for Moarencounterbots to operate properly (controllers must be disconnected to use the bot routines).
Figure 2 - Extra Bot Setup (Overworld)

Once your settings are configured and your in-game setup is correct, you're ready to start the bot and begin searching for target seeds.
Step-by-Step
- Make sure your in-game setup and
Hubsettings are correct for your target Pokémon. - Go back to the
Botstab and selectEncBotOWLCheckRNGfrom the dropdown menu on the right. - Enter your console's IP address into the IP field, add the bot, then click
Start All. - If everything is set up correctly, the bot will begin searching for a target. Wait until it finds a result.
Figure 3 - Target Found (Overworld)
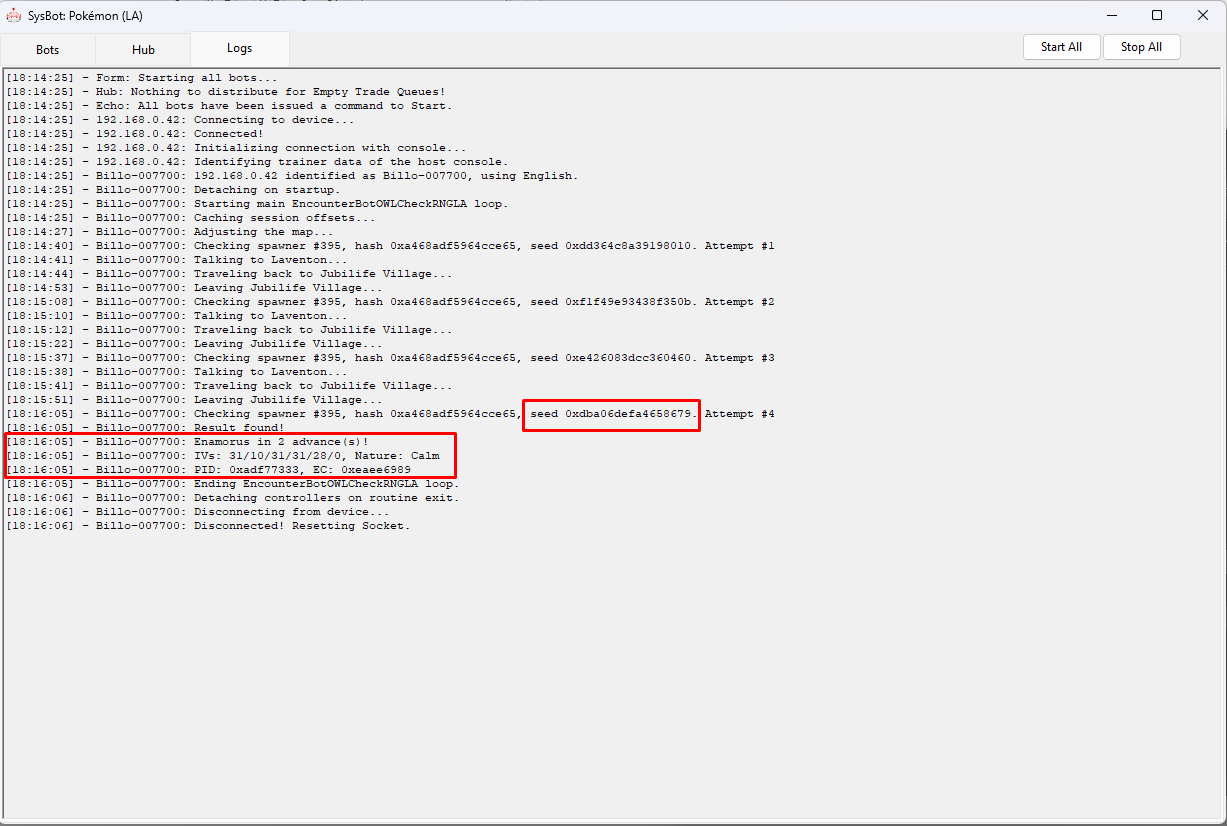
An Enamorus that matches our StopConditions has been found, and will appear after advancing the spawner seed 2 times. For Shaymin, Darkrai, Tornadus, Thundurus, Landorus & Enamorus you can advance the spawner seed by repeating the following actions:
Advancing The Spawner Seed
- Engage your target Pokémon in battle and knock it out.
- Teleport to a campsite, then set the time of day to evening.
- If your target is Tornadus you must sleep repeatedly until the weather is a blizzard or Tornadus will never spawn.
- If your target is Thundurus you must sleep repeatedly until the weather is a thunderstorm or Thundurus will never spawn.
- If your target is Cresselia it will respawn immediately after knocking it out, you do not need to teleport to a campsite.
- Enter the closest subzone (cave) before the time of day turns to night.
- For Obsidian Fields (Shaymin/Landorus), head to the cave at Lake Verity.
- For Crimson Mirelands (Enamorus), head to the cave at Lake Valor.
- For Cobalt Coastlands (Thundurus), head to the cave at Firespit Island.
- For Alabaster Icelands (Tornadus), head to the cave at Lake Acuity.
- For Coronet Highlands (Darkrai), head to either side of Wayward Cave.
- Wait inside the cave until night-time, this should take roughly 3 minutes.
- Verify the time of day by viewing the map, you should see a moon icon in the top-right corner if the time has changed to night.
- You can take this time to set a map marker in the location of your target Pokémon to help with navigation if you wish.
- Leave the cave and head back to the location of your target Pokémon. You should now see that the Pokémon has respawned, each time a Pokémon is knocked out and respawned the spawner seed will advance by +1.
Figure 4 - Tracking Spawner Seed (Overworld)
ParLiAment can be used to track and verify the spawner seeds to ensure they match the desired conditions, we can read the details of the Pokémon we are in battle with, then compare it to the search results table to confirm the advance we are currently on.
Step-by-step
- Connect to the program by typing the IP address of your Switch into the
Switch IP:field, then clicking theConnectbutton. - Select the
Overworld Legendary (Spawner)tab if this is not already open, then select your target Pokémon in the dropdown list. - Paste your seed from moarencounterbots into the
Seedfield underneath the dropdown list. - Set your desired search range, then click
Search. You should now see your upcoming advances in the search results table. - To verify your current advance you can use the
Read Encounterbutton to read the details of the Pokémon you are in battle with. - You will need to advance the spawner seed at least once before you can find the Pokémon you are in battle with in the search results table.
- If you are in a multi-battle, you may need to change the value next to the read encounter button to read the desired Pokémon.
- Keep the value next to the
Read Encounterbutton set to0if you are in a single battle.
Figure 5 - Result Found (Overworld)
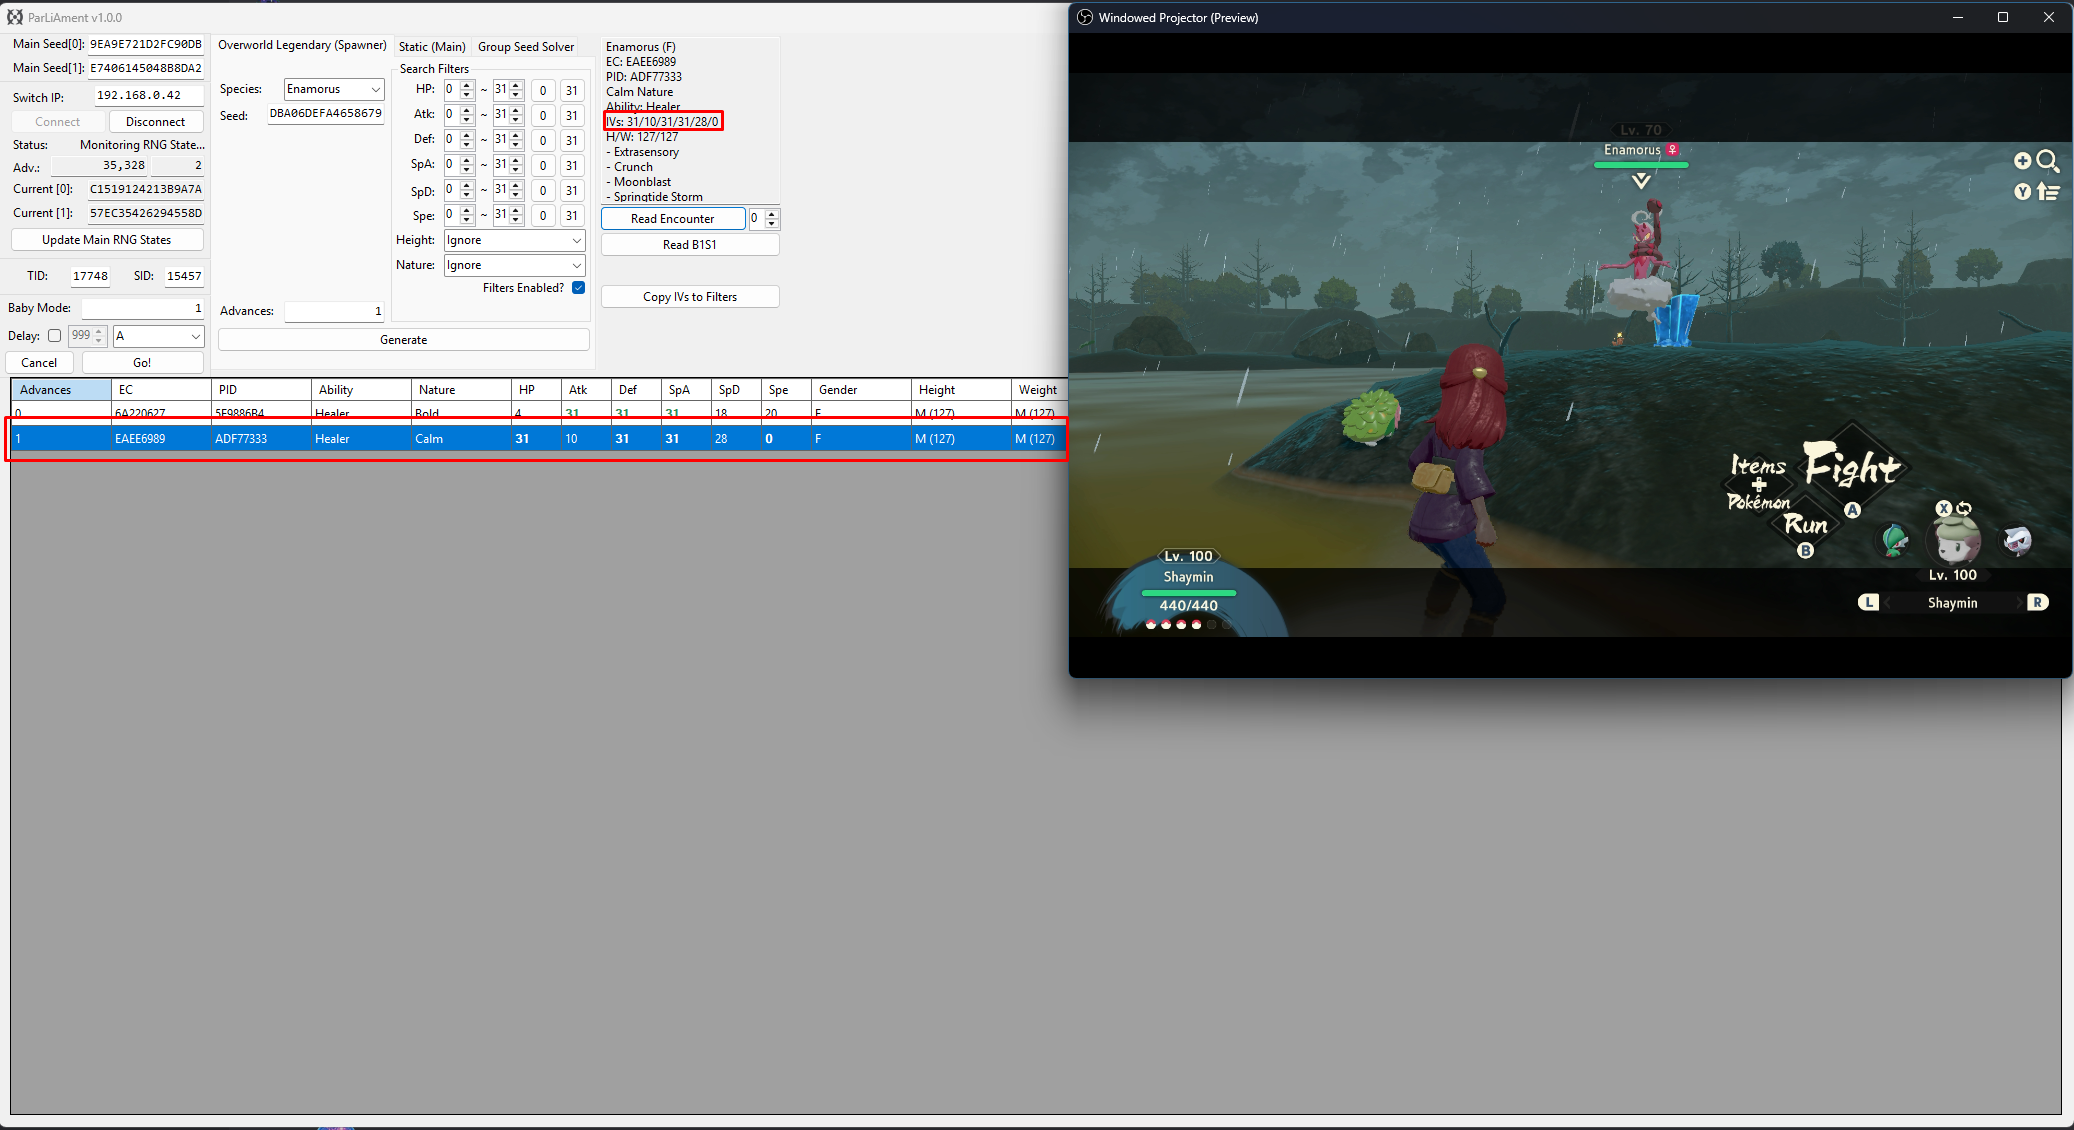
After advancing the spawner seed 2 times and reading the encounter details using ParLiAment, we can see that the details of the Enamorus match our desired conditions!
Figure 1 - In-game Setup (Manaphy/Phione)

The Legendary Pokémon found in caves are generated when the player enters the cave. This means that the required setup is for the player to be standing directly outside the cave that contains your target Pokémon.
Step-by-step
- Start in Jubilife, then speak to the guard to enter the map that corresponds to your target Pokémon. In this case we are targeting Phione so we will select Cobalt Coastlands.
- Head to the cave entrance of Seaside Hallow, then stand directly outside of the cave entrance facing the cave. DO NOT ENTER THE CAVE YET.
- In the event that you have entered the cave by accident or did not enter from Jubilife, repeat the process again from Step 1.
- Save the game, then disconnect any controllers. This is the desired state for Moarencounterbots to operate properly (controllers must be disconnected to use the bot routines).
Figure 2 - Extra Bot Setup (Manaphy/Phione)
Once your settings are configured and your in-game setup is correct, you're ready to start the bot and begin searching for target seeds.
Step-by-Step
- Make sure your in-game setup and
Hubsettings are correct for your target Pokémon. - For Phione specifically, you will need to set
CheckAllPhioneLayerstoTrueif no Phione have been caught on this save file, otherwise set this value to false. - Go back to the
Botstab and selectEncBotOWLCheckRNGfrom the dropdown menu on the right. - Enter your console's IP address into the IP field, add the bot, then click
Start All. - If everything is set up correctly, the bot will begin searching for a target. Wait until it finds a result.
Figure 3 - Target Found (Manaphy/Phione)
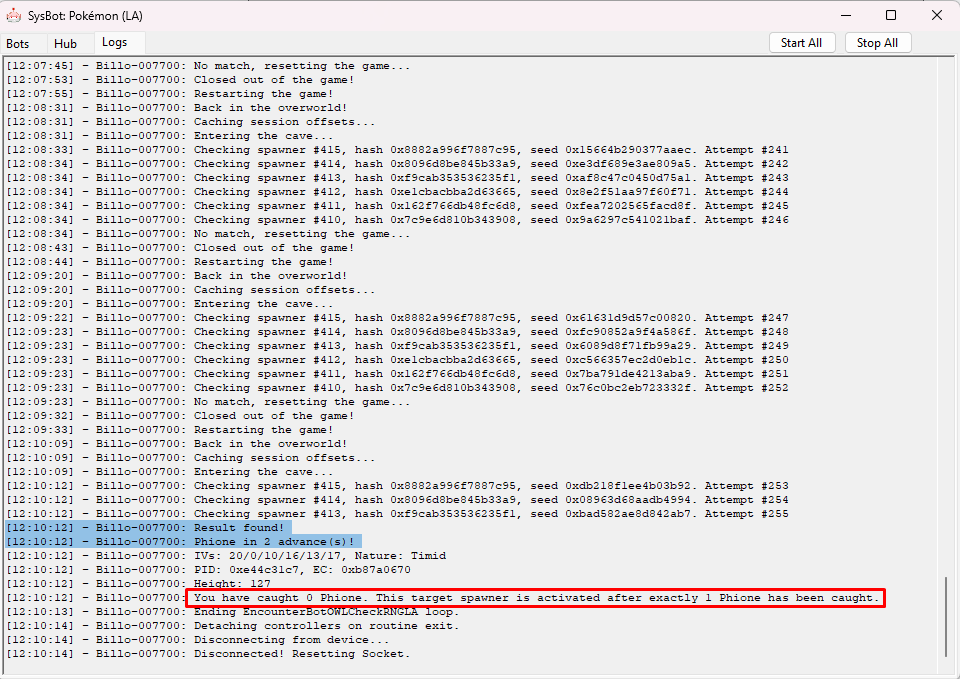
A Phione that matches our StopConditions has been found, and will appear after advancing the spawner seed 2 times. To put ourselves onto this Phione seed we will need to capture at least one Phione, as mentioned in the bot logs.
If the bot logs indicate that a certain number of Phione must be captured before accessing the correct spawner, you must do this first. The game tracks a total of six Phione spawners and unlocks specific ones depending on how many Phione have been caught.
- Capturing 1 Phione leaves 2 in the cave, unlocking two different spawners.
- Capturing 2 Phione leaves 1 in the cave, unlocking one different spawner.
- Capturing none keeps the original 3 spawners active.
In our example, we must capture 1 Phione before proceeding. Once the required number of Phione have been caught we then need to leave the cave and re-enter to unlock the correct Phione spawners.
Advancing The Spawner Seed
- Engage your target Pokémon in battle and knock it out.
- If your target is Manaphy you can knock out only Manaphy if you wish.
- If your target is Phione and there are more than one of them, you will need to knock them all out at least once to track your spawner seed.
- Teleport to a campsite, then set the time of day to evening.
- Head back to Seaside Hallow and enter the cave before time turns to night, the quickest way to do this is to teleport to Firespit Island.
- Wait inside the cave until night-time, this should take roughly 3 minutes.
- Keep in mind that Manaphy and Phione are aggressive and will attack you, pay attention to what is happening in-game.
- Ones the time of day turns to night, Manaphy/Phione should have now respawned, advancing the spawner seed of each of them by +1.
Figure 4 - Tracking Spawner Seed (Manaphy/Phione)
ParLiAment can be used to track and verify the spawner seeds to ensure they match the desired conditions, we can read the details of the Pokémon we are in battle with, then compare it to the search results table to confirm the advance we are currently on.
Step-by-step
- Connect to the program by typing the IP address of your Switch into the
Switch IP:field, then clicking theConnectbutton. - Select the
Overworld Legendary (Spawner)tab if this is not already open, then select your target Pokémon in the dropdown list. - Paste your seed from moarencounterbots into the
Seedfield underneath the dropdown list. - Set your desired search range, then click
Search. You should now see your upcoming advances in the search results table. - To verify your current advance you can use the
Read Encounterbutton to read the details of the Pokémon you are in battle with. - You will need to advance the spawner seed at least once before you can find the Pokémon you are in battle with in the search results table.
- If you are in a multi-battle, you may need to change the value next to the read encounter button to read the desired Pokémon.
- Keep the value next to the
Read Encounterbutton set to0if you are in a single battle.
After advancing the spawner seed 2 times and reading the encounter details using ParLiAment, we can confirm that the Phione meets the desired conditions!