Max Raid RNG
Introduction
Sword/Shield Max Raid RNG manipulation lets you predict the traits of a raid Pokémon before fighting it. IVs, Nature, Shiny status, Gender, Ability, and Size (height/scale, which determines the Jumbo/Teensy Mark in Generation 9) can all be predicted from the den's seed. Each den has its own "raid seed" that decides everything about the Pokémon inside. Every in-game day advances the seed by a fixed step. A technique known as "date skipping" lets you move the system date forward one seed per day until you reach the desired seed.
The recommended software for Sword/Shield Max Raid RNG manipulation depends on your setup, mainly whether you're on custom firmware (CFW) or a stock system. Read this section carefully and follow the instructions for your setup.
Recommended Software
Installation Instructions
- Extract the contents of the PokeFinder download to a empty folder on your PC.
- Extract the contents of the PokePiaSWSH download to a empty folder on your PC.
- (CFW Only) Extract the contents of the Luxray download to the root of your Switch SD card, then reboot the console into your chosen CFW environment.
Alternative Seed Checking for Mac/Linux
If you do not have a PC and are unable to run PKHeX and LiveHeX, you can consider CaptureSight to check and monitor your seeds. This is a Tesla overlay that is installed on your Switch.
CaptureSight will not be covered on this guide, so refer to the GitHub repository above for installation, usage, and troubleshooting. Keep in mind that CaptureSight interferes with programs that rely on sys-botbase, so you will need to reboot the console each time you want to switch over.
Software Overview
Figure 1 - PokePiaSWSH Overview
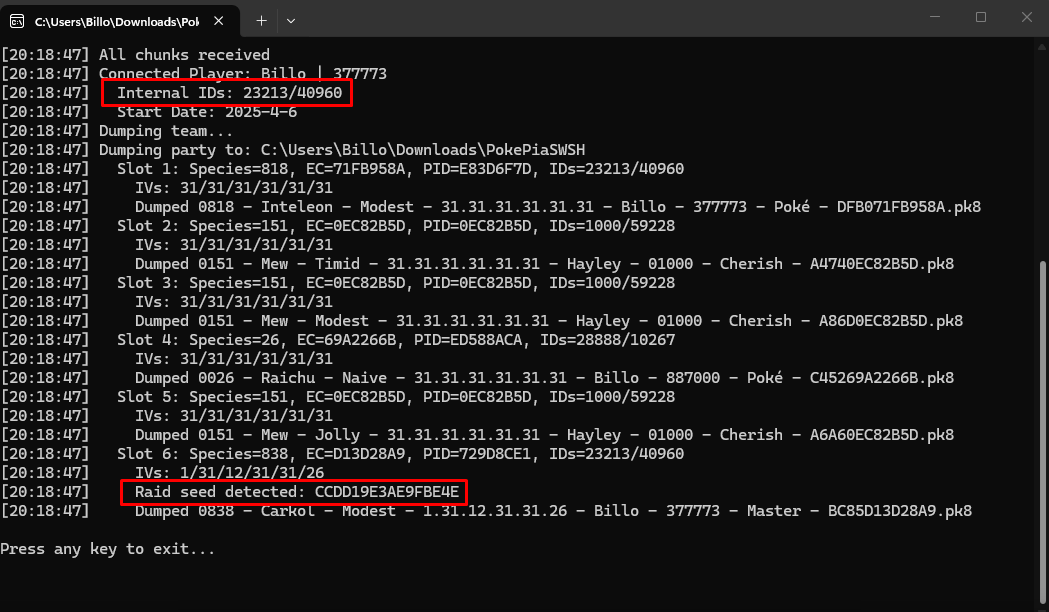
PokePiaSWSH is a tool that has several useful applications. In our context, it is primarily used for finding save file information and resolving the seed of a caught Pokémon from a Max Raid den.
Before doing anything else, you will need to ensure that PokePiaSWSH is functioning properly by following the instrructions below. When everything is done correctly you should see an output similar to what is shown in Figure 1.
Instructions
- Open PokePiaSWSH.exe and make sure the program launches as intended. Close the program after doing so.
- You will be prompted by Windows Defender Firewall; allow the program the permissions it needs to run properly.
- If you need to manually allow it through the firewall you can do so by following this process.
- Open Sword or Shield, then enter LAN Mode. This can be done by navigating to the Options menu and pressing
L+R+Left Stickall at once. - If done correctly you should see a message indicating that the console is in LAN Mode (Booting LAN, LAN enabled).
- Open the Y-Comm and select
Link Trade, then search without a code. LaunchPokePiaSWSH.exeon your computer after doing so to have it listen. - If done correctly you should now see the details of your save file in the PokePiaSWSH window.
- The Internal IDs are used later! Save them before closing the program.
It is important that you do not mess around in-game while using PokePiaSWSH. You should be standing in the overworld with the Searching... message visible. Do not open any menus, walk around, start any battles, or interact with any NPCs.
Troubleshooting
Restarting the console and/or program often fixes broadcasting issues, so try that first. If that doesn't work and you're certain your setup is correct, make sure the console and computer are on the same network (if your router is dual-band, try both bands). Disable any VPN, and if you use a firewall, allow PokePiaSWSH through it.
If PokePiaSWSH still doesn't work, the cause is likely hardware-related. We cannot provide support with hardware compatibility beyond suggesting you try a different machine. Click the button below for alternative ways to find your save file information and raid seeds.
Alternative MethodsFigure 2 - PokeFinder Overview
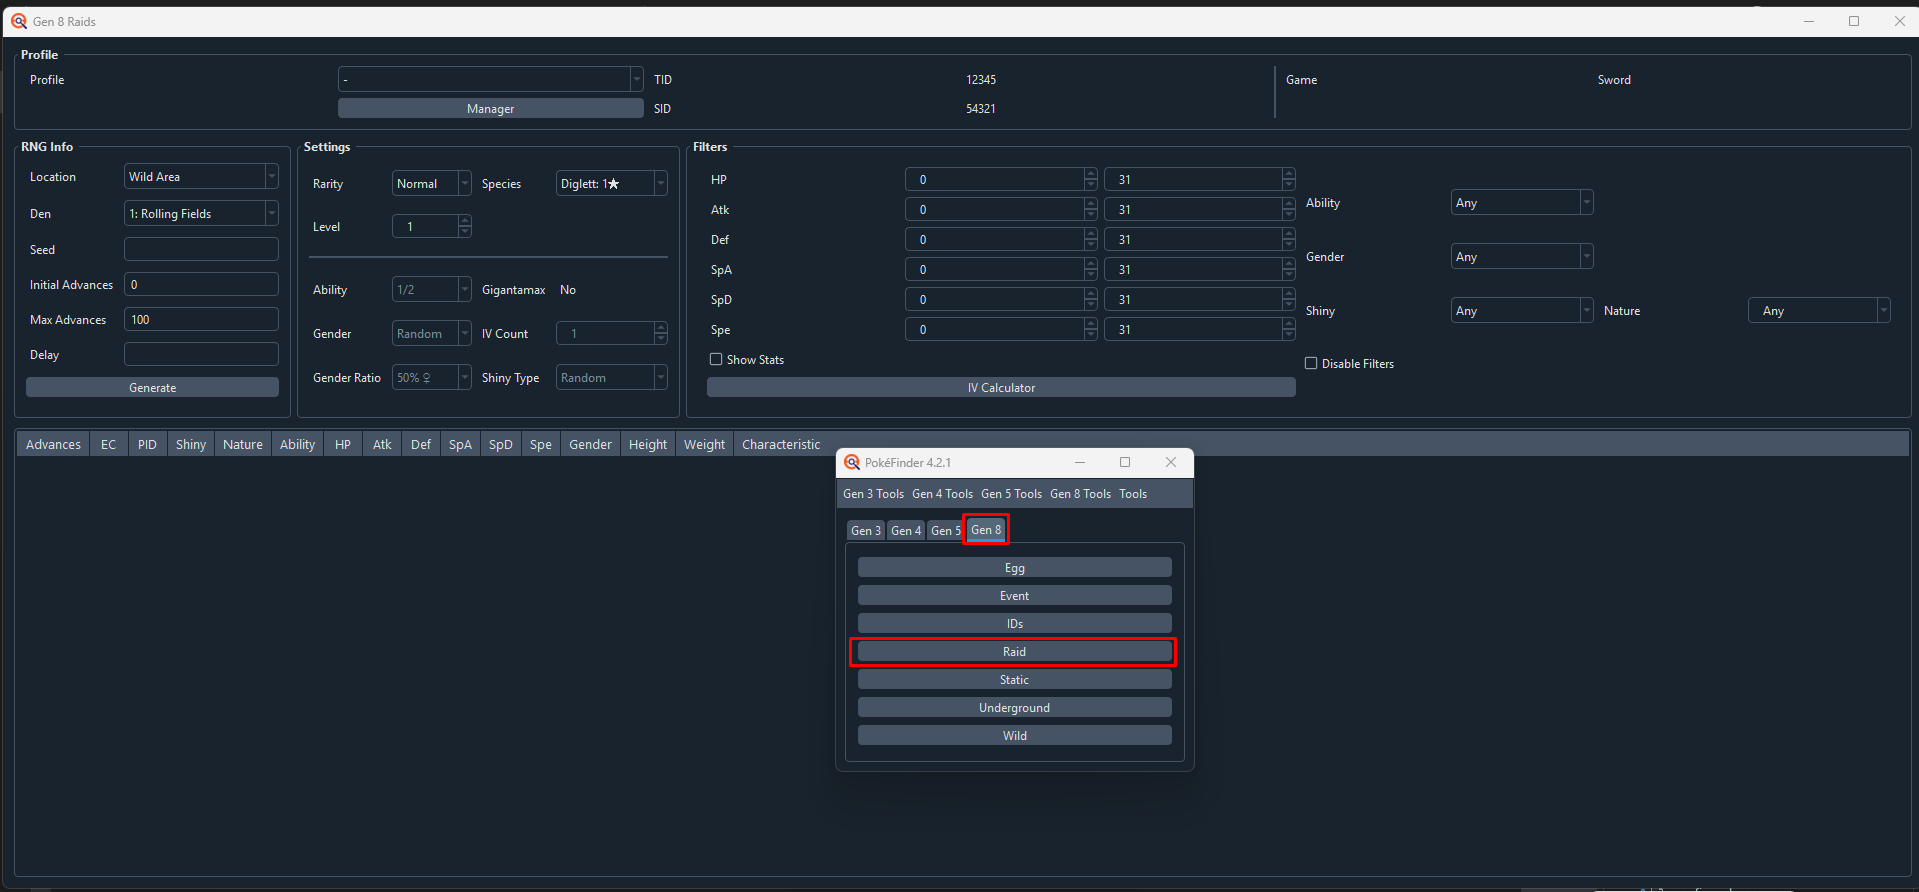
PokeFinder launches as a small window with a separate tab for each generation and multiple buttons on each tab. Select the Gen 8 tab and click the Raid button to open a larger window titled Gen 8 Raids. For the purposes of this guide, the Gen 8 Raids window will be referred to as the "main window." Here, we can configure the program to search raids and calculate upcoming advances based on user-defined search criteria.
Main Window Feature Overview
- Left Side - Specify search conditions to target specific raid dens, and input seed and # of advances to search.
- Center - Specify raid details, such as species, raid type (Normal/Rare), and difficulty (star count).
- Right Side - Add search filters for IVs, Nature, Shiny Status, Gender, and Ability; filters are combined.
- Top - Manage your profiles; this lets you store each game's version, 5 digit TID/SID, and presence of charms.
- Bottom - View all search results that match your filters.
Profiles
It is important to a set up a basic PokeFinder profile. For Max Raids, only the game version is necessary so that PokeFinder knows which raids to display. You can also input your 5-digit Internal TID/SID for correct PID prediction (you should have this if you have correctly followed the above instructions).
Stock Dens VS Event Dens
Before you continue, you should understand the difference between stock raid dens and event raid dens.
Stock Dens
These are location-specific, and their beams can either be red (Common/Normal) or purple (Rare). These raid dens are always available, even if you have not connected online. You can see what appears in each location using Serebii's Max Raid Battle Dens page.
Event Dens
These dens are obtained by connecting online to receive the Wild Area News. These dens appear anywhere on the map and contain unique tables of available Pokémon for a limited time. These raid beams are always red. You can see what appeared in each event distribution using Serebii's Max Raid Event Dens page. In most cases, you should have the final event distribution active in-game.
You can inject Wild Area News using Custom Firmware. Information about injecting older Wild Area News can be found in this ProjectPokémon tutorial. No further support for Wild Area News injection will be provided in this guide.
Figure 3 - PokeFinder Configuration
In this section, you will learn how to properly configure PokeFinder for the specific raid you are targetting. First, you will need to understand how to find a Raid Den ID, this is done using the Den Map tool in PokeFinder.
Finding Den ID
On the initial smaller window that first appears when launching PokeFinder, the navigation menu at the top lists tools used for different games. Under Gen 8 Tools, there is an option for Den Map. This tool opens in a subwindow and can be used to find your chosen raid den's ID more easily.
We can match the in-game location of a raid den to its location on PokeFinder's Den Map to find the corresponding Den ID.
- If you are planning to RNG manipulate a stock den, use Serebii to find a raid den that contains your desired Pokémon. Otherwise, find an event den, which can be confirmed by checking the Pokémon inside versus what normally appears in that raid den.
- Throw a Wishing Piece into the den and confirm the species matches the tables on Serebii. If the species does not match, you are not standing by the correct den in-game.
- Take note of the map (Wild Area, IoA, or CT) and the area (e.g. Dusty Bowl) for your selected den.
- Open the
Den Mapsubwindow on PokeFinder. - Select the correct map from the first dropdown menu (Wild Area, IoA, or CT).
- Under the second dropdown menu, check each option that matches the area until the red dot appears in the same place as your chosen raid den.
- The number that appears in front of the location in the second dropdown menu is the Den ID. Take note of this value.
- If you found your raid den at
76: Dusty Bowl, then the Den ID is76, the area isDusty Bowl, and the map isWild Area. - Go back to the main PokeFinder window to enter this information.
- Confirm that the correct profile has been selected at the top.
- From the
Locationdropdown, select the correct map if you are manipulating a stock den, orEventif you are manipulating an event den. - From the
Dendropdown, select the Den ID you found earlier if you are manipulating a stock den, or the correct Wild Area News Event if you are manipulating an event den. - If this is a stock den, select the correct Den rarity (Normal/Rare) from the
Raritydropdown. This does not matter for event dens. - Confirm that the species selection in PokeFinder matches Serebii.
- Write down your Den ID in case you forget or need it later.
Figure 4 - Finding Your Den Seed
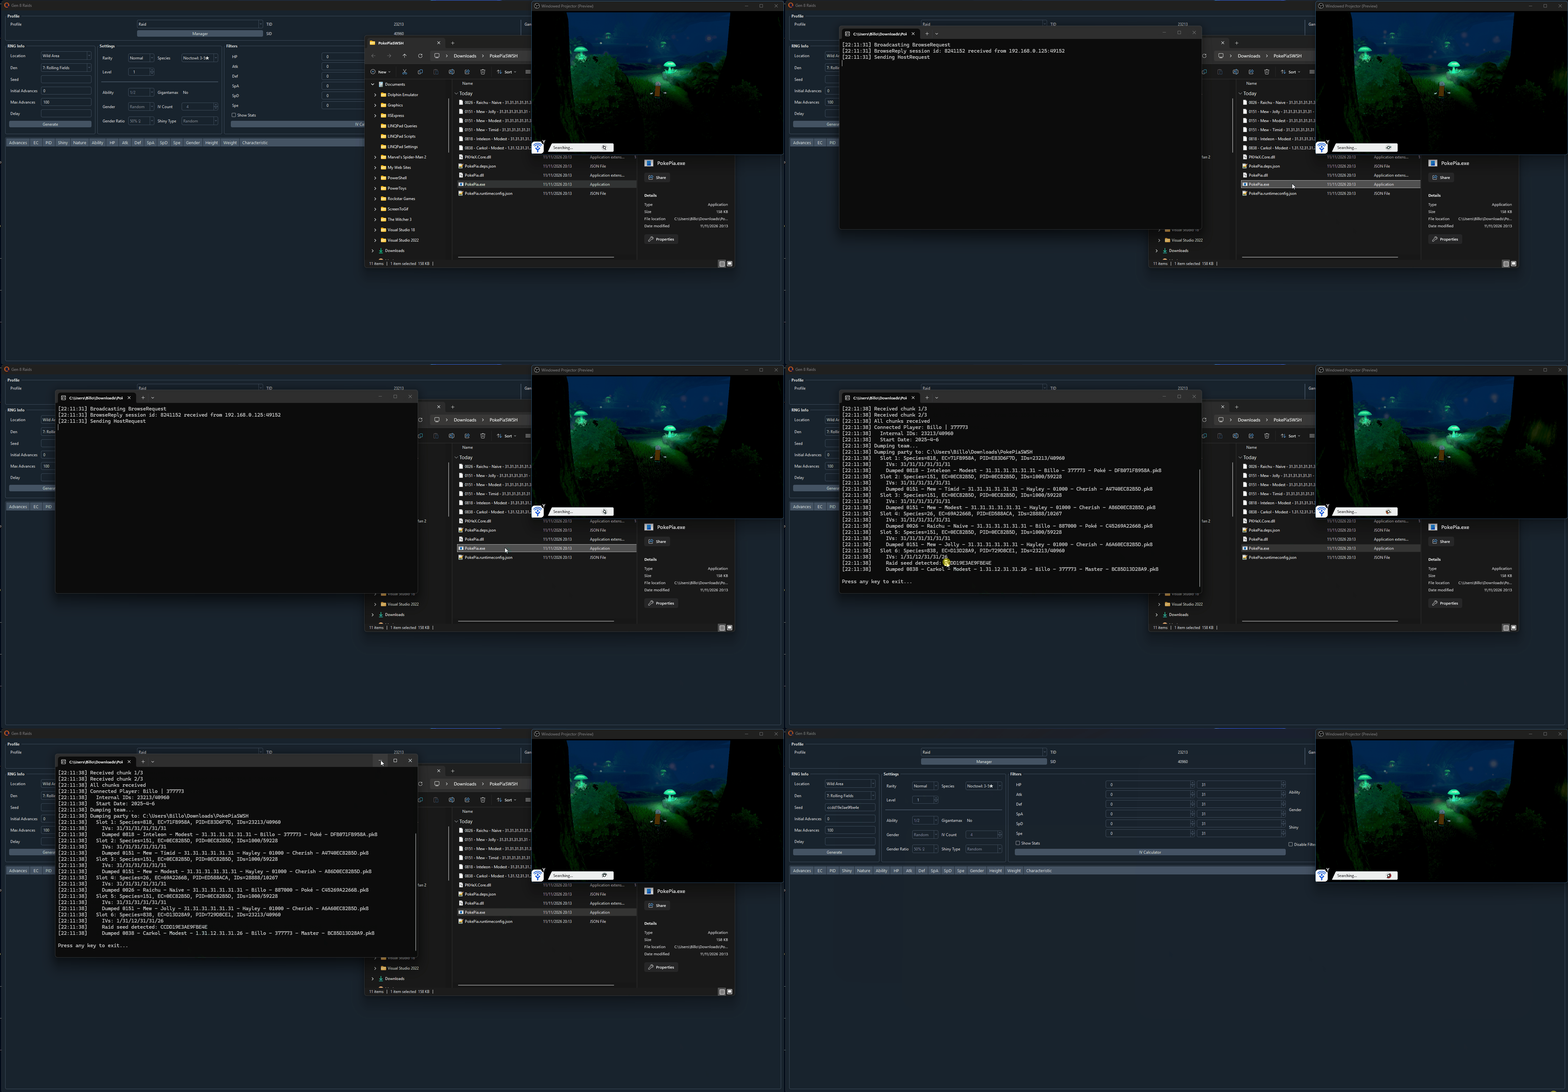
After correctly identifying your raid den, you will need to find the den seed. This can be done by capturing the Pokémon inside the Raid Den, then running PokePiaSWSH.
Finding Den Seed
- Save the game while standing in front of your desired den.
- Throw a Wishing Piece into your desired den to activate it. Ensure that your beam is the correct colour (red = common, purple = rare)
- If the colour is incorrect, you can reset the game before it force saves to preserve your wishing piece.
- If the colour is correct, but it is an event den when you don't want it to be (or vice versa), throw a wishing piece into a different den or clear out the current den to deaactivate it and try again.
- Capture the Pokémon inside the den, do not save with the Pokemon captured.
- Run PokePiaSWSH, you should now see your den seed in the output. Refer back to Figure 1 for guidance.
- Copy your den seed, paste it into the
Seedfield of PokeFinder, then enter your search parameters. - Click the
Generatebutton and check for results in the search result table. - If no results are found, try increasing your search range or adjusting your search parameters to be less strict.
- You will need to adjust your
Max Advancesaccording to your setup. Those using custom firmware can afford to set this value higher than those on a stock console.
Figure 5 - Target Found

In Figure 5 we can see that a shiny, Gentle-natured Runerigus appears in 1,896 advances (rare beam). It is now time to advance the seed by date skipping until we are close to the target. The method you use to advance the seed will again depend on your setup and preferences.
If you wish to control the species of Pokémon found inside the Raid Den, you must stop advancing the date 3 advances before your target seed. This will be explained in more detail below. In this case, since we specifically want Runerigus and our shiny is on advance 1,896, we must stop advancing once we reach frame 1,893.
Using Luxray (Quickest Automated Method - CFW Only)
- Launch Luxray through the Homebrew Menu.
- Type the number of days you wish to advance into the calculator. For safety, you may wish to stop a few days earlier in case the system time rolls over automatically.
- For targets >1,000 advances away, move to an indoor location like a Pokémon Center before date skipping. Skipping rapidly for a long time while standing in the Wild Areas can cause the game to crash.
- Click the
Stepbutton and wait for the calculator to count to 0.
Luxray tricks the system clock into believing a day has passed, causing the RNG to advance. This can advance up to 7,000 frames per hour which is much faster than human input. If you dislike the idea of using Luxray to artificially modify the system date, you can use one of the other two date skipping methods instead.
It is heavily advised use an indoor location and to stay within legal date boundaries when using Luxray. The lowest settable date is January 1, 2000, and the highest settable date is December 31, 2060. Use NTP or Set to adjust the clock if you are going out of bounds.
PvP Exploit (Quickest Manual Method - Stock Firmware Friendly)
- Open the game and enter any Wild Area. Position your camera so you can see some active raid beams or claim the Watts from a nearby raid den.
- Open the Y-Comm, connect to the internet, and select the
Link Battleoption. - Search for a battle with no code to find an online battle as quickly as possible.
- Once you have entered the battle, cancel the battle by turning on
Airplane Mode. - Close any in-game menus and go back to the overworld.
- Change the console date forward in the
System Settings>System, then resume the game where you are looking at the overworld. - It is possible to skip multiple days at once without resuming the game. To do this, setting the date forward, hit
OK, and repeat this process until you have done enough days. You can only skip once each time you hitOK, so changing the date forward by more than 1 will still be treated as 1. - If you are in the Wild Area, resuming the game after advancing multiple days has a chance to crash your game! If you are advancing more than 1 month at a time, we suggest you move indoors to a Pokémon Center.
- If you did this correctly, the screen will flash, the currently active raid beams will change location, and any Watts you claimed will become available again.
- Repeat this process from step 4. The exploit remains active until the game is restarted.
"Invite Others" Exploit (Slow Manual Method - Stock Firmware Friendly)
- Open the game, enter any Wild Area and find an inactive raid den. You can use your chosen raid den if you wish.
- Throw a Wishing Piece into the raid den, then interact with it.
- Click
Invite Others, then minimize the game by pressing the Home button. - Navigate to
System Settings. Change the console date forward underSystem, then resume the game. - Back out of the raid and re-enter the overworld.
- If you did this correctly, you should see that you are able to claim Watts from the raid den again.
- Repeat this process from Step 3 onwards as much as needed.
Figure 6 - Species Manipulation

As stated previously, we cannot RNG manipulate species for Max Raid dens; we must randomly roll them. Raid dens lock the species for the first 2 days from the current day, but the 3rd day is random. Therefore, we must repeatedly advance 3 days until the species we want appears in the raid den. This is why it is important to stop 3 advances/days before the target if you want a specific species.
At this stage, you should be exactly 3 advances/days away from your target (today(0), second day(1), third day(2), target day(3)). From here, you can reroll the species on the "target day".
In the above image, the game has been saved and we are 3 advances away from the target. After advancing the seed 3 times, we started the raid to confirm that the Pokémon is shiny, but the species was wrong. This problem can be resolved by doing the following:
Rerolling the Raid Species
- Check your seed and confirm that you are exactly 3 advances away from the target.
- Save the game once you are confident that you are in the correct state.
- Advance the seed 3 times by date skipping. Open the raid den lobby and check the species. If the species is not what you wanted, reset the game.
- You should now be standing besides your den, and the raid seed should be 3 advances away again. Repeat step 3 until your desired species appears.
- (Optional) Save the game after acquiring your desired species if you intend to share it with friends.
Be careful that the date does not automatically advance while you are doing the "3 day" method. You can change the system time to earlier in the day. If system time naturally advances past midnight, the seed will advance as well, which can cause you to go past your target.
Figure 7 - Result Found
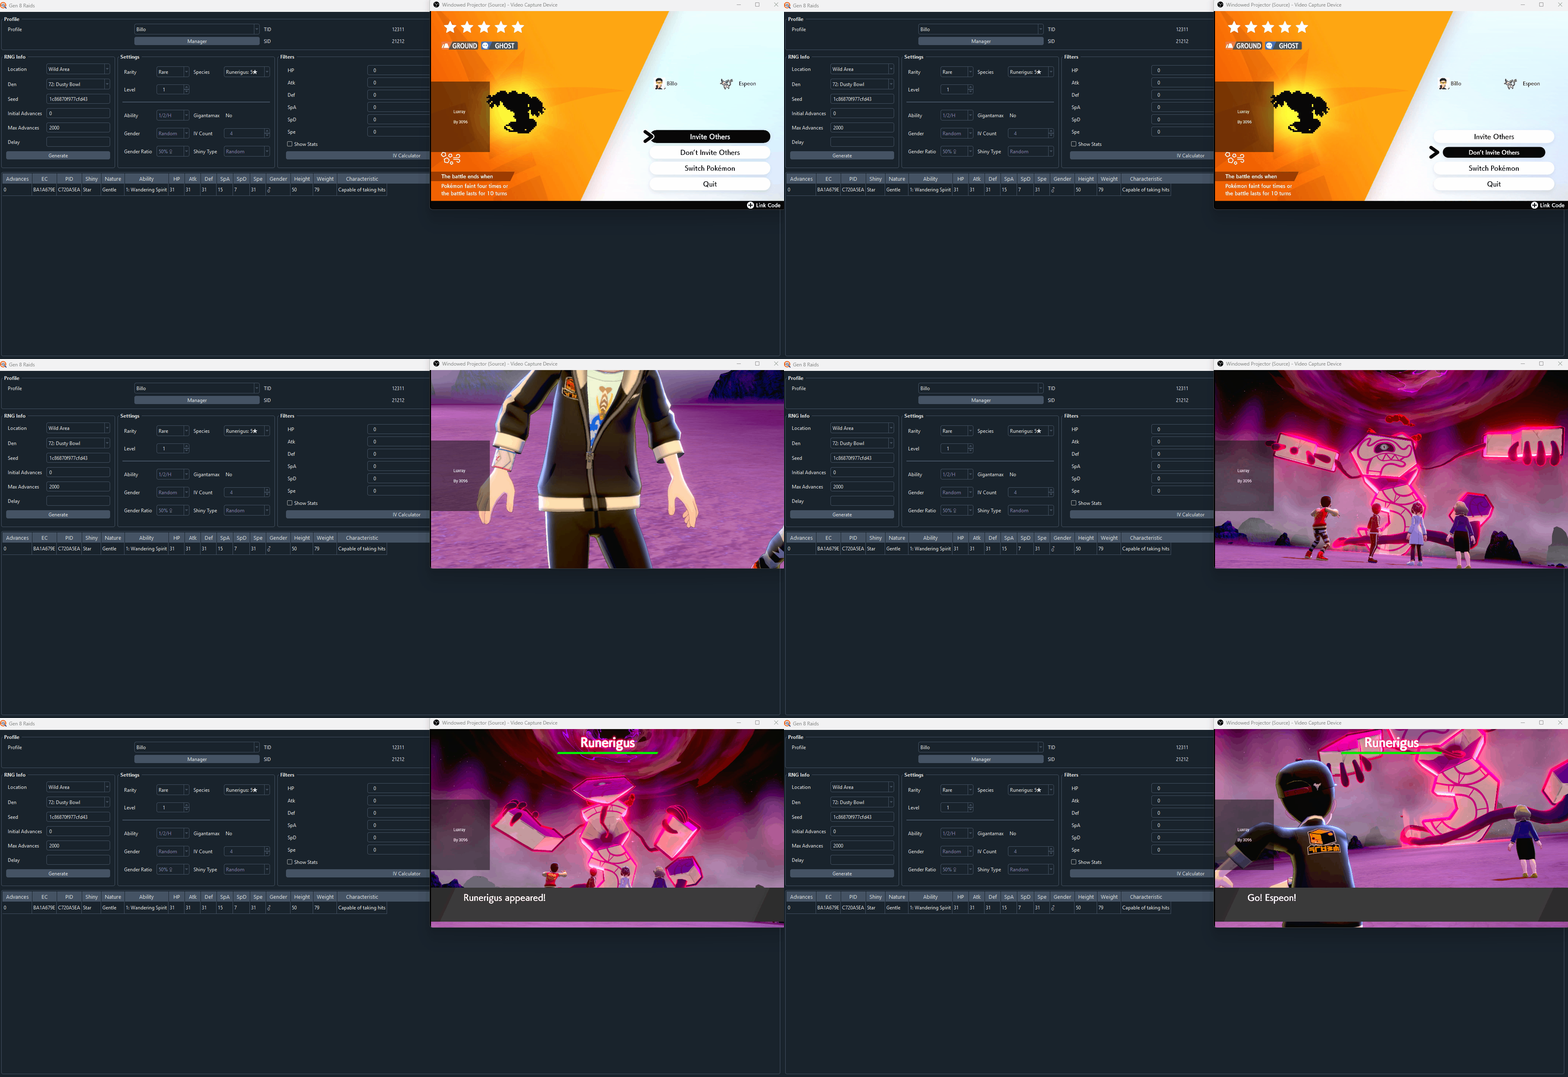
The Max Raid den now contains the desired species. In this case, a 5 star shiny Runerigus! We can now capture the Pokémon or share the raid with friends.
That's all there is to manipulating Max Raid Battles!