TID/SID Manipulation (CFW)
Introduction / Preface
If you're on this page, you are looking to manipulate your TID, SID, or both! As explained on the main page, this process lets you control which PIDs become shiny and/or aim for a specific TID for aesthetic reasons. This section covers both obtaining a desired TID and manipulating your SID so a chosen PID becomes shiny. Your approach depends on your goal, in most cases you will either:
- Target a specific TID purely for aesthetics or personal preference.
- Get a random TID, and then manipulate your SID to make a desired spread or PID shiny.
- Target a specific TID for aesthetics AND manipulate your SID to make a desired spread or PID shiny.
Select your desired use case from the list below to get started. Be aware that searching for a specific TID and a SID to make a specific spread shiny may take a while! It can take some time to find a matching TID, and hitting the desired SID still relies on a perfectly timed input.
Figure 1 - Spread Finder

When manipulating your SID, you will first want to decide on your target Pokémon and your desired IV spread. GRASS provides a Spread Finder tool to help with confirming whether or not the IV spread you want actually exists, and gives us valuable information such as the PID the Pokémon will have.
Step-by-step
- Launch GRASS and open the
Spread Findertab, then select your target Pokémon andMethod. - In most cases, static encounters will use Method 1 and wild encounters will use Method H1. If you are targeting a Method H1 spread and the number of rerolls is between 30-50+, you may have more luck targeting Method H4 instead.
- Controlling the method a Pokémon is generated with is considered an advanced technique for those with enough experience, and will not be covered further in these guides.
- Enter your search filters, such as filtering for a specific set of IVs.
- It is recommended to only set IV filters and check the available natures when seeking a high value spread (e.g, 6IV).
- Spreads are limited, so applying IV and nature filters on high value spreads may yield no results as the spread may not exist.
- Click
Generate, you should now see a list of spreads in the results table. Pick your desired spread, then note down the PID somewhere for later use. - For wild encounters you may also wish to note down the location that the Pokémon can be found in.
- If your target is a static, the species is less relevant as the spread can be used on any static Pokémon or gift.
In this example we have configured our filters to search for any Mewtwo with 6 perfect IVs and a few results have appeared in the search results table. We will be targeting the Modest Mewtwo (PID: 685011A9) found at the bottom of the table.
Now that we know the PID of the Pokémon we would like to be shiny, we can move on to manipulating our SID to match the conditions needed to make our target PID shiny.
Figure 2 - Calibrating SID Delay
It is a good idea to calibrate your SID delay before doing anything else - this will allow you to target your desired SID with more accuracy when the time comes. To calibrate SID delay, pick between manual or automatic calibration and follow the relevant steps. The above example uses automatic calibration (Baby Mode).
Step-by-step (Manual Calibration)
- Confirm your character name, then press the
Homebutton and reconnect to GRASS. - Resume the game and name your rival, press A until you reach this text box.
- Your SID is generated shortly after dismissing the text box. You will be able to read your SID after entering the overworld.
- Aim to press the
Abutton on a round number (such as a multiple of 1,000) of advances for simplicity. - This helps maintain consistency and makes calculation slightly easier when calibrating your delay.
- Resume the game, then press the
Abutton on your target advance. Avoid pressing multiple times. - Pressing the
Abutton multiple times can speed up the text, which will cause inconsistency between attempts. - Click the
Read IDs from RAMbutton on the TID/SID tab of GRASS after entering the overworld. - Click the
Specific SIDbutton. The SID you have found should already be present inside the correct field, but you can enter the SID manually if there are any issues. Click theGenerateto populate the results table. - Confirm the advance that your SID was generated on in the generated table, and subtract it from the advance that you pressed the
Abutton on. - For example, if we pressed the
Abutton on advance 2000 and the SID was generated on advance 2,465, our delay for this attempt is 465. - Repeat this process multiple times until you see a level of consistency in your delay.
- If you are not seeing consistency at all you can consider using the Baby Mode method instead (read below).
Step-by-step (Automatic Calibration)
- Confirm your character name, then press the
Homebutton and reconnect to GRASS. - Resume the game and name your rival, press A until you reach this text box.
- Your SID is generated shortly after dismissing the text box, you will be able to read your SID after entering the overworld.
- In the Baby Mode section of the main window, enter a round number (such as a multiple of 1,000) inside the empty field and set the dropdown menu button to
A. - Setting the value to a round number helps to maintain consistency and makes calculation slightly easier when calibrating your delay.
- Resume the game, then wirelessly connect your controllers and disconnect them immediately afterwards.
- On JoyCons the disconnect button is found on the side of the controller.
- On Pro Controllers the disconnect button is found on the top of the controller.
- Press the
Go!button in the Baby Mode section of GRASS and wait. TheAbutton will be pressed automatically on your target advance. - Click the
Read IDs from RAMbutton on the TID/SID tab of GRASS after entering the overworld. - Click the
Specific SIDbutton. The SID you have found should already be present inside the correct field, but you can enter the SID manually if there are any issues. Click theGenerateto populate the results table. - Confirm the advance that your SID was generated on in the generated table, and subtract it from the advance that Baby Mode pressed the
Abutton on. - For example, if the
Abutton was pressed on advance 2000 and the SID was generated on advance 2,465, our delay for this attempt is 465. - Repeat this process multiple times until you see a level of consistency in your delay.
Figure 3 - Manipulating The SID
We have now calibrated our SID delay and we know the PID of the spread we want to be shiny, so we can move onto manipulating our SID to match the conditions that make our target PID shiny. Similar to calibrating your delay, you can choose between manual button input or using the Baby Mode feature for automatic button input. Use whichever method you completed the above calibration with.
Step-by-step (manual button input)
- Confirm your character name, then press the
Homebutton and reconnect to GRASS. - Resume the game and name your rival, then press A until you reach this text box.
- Click
Read Temp TID. This will input your current TID into theTIDsection of the main window. - Select
SIDs for Shiny PIDin GRASS, then paste the PID of the spread you wish to make shiny into the field. - Enter your delay (calibrated earlier) and your search range, then hit
Generate. You should now see results inside the table. - If you do not find any results you may need to increase your search range.
- Take note of the advance that produces your target SID. This is the advance you will aim to press the
Abutton to dismiss the text box. - Once you reach your target advance, press the
Abutton once and wait for the character to enter the overworld. - Click the
Read IDs from RAMand confirm that the correct SID was generated.
Step-by-step (Baby Mode)
- Confirm your character name, then press the
Homebutton and reconnect to GRASS. - Resume the game and name your rival, then press A until you reach this text box.
- Click
Read Temp TID. This will input your current TID into theTIDsection of the main window. - Select
SIDs for Shiny PIDin GRASS, then paste the PID of the spread you wish to make shiny into the field. - Enter your search range, then hit
Generate. You should now see results inside the table. - Do not enter your delay into the TID/SID tab!. This is needed for the Baby Mode section instead.
- If you do not find any results you may need to increase your search range.
- Enter your target adance into the Baby Mode section, then click the
Delaycheckbox and enter your calibrated delay. - Connect your controller wirelessly, then press the disconnect button on the controller.
- Press the
Go!button in the Baby Mode section of GRASS and wait. TheAbutton will be pressed automatically on your target advance. - Click the
Read IDs from RAMonce you have entered the overworld to confirm that the correct SID was generated.
After loading into the overworld and clicking the Read IDs from RAM button, you should see that the correct SID has been generated. This confirms that the manipulation was successful.
Figure 1 - TID Botting
GRASS can automate the process of finding a desirable TID. Before doing anything else you will need to create a list of acceptable TIDs by doing the following:
Step-by-step
- Launch GRASS, then open the
TID/SIDtab. - Click the
Edit TID Listbutton to open a sub-window. - Enter your desired TID into the
ID:field, then clickAdd. - Remember, values must be between 00000-65535 inclusive.
- Repeat the previous step until you have a list of acceptable TIDs.
- Close the sub-window after entering all of your desired TIDs.
- On the left-hand side of the main window, click
Connection/Reset Settings. - Enter your desired name, then close the sub-window.
If you have a long list of TIDs you would accept you can consider opening tid-list.json in a text editor like notepad and entering your TIDs directly into the list. This may cause issues if you do not know what you are doing but is a more time efficient approach.
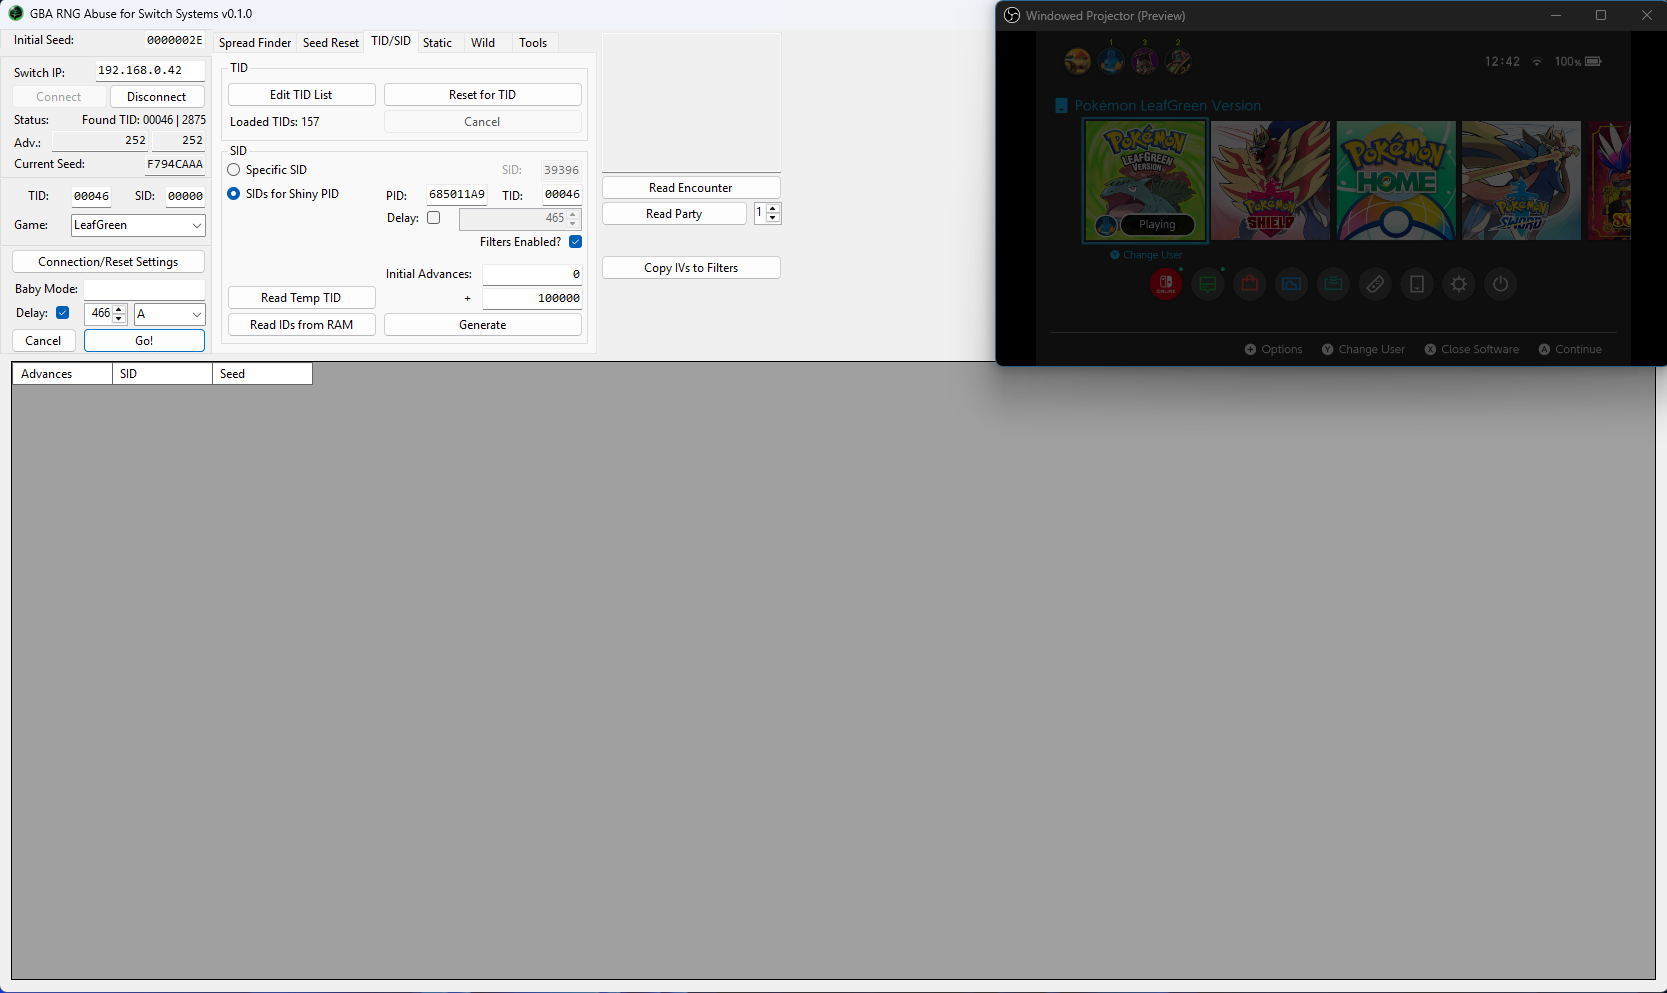
Figure 2 - TID Bot Started
Once you have entered your list of desired TIDs, you can start the TID bot to begin searching for a matching TID.
Step-by-step
- Start a new save file, then press the
Abutton until you reach the this screen. - Connect your controller wirelessly, then press the disconnect button on the controller.
- On JoyCons the disconnect button is found on the side of the controller.
- On Pro Controllers the disconnect button is found on the top of the controller.
- Connect your console to GRASS by clicking the
Connectbutton. - Click the
Reset for TIDbutton in the TID/SID tab of GRASS to start the bot.
The bot will now begin cycling between entering your desired name and checking the TID until it matches one of the TIDs in your list. It may take a while to find a matching TID, especially if you only entered a small number of acceptable TIDs in the TID List.
If you are running into timing issues when using the bot, you can manually adjust the default timings inside Connection/Reset Settings until you find settings that work for you.
Figure 3 - TID Found
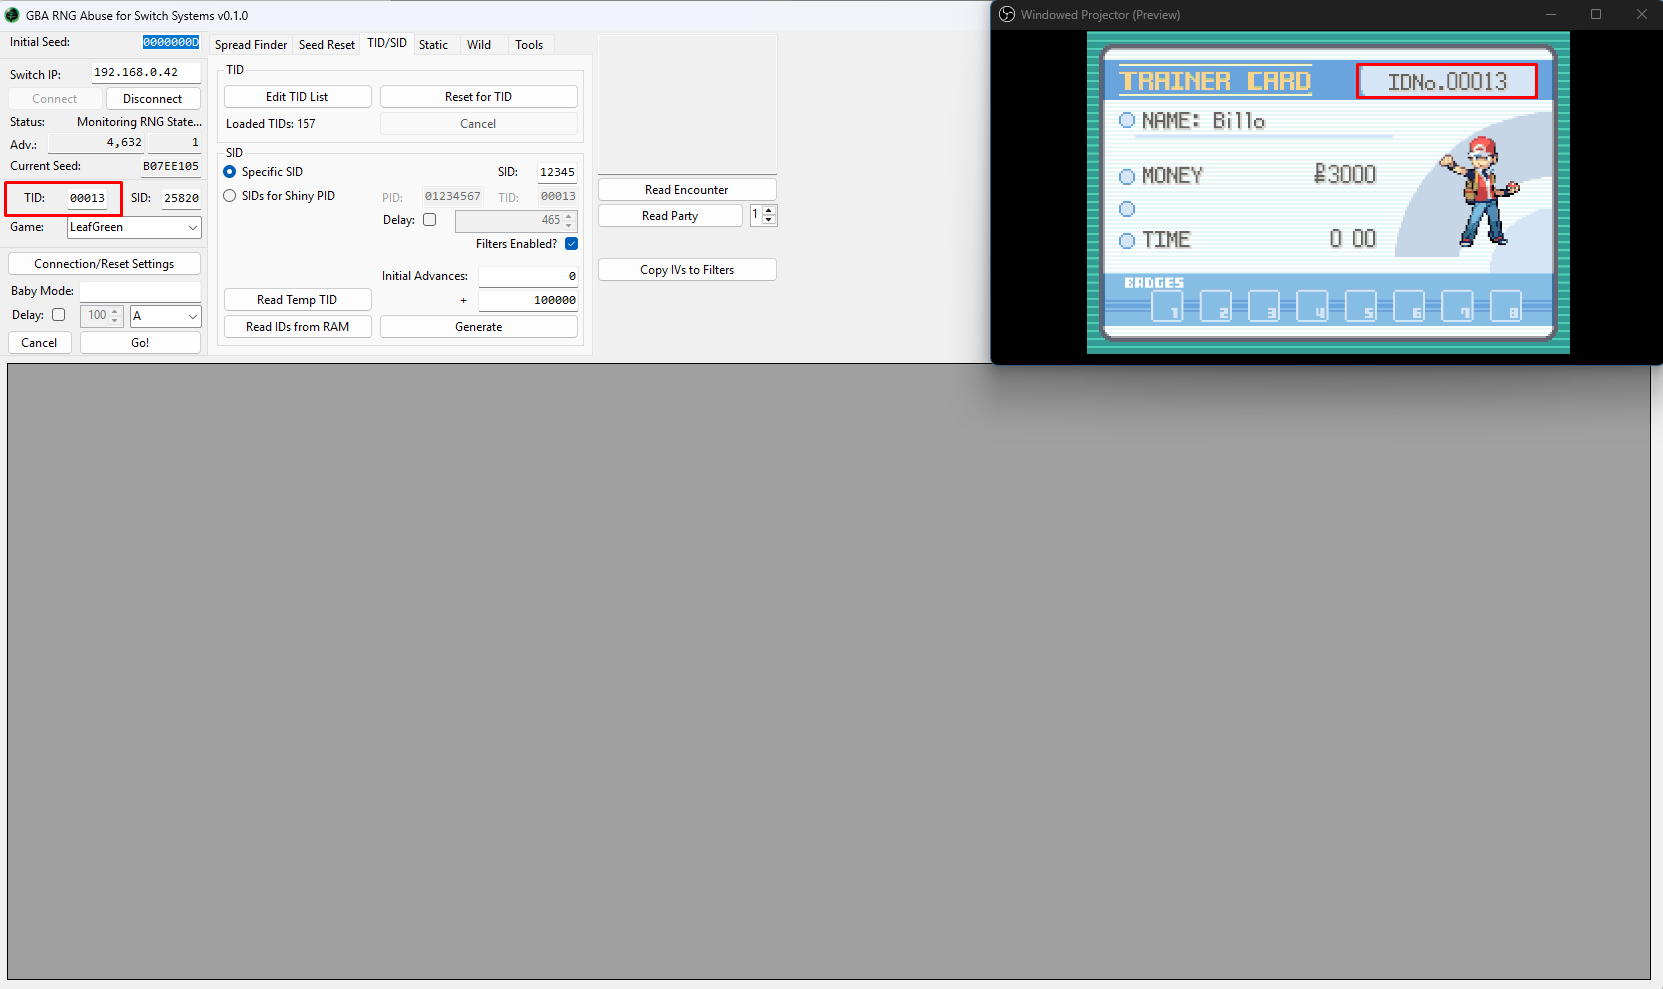
When the bot finds a matching TID it will pause the game on the Switch HOME Menu. In this case we found a TID of 00013. We can now click through the rest of the intro cutscene or click the Read IDs from RAM button to confirm that the found TID is correct.
Figure 1 - Spread Finder
When manipulating your SID, you will first want to decide on your target Pokémon and your desired IV spread. GRASS provides a Spread Finder tool to help with confirming whether or not the IV spread you want actually exists, and gives us valuable information such as the PID the Pokémon will have.
Step-by-step
- Launch GRASS and open the
Spread Findertab, then select your target Pokémon andMethod. - In most cases, static encounters will use Method 1 and wild encounters will use Method H1. If you are targeting a Method H1 spread and the number of rerolls is between 30-50+, you may have more luck targeting Method H4 instead.
- Controlling the method a Pokémon is generated with is considered an advanced technique for those with enough experience, and will not be covered further in these guides.
- Enter your search filters, such as filtering for a specific set of IVs.
- It is recommended to only set IV filters and check the available natures when seeking a high value spread (e.g, 6IV).
- Spreads are limited, so applying IV and nature filters on high value spreads may yield no results as the spread may not exist.
- Click
Generate, you should now see a list of spreads in the results table. Pick your desired spread, then note down the PID somewhere for later use. - For wild encounters you may also wish to note down the location that the Pokémon can be found in.
- If your target is a static, the species is less relevant as the spread can be used on any static Pokémon or gift.
In this example we have configured our filters to search for any Mewtwo with 6 perfect IVs and a few results have appeared in the search results table. We will be targeting the Modest Mewtwo (PID: 685011A9) found at the bottom of the table.
Now that we know the PID of the Pokémon we would like to be shiny, we can move on to manipulating our SID to match the conditions needed to make our target PID shiny.
Figure 2 - Calibrating SID Delay
It is a good idea to calibrate your SID delay before doing anything else - this will allow you to target your desired SID with more accuracy when the time comes. To calibrate SID delay, pick between manual or automatic calibration and follow the relevant steps. The above example uses automatic calibration (Baby Mode).
Step-by-step (Manual Calibration)
- Confirm your character name, then press the
Homebutton and reconnect to GRASS. - Resume the game and name your rival, press A until you reach this text box.
- Your SID is generated shortly after dismissing the text box. You will be able to read your SID after entering the overworld.
- Aim to press the
Abutton on a round number (such as a multiple of 1,000) of advances for simplicity. - This helps maintain consistency and makes calculation slightly easier when calibrating your delay.
- Resume the game, then press the
Abutton on your target advance. Avoid pressing multiple times. - Pressing the
Abutton multiple times can speed up the text, which will cause inconsistency between attempts. - Click the
Read IDs from RAMbutton on the TID/SID tab of GRASS after entering the overworld. - Click the
Specific SIDbutton. The SID you have found should already be present inside the correct field, but you can enter the SID manually if there are any issues. Click theGenerateto populate the results table. - Confirm the advance that your SID was generated on in the generated table, and subtract it from the advance that you pressed the
Abutton on. - For example, if we pressed the
Abutton on advance 2000 and the SID was generated on advance 2,465, our delay for this attempt is 465. - Repeat this process multiple times until you see a level of consistency in your delay.
- If you are not seeing consistency at all you can consider using the Baby Mode method instead (read below).
Step-by-step (Automatic Calibration)
- Confirm your character name, then press the
Homebutton and reconnect to GRASS. - Resume the game and name your rival, press A until you reach this text box.
- Your SID is generated shortly after dismissing the text box, you will be able to read your SID after entering the overworld.
- In the Baby Mode section of the main window, enter a round number (such as a multiple of 1,000) inside the empty field and set the dropdown menu button to
A. - Setting the value to a round number helps to maintain consistency and makes calculation slightly easier when calibrating your delay.
- Resume the game, then wirelessly connect your controllers and disconnect them immediately afterwards.
- On JoyCons the disconnect button is found on the side of the controller.
- On Pro Controllers the disconnect button is found on the top of the controller.
- Press the
Go!button in the Baby Mode section of GRASS and wait. TheAbutton will be pressed automatically on your target advance. - Click the
Read IDs from RAMbutton on the TID/SID tab of GRASS after entering the overworld. - Click the
Specific SIDbutton. The SID you have found should already be present inside the correct field, but you can enter the SID manually if there are any issues. Click theGenerateto populate the results table. - Confirm the advance that your SID was generated on in the generated table, and subtract it from the advance that Baby Mode pressed the
Abutton on. - For example, if the
Abutton was pressed on advance 2000 and the SID was generated on advance 2,465, our delay for this attempt is 465. - Repeat this process multiple times until you see a level of consistency in your delay.
Figure 3 - TID Botting Setup
GRASS can automate the process of finding a desirable TID. Before doing anything else you will need to create a list of acceptable TIDs by doing the following:
Step-by-step
- Launch GRASS, then open the
TID/SIDtab. - Click the
Edit TID Listbutton to open a sub-window. - Enter your desired TID into the
ID:field, then clickAdd. - Remember, values must be between 00000-65535 inclusive.
- Repeat the previous step until you have a list of acceptable TIDs.
- Close the sub-window after entering all of your desired TIDs.
- On the left-hand side of the main window, click
Connection/Reset Settings. - Enter your desired name, then close the sub-window.
If you have a long list of TIDs you would accept you can consider opening tid-list.json in a text editor like notepad and entering your TIDs directly into the list. This may cause issues if you do not know what you are doing but is a more time efficient approach.
Figure 4 - TID Bot Started
Once you have entered your list of desired TIDs, you can start the TID bot to begin searching for a matching TID.
Step-by-step
- Start a new save file, then press the
Abutton until you reach the this screen. - Connect your controller wirelessly, then press the disconnect button on the controller.
- On JoyCons the disconnect button is found on the side of the controller.
- On Pro Controllers the disconnect button is found on the top of the controller.
- Connect your console to GRASS by clicking the
Connectbutton. - Click the
Reset for TIDbutton in the TID/SID tab of GRASS to start the bot.
The bot will now begin cycling between entering your desired name and checking the TID until it matches one of the TIDs in your list. It may take a while to find a matching TID, especially if you only entered a small number of acceptable TIDs in the TID List.
If you are running into timing issues when using the bot, you can manually adjust the default timings inside Connection/Reset Settings until you find settings that work for you.
Figure 5 - Target TID Found / Manipulating The SID
A target TID has been found! In this example we found the TID 00043. We now need to move onto manipulating the SID to make our desired spread shiny.
Step-by-step (manual button input)
- Confirm your character name, then press the
Homebutton and reconnect to GRASS. - Resume the game and name your rival, then press A until you reach this text box.
- Click
Read Temp TID. This will input your current TID into theTIDsection of the main window. - Select
SIDs for Shiny PIDin GRASS, then paste the PID of the spread you wish to make shiny into the field. - Enter your delay (calibrated earlier) and your search range, then hit
Generate. You should now see results inside the table. - If you do not find any results you may need to increase your search range.
- Take note of the advance that produces your target SID. This is the advance you will aim to press the
Abutton to dismiss the text box. - Once you reach your target advance, press the
Abutton once and wait for the character to enter the overworld. - Click the
Read IDs from RAMand confirm that the correct SID was generated.
Step-by-step (Baby Mode)
- Confirm your character name, then press the
Homebutton and reconnect to GRASS. - Resume the game and name your rival, then press A until you reach this text box.
- Click
Read Temp TID. This will input your current TID into theTIDsection of the main window. - Select
SIDs for Shiny PIDin GRASS, then paste the PID of the spread you wish to make shiny into the field. - Enter your search range, then hit
Generate. You should now see results inside the table. - Do not enter your delay into the TID/SID tab!. This is needed for the Baby Mode section instead.
- If you do not find any results you may need to increase your search range.
- Enter your target adance into the Baby Mode section, then click the
Delaycheckbox and enter your calibrated delay. - Connect your controller wirelessly, then press the disconnect button on the controller.
- Press the
Go!button in the Baby Mode section of GRASS and wait. TheAbutton will be pressed automatically on your target advance. - Click the
Read IDs from RAMonce you have entered the overworld to confirm that the correct SID was generated.
Figure 6 - SID Target Hit
After loading into the overworld and clicking the Read IDs from RAM button, you should see that the correct SID (31187) has been generated. This confirms that the manipulation was successful.