Overworld Roaming Encounters
The roaming Galarian bird trio, Articuno, Zapdos, and Moltres can be found in their respective Wild Areas after starting the Crown Tundra DLC - Legendary Quest 3 and releasing them from Dyna Tree Hill in the Crown Tundra. You must have at least 8 badges or else they will be too strong for you to capture. These Pokémon are generated upon entering a loading zone and all of their data remain unchanged until the area is reloaded.
Using fly RNG manipulation, we can precisely respawn the bird on a specific frame to generate it with the desired IVs, Nature, and Marks. Once the bird respawns, we can chase it down at our leisure and initiate the encounter.
Figure 1 - RNG Tool Setup
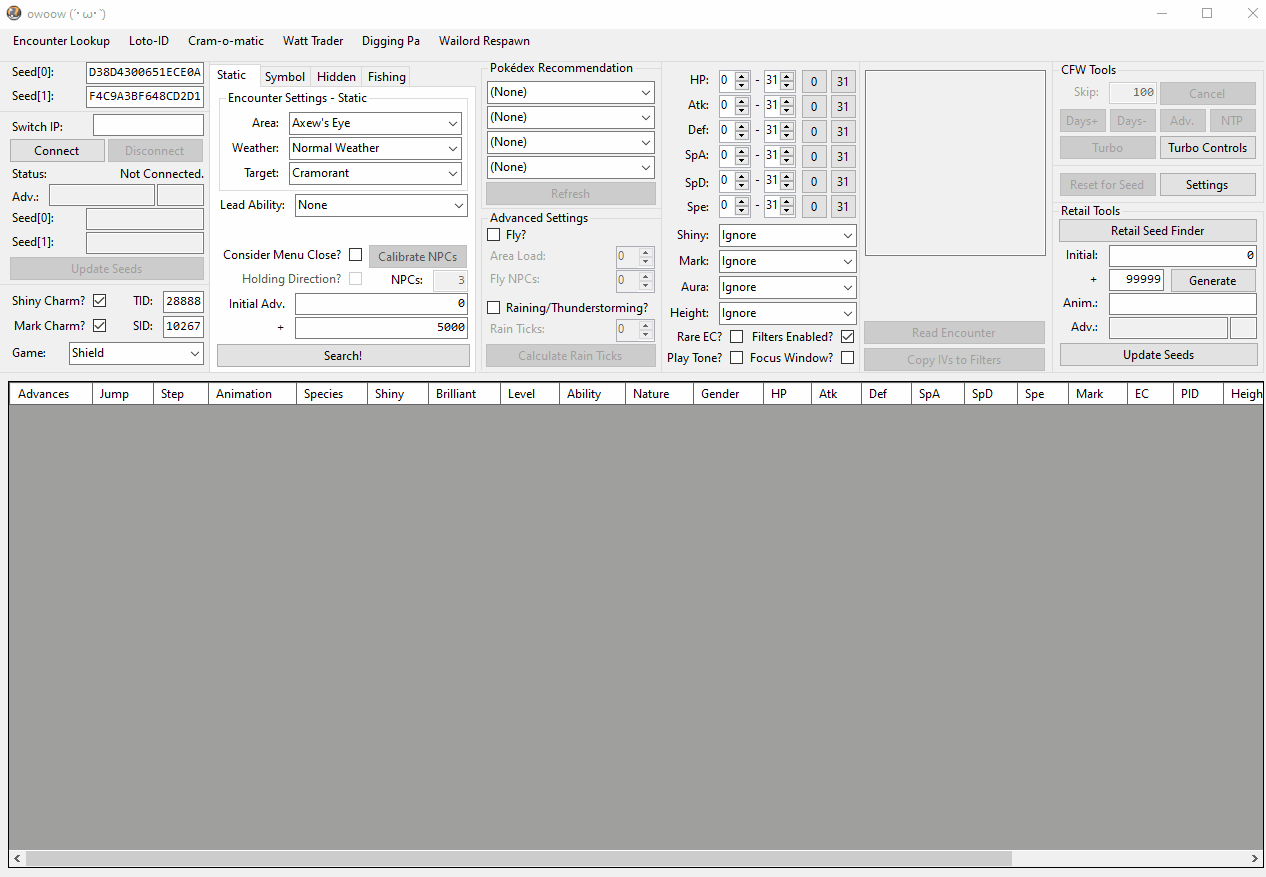
- In the main window, enter your TID/SID, select your game version, and check the Shiny/Mark Charm checkboxes if these items are present in your save file.
- Select
Staticin theEncounter Settingscolumn and select the followingArea:based on your desired bird: - For Articuno-Galar, select Giant's Bed.
- For Zapdos-Galar, select East Lake Axewell.
- For Moltres-Galar, select Challenge Road.
- After you have selected a location, set your target Pokémon accordingly.
- Select the weather you plan to use for the RNG manipulation. Keep in mind that weather can change if the system time reaches midnight (00:00) since weather is date-specific.
- Under
Advanced Settings, click theFly?checkbox. This is where we can configure the necessary values for fly RNG manipulation. Leave theArea Load&Fly NPCsat 0 for now. - Adjust your search range using the
+field inEncounter Settings, then configure additional search filters such as Marks, IVs, or Height.
Figure 2 - Game Setup

- You will need to unlock the fly points shown in Figure 2 if you have not already done so. The fly points for Articuno and Moltres require DLC story progression.
- For Articuno-Galar, unlock the fly point to the east of Giant's Bed by interacting with the Regi cave close by.
- For Zapdos-Galar, unlock the fly point below Motostoke, this fly point should be active already through main story progression.
- For Moltres-Galar, unlock the fly point at the Tower of Darkness. You will need to complete climbing either tower. Visit the Tower of Darkness afterwards if you picked the Tower of Waters.
- Remove all the Pokémon in your party except for one. This is a crucial step as the RNG tool assumes you have a single Pokémon in your party.
- You can use any Pokémon you want to fill this role as long as it has a "fondly" memory.
- Remember that after the bird is generated, all of its details are fully decided, so you can freely change your party afterwards using the PC Box Link.
- Visit the Memory Check NPC found in any Pokémon Center and repeatedly rename your remaining Pokémon until it has a memory intensity of "fondly remembers".
- Do not use a Pokémon with a map memory! This will cause your RNG manipulation attempt to fail. The map memory text looks similar to "Urshifu checked a destination with Billo using the Town Map in a town in the mountains."
- The simplest way to achieve a "fondly" intensity memory is by renaming your Pokémon multiple times. Confirm the memory intensity by speaking to the NPC.
- Pokémon that have been in your boxes for a few days naturally end up with box memories, which start at an intensity of "definitely remembers". This is one step away from "fondly remembers." An easy way to get a Pokémon with a "fondly" intensity memory is start with a Pokémon with a box memory and nickname it until it upgrades to "fondly remembers." If the memory is overwritten by a nickname memory, you can use another Pokémon or reset.
- Only the memory with the trainer of your current save file needs to be at the "fondly remembers" intensity. If you are using an outsider Pokémon, the original trainer memory does not matter.
- Your follower Pokémon adds additional RNG calls, which are not predicted by owoow. You MUST remove your follower Pokémon before manipulating Articuno or Moltres. There are two separate NPCs to disable the follower feature. One is in the Isle of Armor and the other is in the Crown Tundra. Visit the NPC corresponding to your target bird.
- For Articuno, speak to the NPC in Freezington.
- For Moltres, speak to the NPC inside the Dojo.
Figure 3 - Fondly Memory Demonstration

Advanced Settings
This section provides information about the values required for the Advanced Settings fields. These values will vary based on the bird you are manipulating and whether the current weather is Rain/Thunderstorm. Select your desired weather condition in the drop-down menu below to see the relevant table for each bird.
Rain/Thunderstorm are considered "advanced" and may be challenging for beginners. If this is your first time attempting this type of RNG manipulation, we recommended you start with a different weather condition to familiarize yourself with the general process.
Articuno - East Giant's Bed
| Area Load # | Menu NPC # | Total Fly NPC # |
|---|---|---|
| 43-47 (see below) | 0 | 0 |
An additional calibration for the Area Load value is needed for Galarian Articuno. This value represents the total number of strong spawns that are loaded in the area and distantly (e.g. birds and IoA Wailord). Normally, this would be constant after a date skip, but the strong spawn Audino in the area only respawn at a 10% rate each new day when you first load the map. If any are missing when you are performing the RNG manipulation, this will cause your predictions to be inaccurate.
For this calibration, you will need to go to all 3 locations for the Audino and take note of which ones are spawning. Note that Audino has flee behavior, so if you scare one away, do not count it.
Video of Giant's Bed Audino Locations
The final Area Load value should be calculated like so:
- Start with 43.
- Add the number of Audino that are loaded, which will be +1, +2, or +3.
- Add 1 if Virizion is spawning.
You should get a number from 43-47. Put the final value in the Area Load box.
If you have any missing Audino and date skip, you will need to count them again before performing your RNG manipulation attempt.
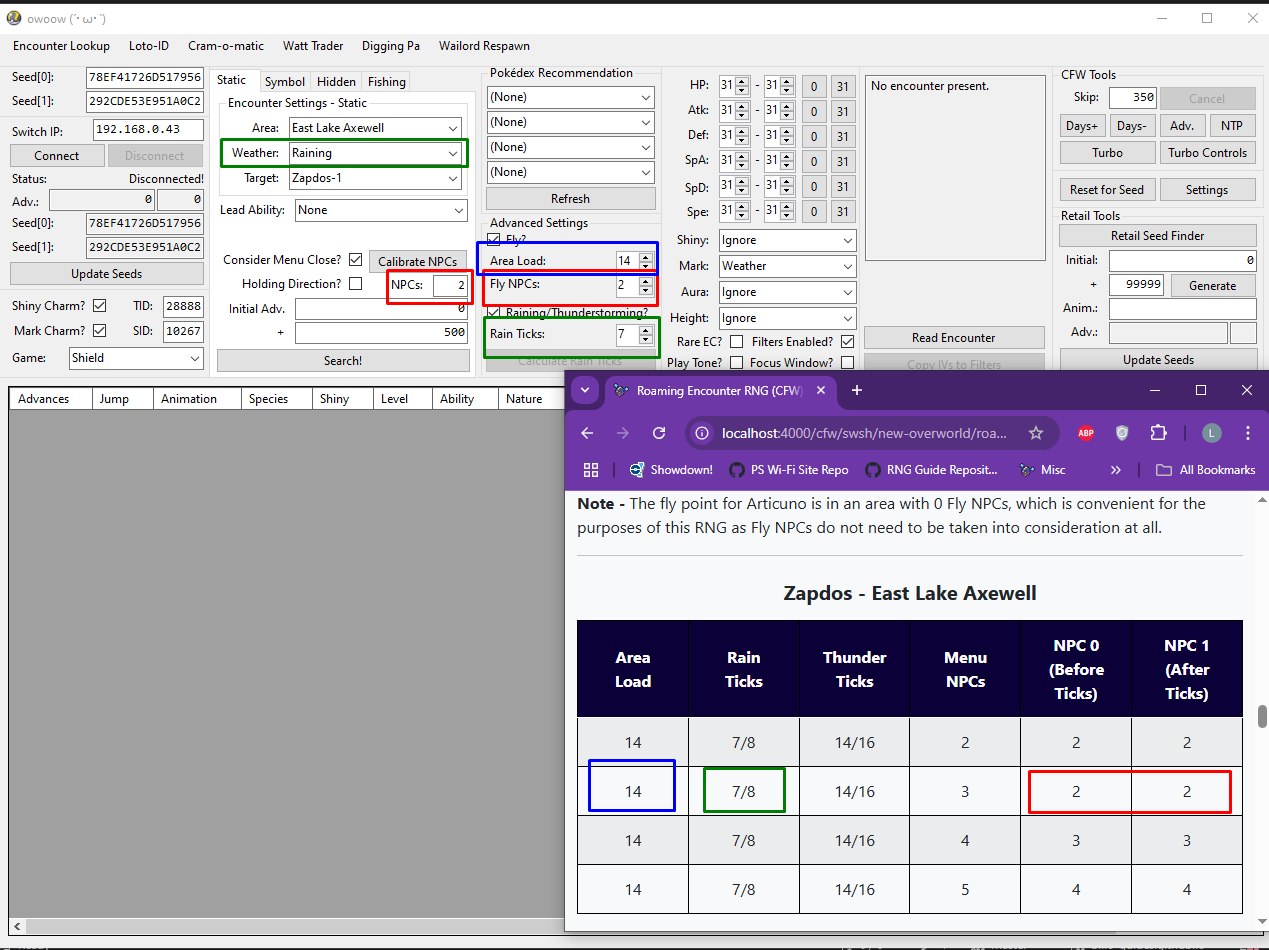
Zapdos - East Lake Axewell
| Area Load # | Menu NPC # | Total Fly NPC # |
|---|---|---|
| 14 | 2 | 4 |
| 14 | 3 | 4 |
| 14 | 4 | 6 |
| 14 | 5 | 8 |
Note - The values for Zapdos are for initially flying into the East Lake Axewell fly point on a fresh day. Date skip if you have done anything in the base Wild Area.
Moltres - Challenge Road (Tower of Waters picked - Sword)
| Area Load # | Menu NPC # | Total Fly NPC # |
|---|---|---|
| 11-12 | 10 | 11 |
| 11-12 | 11 | 13 |
| 11-12 | 12 | 14 |
| 11-12 | 13 | 17 |
Moltres - Challenge Road (Tower of Waters picked - Shield)
| Area Load # | Menu NPC # | Total Fly NPC # |
|---|---|---|
| 11-12 | 10 | 10 |
| 11-12 | 11 | 12 |
| 11-12 | 12 | 14 |
| 11-12 | 13 | 15 |
| 11-12 | 14 | 17 |
Moltres - Challenge Road (Tower of Darkness picked - Sword/Shield)
| Area Load # | Menu NPC # | Total Fly NPC # |
|---|---|---|
| 11-12 | 8 | 8 |
| 11-12 | 9 | 8 |
| 11-12 | 10 | 10 |
| 11-12 | 11 | 12 |
| 11-12 | 12 | 13 |
Note - Your Area Load value for MOLTRES depends on if Wailord is active. Use 11 if Wailord has been defeated and 12 if Wailord is present on the map.
Articuno - East Giant's Bed
| Area Load | Rain Ticks | Thunder Ticks | Menu NPCs | NPC 0 (Before Ticks) | NPC 1 (After Ticks) |
|---|---|---|---|---|---|
| 43-47 (see below) | 7/8 | 14/16 | 3 | 0 | 0 |
An additional calibration for the Area Load value is needed for Galarian Articuno. This value represents the total number of strong spawns that are loaded in the area and distantly (e.g. birds and IoA Wailord). Normally, this would be constant after a date skip, but the strong spawn Audino in the area only respawn at a 10% rate each new day when you first load the map. If any are missing when you are performing the RNG manipulation, this will cause your predictions to be inaccurate.
For this calibration, you will need to go to all 3 locations for the Audino and take note of which ones are spawning. Note that Audino has flee behavior, so if you scare one away, do not count it.
Video of Giant's Bed Audino Locations
The final Area Load value should be calculated like so:
- Start with 43.
- Add the number of Audino that are loaded, which will be +1, +2, or +3.
- Add 1 if Virizion is spawning.
You should get a number from 43-47. Put the final value in the Area Load box.
If you have any missing Audino and date skip, you will need to count them again before performing your RNG manipulation attempt.
Zapdos - East Lake Axewell
| Area Load | Rain Ticks | Thunder Ticks | Menu NPCs | NPC 0 (Before Ticks) | NPC 1 (After Ticks) |
|---|---|---|---|---|---|
| 14 | 7/8 | 14/16 | 2 | 2 | 2 |
| 14 | 7/8 | 14/16 | 3 | 2 | 2 |
| 14 | 7/8 | 14/16 | 4 | 3 | 3 |
| 14 | 7/8 | 14/16 | 5 | 4 | 4 |
Note - The values for Zapdos are for initially flying into the East Lake Axewell fly point on a fresh day. Date skip if you have done anything in the base Wild Area.
Moltres - Challenge Road (Tower of Waters picked - Sword)
| Area Load | Rain Ticks | Thunder Ticks | Menu NPCs | NPC 0 (Before Ticks) | NPC 1 (After Ticks) |
|---|---|---|---|---|---|
| 11/12 | 7/8 | 14/16 | 10 | 2 | 9 |
| 11/12 | 7/8 | 14/16 | 11 | 3 | 10 |
| 11/12 | 7/8 | 14/16 | 12 | 3 | 11 |
| 11/12 | 7/8 | 14/16 | 13 | 5 | 12 |
Moltres - Challenge Road (Tower of Waters picked - Shield)
| Area Load | Rain Ticks | Thunder Ticks | Menu NPCs | NPC 0 (Before Ticks) | NPC 1 (After Ticks) |
|---|---|---|---|---|---|
| 11/12 | 7/8 | 14/16 | 10 | 1 | 9 |
| 11/12 | 7/8 | 14/16 | 11 | 2 | 10 |
| 11/12 | 7/8 | 14/16 | 12 | 3 | 11 |
| 11/12 | 7/8 | 14/16 | 13 | 3 | 12 |
| 11/12 | 7/8 | 14/16 | 14 | 4 | 13 |
Moltres - Challenge Road (Tower of Darkness picked - Sword/Shield)
| Area Load | Rain Ticks | Thunder Ticks | Menu NPCs | NPC 0 (Before Ticks) | NPC 1 (After Ticks) |
|---|---|---|---|---|---|
| 11/12 | 7/8 | 14/16 | 8 | 0 | 8 |
| 11/12 | 7/8 | 14/16 | 9 | 0 | 8 |
| 11/12 | 7/8 | 14/16 | 10 | 1 | 9 |
| 11/12 | 7/8 | 14/16 | 11 | 2 | 10 |
| 11/12 | 7/8 | 14/16 | 12 | 2 | 11 |
Note - Your Area Load value for MOLTRES depends on if Wailord is active. Use 11 if Wailord has been defeated and 12 if Wailord is present on the map.
Advancing Towards a Target
Figure 4 - Relevant Calibration
- Ensure you are on a freshly-advanced day. If you have touched anything on the map today or are not sure, perform a date skip. This refreshes the overworld state.
- Fly to the required location for your target bird: East Giant's Bed (Articuno), East Lake Axewell (Zapdos), or Challenge Road (Moltres).
- Confirm that you have a single Pokémon in your party. This should be the same Pokémon that was given a "fondly" intensity memory earlier.
- Set the current weather condition to anything that is NOT Rain/Thunderstorm both in-game and on owoow. Save the game after doing so.
- Calibrate your current menu close NPC count, then close the
MenuCloseTimelinesubwindow. Note down your current menu close NPC count. - Refer to the correct table above based on your chosen weather, target bird, and game version/progression (Moltres).
- Set your
Area Loadvalue in theAdvanced Settingson owoow. This will be the same regardless of weather condition. - If you are NOT in Rain/Thunderstorm:
- Ensure the menu close NPC count is set to 0.
- Enter the
Total Fly NPCvalue into theFly NPCsfield underAdvanced Settings. - If you are in Rain/Thunderstorm:
- Enter the
NPC 0value into the menu close NPC field. - Enter the
NPC 1value into theFly NPCsfield underAdvanced Settings. - Set the
Rain Tickvalue depending on if you are in Rain or Thunderstorm. If this is your first time calibrating, pick the lowest possible value (7 for Rain, 14 for Thunderstorm).
The calibration values (Consider Menu Close? / Menu Close NPCs Area Load / Fly NPCs / Rain Ticks) will account for the advances consumed when exiting from the party list -> main X Menu -> opening map -> flying into the area that contains your bird.
After correctly setting your calibration values, you can begin searching for targets.
Forgot how to calibrate NPC count? Click here for a refresher
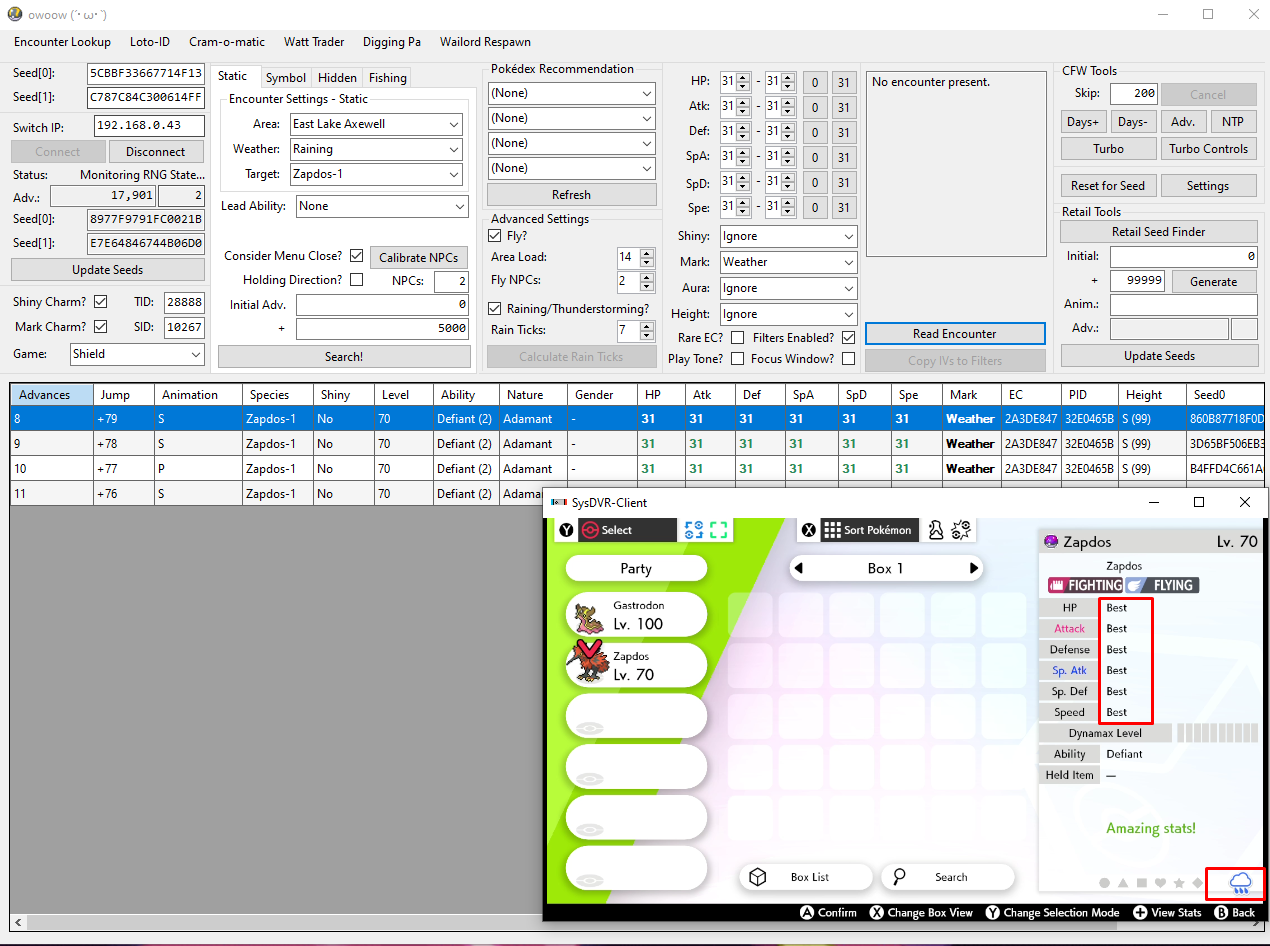
Figure 5 - Target Bird Found
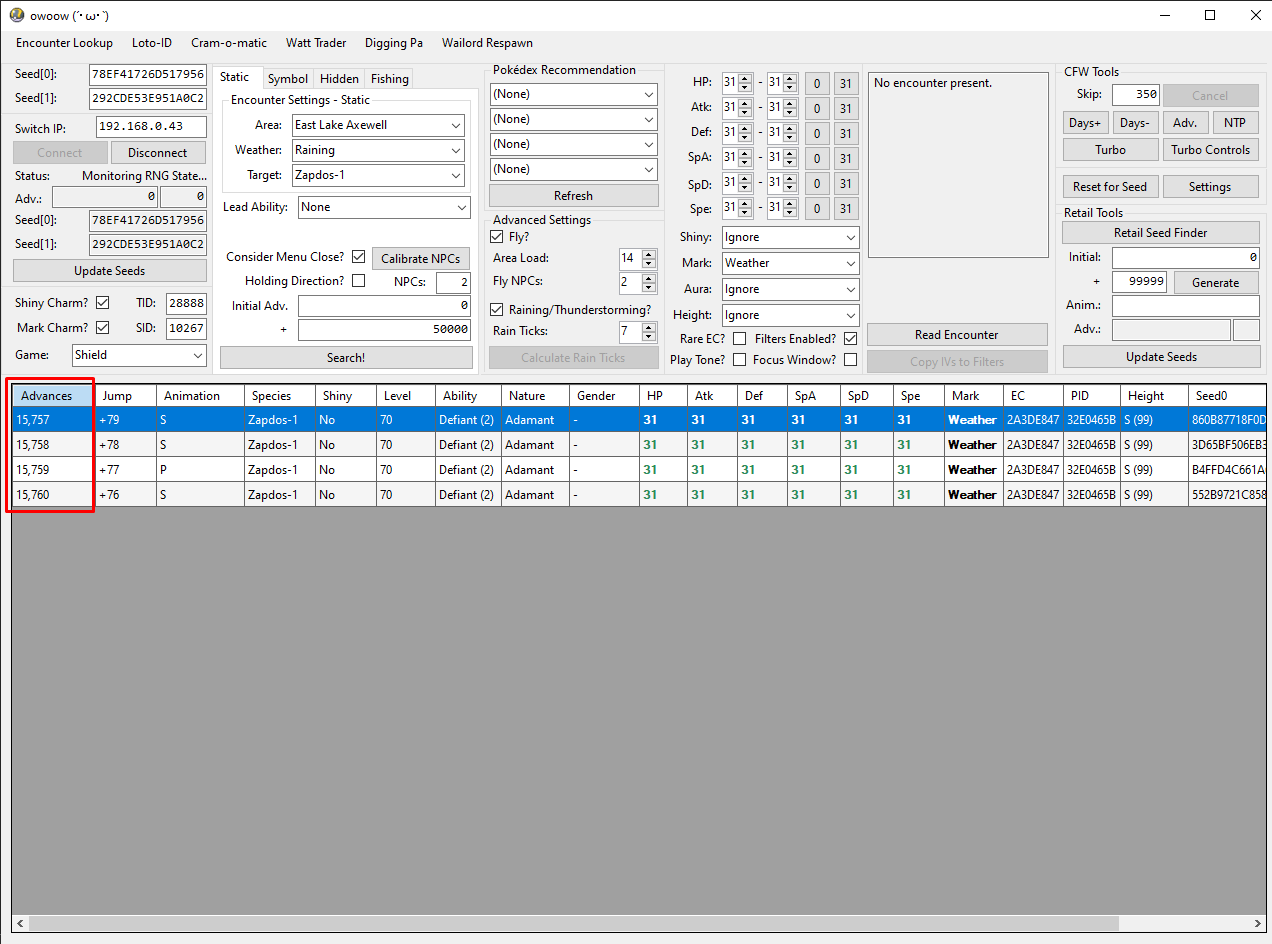
In this example, a 6IV Zapdos with a Weather Mark appears in a cluster between advances 15,757-15,760. The relevant calibration values we need were set earlier. In this example, no direction should be held when flying into the area.
Step-by-Step
- Advance toward your target using either wet weather, NPC activation, or date skipping.
- Note that date skipping and flying into the area can change the menu close NPC count, making your previous calibrations inaccurate. If you choose this method, you will need to recalibrate your menu close NPC count and update the calibration fields before attempting the RNG manipulation.
- Consider using wet weather if you wish to maintain an accurate calibration without moving.
- Reidentify your current seed periodically to avoid overshooting the target. Stop advancing once you are a few thousand advances before your target.
- Fly back to the designated fly point for your desired bird if you moved or date skipped.
- If you used date skipping to advance earlier, you MUST recheck your menu close NPC count and update all of the calibration values from the table accordingly before proceeding.
- Date skipping or booting into the game on a later date than you saved on can cause the menu NPC count to change, which is why it is important to verify again before performing the RNG manipulation.
- Ensure that the
Consider Menu Close?checkbox is checked in the main window, and confirm that your calibration checkboxes are filled in correctly. - Use any of the medium-speed advancement methods such as bike hopping and menu close to get to about 200-500 advances from your target.
- Pause the game by opening the
X Menu, then use attack animations to advance the RNG state until you are approximately 100 advances away from your target. - You should be on the Pokémon party list, not a Pokémon summary page! Reidentify your current seed and search for your target again, then use attack animations to reach your exact target frame.
- When you are under 100 advances, you can consider unticking the
Filters Enabled?checkbox and clickingSearch!. This will generate the next 100 frames and allow you to see the predicted attack animations corresponding to each frame until you reach your target. - You are ready to perform the fly RNG manipulation. Back out to the main
X Menu, open the map, and then fly to the required location for your desired bird. - Once you load into the area, the bird has already been fully generated. As long as you do not exit the map or fly into it again, you can take this time to:
- Save the game for multiple attempts to catch it.
- Change out your party with the PC Box Link if you need to bring in catchers or a Synchronize lead.
- Change the console date to the current date or to one with more convenient weather/terrain for catching.
- Chase down the bird and encounter it to verify that your result matches what is expected. If your bird does NOT match, refer to the troubleshooting section below.
Troubleshooting
Enter the IVs of the bird you hit into the search filters of owoow, and remove any Mark/Height filters that are currently in place. The goal is to find the bird you hit by adjusting the calibration values.
- If your target is in Rain or Thunderstorm, change the
Rain Tickvalue to whichever value you did not use (e.g, if you used 14 in Thunderstorm, try 16). - If your target is Moltres:
- Confirm whether Wailord is active/inactive. Make sure your
Area Loadcalibration is properly set (11 for inactive, 12 for active). - Confirm that you are using the correct table to calibrate your values. The game version and tower that you picked are important.
- If you still cannot find the bird you hit, recheck your menu close NPC count to be sure it is correct. Remember that date skipping can change this value.
- If you are certain everything is correct but your bird is not predicted, you can try tweaking the values inside the Menu Close/Fly NPCs fields until you find a match. After finding your bird, retry and confirm that your new calibration values are correct. Report any new NPC values to me (Billo) on Discord (linked below).
Figure 6 - Flying into Area
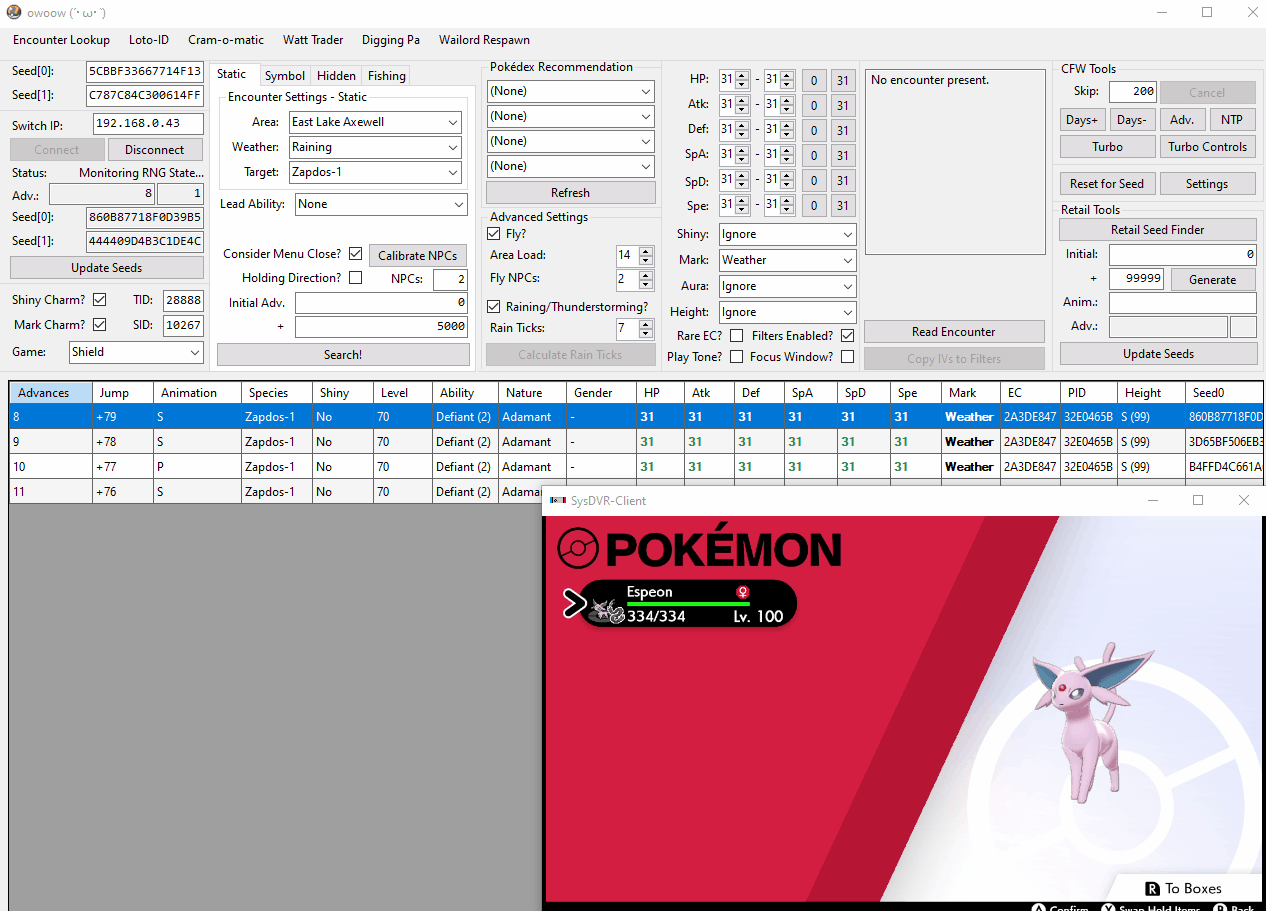
Exiting the Pokémon Party list on the required target frame, opening the map, then flying into East Lake Axewell to spawn our desired Galarian Zapdos.
Figure 7 - Result Found
That's all there is to RNG manipulating roaming Legendary Bird encounters (RETAIL)!